• Skip to primary navigation
  • Skip to main content
  • Skip to primary sidebar
Bigger Than the Three of Us
  • Our Home
  • DIY IDEAS
    • DIY IDEAS
    • DIY Open Shelving Kitchen Guide
  • Shop
    • Shop Our Home
    • Shop My Closet
    • Vintage Home Decor
    • My Current Favorite Rugs For Sale
    • Pieces I’m Loving
  • Podcast
  • Travel
  • The Three of Us
    • Privacy and Disclosure
menu icon
go to homepage
search icon
Homepage link
  • House Tour
  • Floating Shelving Guide
  • DIY Projects
  • Shop
  • The Three of Us
    • Email
    • Facebook
    • Instagram
    • Pinterest
    • YouTube
  • ×

    Upcycled DIY Sunburst Mirror

    January 3, 2014 by Ashley Mayes 32 Comments

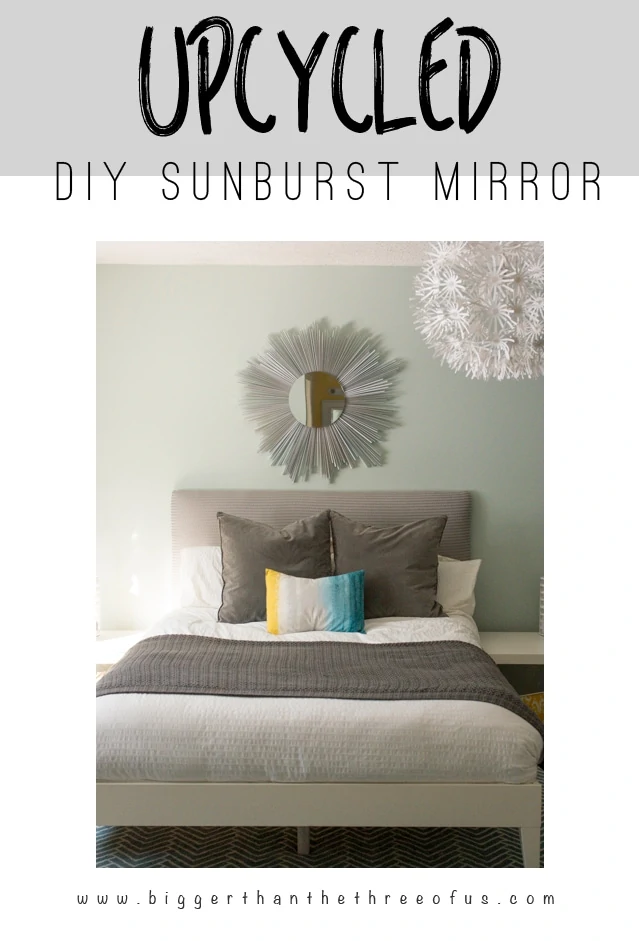
     As a part of updating Greyson's big boy room, we took down the blinds and replaced them with roman shades. The blinds had been installed for quite some time, but the way they were installed you couldn't get the double-paned windows in or out. So, it was hot in the summer and cold in the winter in his room. We fixed that, but that left us with three sets of old blinds. They sparked a crazy idea... make a sunburst mirror. I'm happy to say that I love this little project. At just over $6 its a steal for how much of an impact it makes.

    DIY Sunburst Upcycled Mirror

    I'll give you a step-by-step tutorial if you want to try it yourself.

    1. Take the blinds down and cut all the threads out. Wash the blinds with warm soapy water and lay on a towel to dry.
    How to make a starburst mirror out of blinds

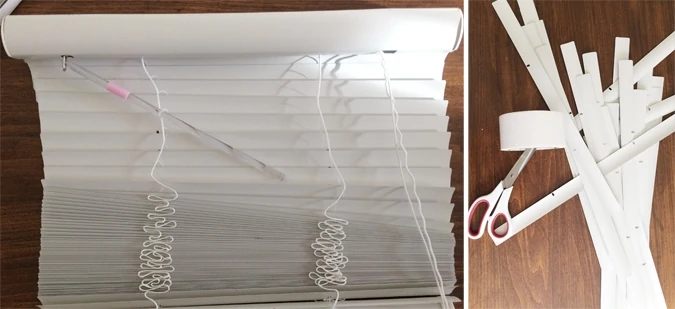
    2. Stack the blinds by two and make the stacks so that the blinds curve in on each other (it resembles a oval).
    double blinds up to create depth

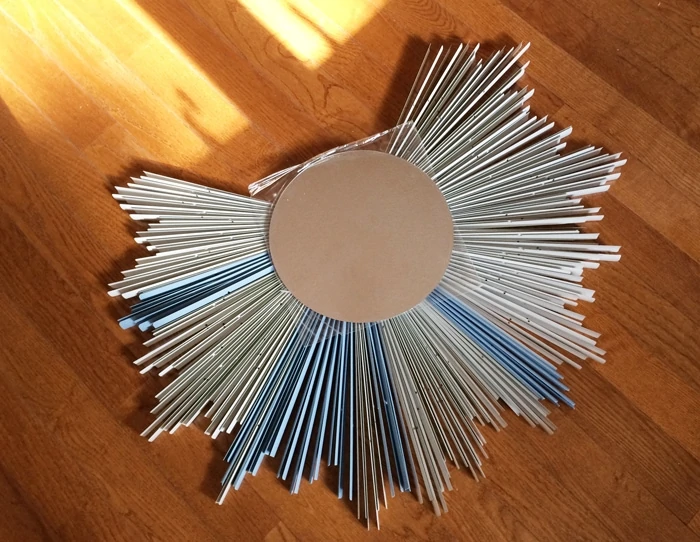
    3. Experiment and see what you like. What worked well for me was 5 pairs (at pair being an oval from step 2) bunched together. Duct tape the bunch together into a fan. Keep doing that with all the blinds.

    using blinds to create fans

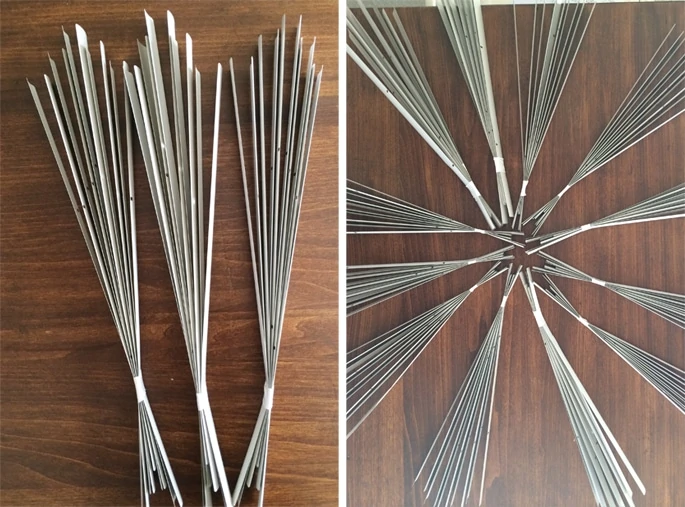
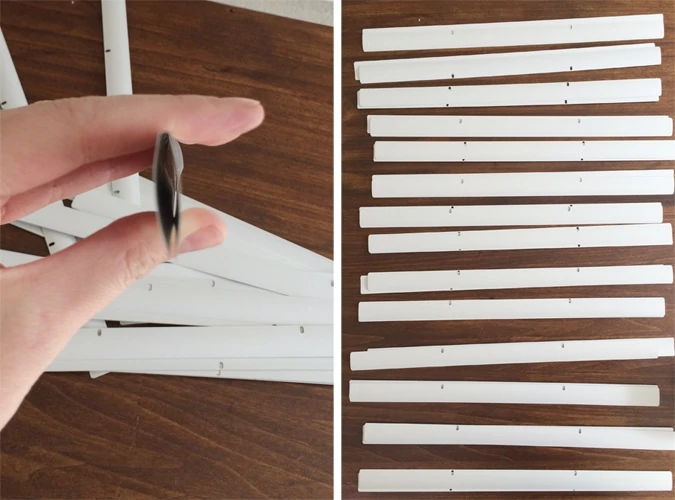
    4. At this point, use three sets (like the above left picture) to create a larger fan. Duct tape all three together. Use bolt cutters to cut off the extra pieces beyond the duct tape. *The tighter you get the duct tape, the more the blinds look like a fan.

    Bolt cutters to cut excess off

    5. Add your mirror to see how many different sets of fans you will need. *At this point, I had already used the three sets of blinds that I had started with. We actually had a blue set that wasn't being used in the basement, so I used those as well. Then, I realized that I needed one more set. I went to Habitat Restore and picked up another set for $1.50.

    start arranging your starbursts

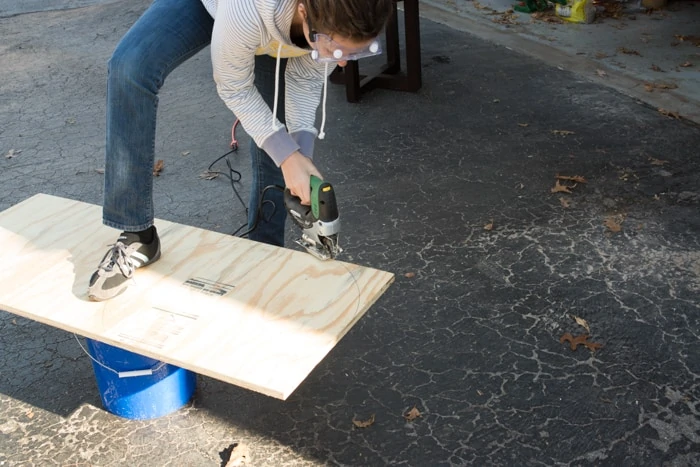
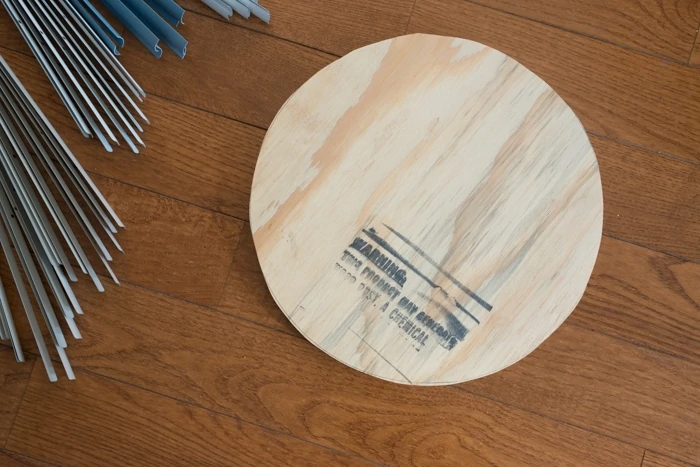
    6. Using the mirror as a template, draw a circle on the plywood. Then use a jigsaw to cut the circle out.

    Using a jigsaw to cut plywood for mirror base

    circle cut plywood for mirror base

    7. Using a hot glue gun, start gluing all the pieces on to the plywood. *I used lots of hot glue to apply the pieces and then I came back after 20 min and wiggled each individual piece. If it wiggled then I added additional hot glue under that piece. Once I had all of the blind pieces attached, I gave it a few coats of white spray paint.

    using blinds as pieces of an upcycled mirror

    8. Attach the mirror on the top using hot glue. Then attach picture hangers on the back (directly on the plywood) to hang it on the wall.

    Big mirror over bed on wall in master bedroom

    Do it yourself mirror

    Close up of DIY mirror

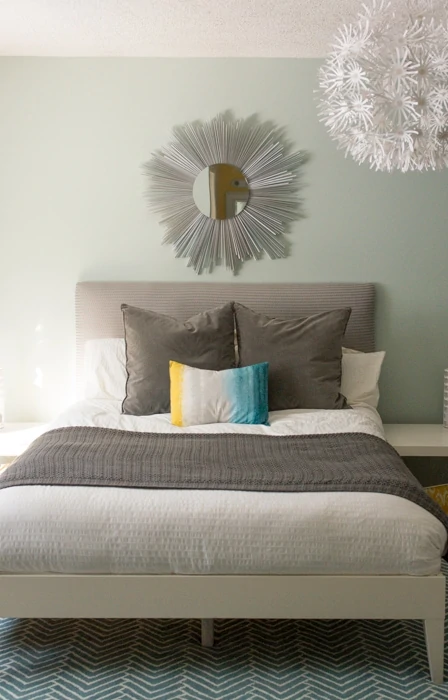
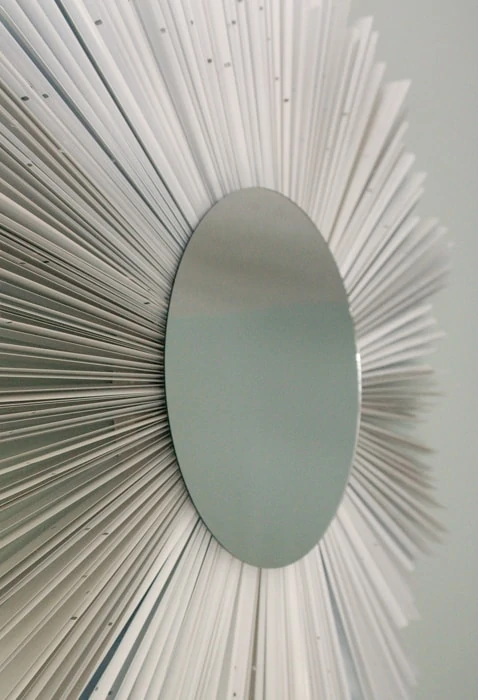
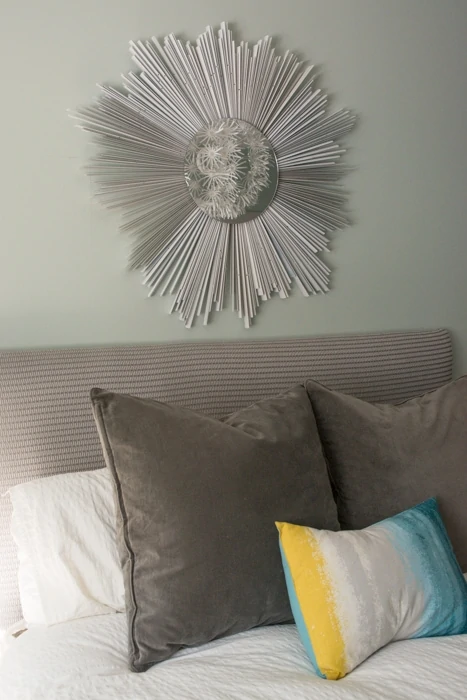
    I'm in love with the outcome of this project. Sunburst mirrors are all over Pinterest using wood shims and paint sticks (and I love all of those), but I really like the fact that I was able to come up with something that I had on hand. The blinds would have ended up in the trash, yet we now have a pretty cool decor item out of them.

    You can use this tutorial to create your own (sticks, shims, painter sticks, blinds, etc.).

    Cost breakdown:

    4 Old sets of Blinds (already owned) $0

    1 old set of blinds (Habitat Restore) $1.50

    Can of Spray Paint $3.20

    Plywood (already owned)

    Hot glue (already owned)

    Mirror (JoAnn's) $1.60

    Total $6.30

    DIY Sunburst Upcycled Mirror

    Linking up to:

    Work it Wednesday at the Happy Housie

    TIGfinal

    link-party-palooza-banner

    GiveMeTheGoodsMondaynewbutton_zps121b9e82beYOUtiful-link-party-logo-Square-650x650

    Frugal Crafty Home Blog Hop

    Cupcakes and Crinoline

    Home Stories A to Z

    Share286
    Pin126
    Post
    Email
    Print
    412Shares

    More Decor

    • custom cut marble remnant
      Marble Remnants : Cool Ideas for Custom Cut Marble Pieces
    • DIY outdoor planters with pavers
      Pinterest Made Me Do It :: DIY Outdoor Planters
    • decorative light switch for car themed room for toddlers
      Make this Decorative Light Switch for a Race Car Room
    • Scrap fabric planter pot
      DIY Plant Bag : Scrap Fabric Project

    Keep In Touch...

    Sign up for my weekly emails to see new projects, plus what I'm doing behind-the-scenes.

    You can unsubscribe anytime. For more details, review our Privacy Policy.

    Thank you!

    You have successfully joined our subscriber list.

    .

    Disclosure: This post may contain affiliate links. I receive a small commission at no cost to you when you make a purchase using my link.

    About Ashley Mayes

    Founder & Creative Director

    Reader Interactions


    Comments

      Leave a Reply Cancel reply

      Your email address will not be published. Required fields are marked *

    1. Julia@Cuckoo4Design

      January 03, 2014 at 6:10 am

      What an awesome idea! Love it and pinned!

      Reply
      • Ashley Mayes

        January 03, 2014 at 2:14 pm

        Thanks Julia!

        Reply
    2. Charlotte @couldntkeepit2myself

      January 03, 2014 at 9:21 am

      This really turned out so neat! Love it above the bed too. Now I'm kind of sad about all the old blinds I know I've thrown away!

      Reply
      • Ashley Mayes

        January 03, 2014 at 2:15 pm

        I know, right? Although, I know I've seen blinds for free at garage sales.

        Reply
        • Bobbie Larsen

          September 18, 2017 at 1:07 pm

          You must have to stagger the pieces before cutting? I didn't read that in the post

          Reply
          • Ashley Mayes

            September 20, 2017 at 8:17 am

            yes! Stagger and group together.

            Reply
    3. Carrie

      January 06, 2014 at 7:53 pm

      This is genius! What a great use for old blinds!

      Reply
      • Ashley Mayes

        January 07, 2014 at 7:48 am

        Thanks Carrie!

        Reply
    4. Christi Clark Chambers

      January 09, 2014 at 12:26 pm

      So cool! I've been wanting to try one...

      Reply
      • Ashley Mayes

        January 09, 2014 at 7:34 pm

        Thanks Christi! I completely forgot about meeting up with you over New Years! Sometime soon, k?

        Reply
    5. Maria

      January 09, 2014 at 8:26 pm

      Oh wow this is so clever!!!! The mirror looks beautiful, you did an awesome job with it! So creative!!!!

      Reply
      • Ashley Mayes

        January 10, 2014 at 7:48 am

        Thanks Maria!

        Reply
    6. courtney

      January 17, 2014 at 6:50 pm

      Oh my gosh, I LOVE this idea! My blogging friends and I just started a lifestyle link party and think you would be the perfect match for it, check it out here!http://www.frysauceandgrits.com/2014/01/beyoutiful-link-up-party-3.html

      Reply
      • Ashley Mayes

        January 18, 2014 at 7:54 am

        Thanks Courtney! I'll stop by to check it out. Thanks again!

        Reply
    7. Allie

      January 17, 2014 at 8:51 pm

      Wow, so genius, and it looks amazing. Good job!

      Reply
      • Ashley Mayes

        January 18, 2014 at 7:54 am

        Thanks Allie!

        Reply
    8. Carrie This Home

      January 27, 2014 at 1:21 pm

      I never would have guessed this was made out of an old set of blinds! It turned out fabulous! I would LOVE it if you'd link this up to the Frugal Crafty Home Blog Hop. Our readers love to see frugal and awesome transformations like this!

      Reply
      • Ashley Mayes

        January 27, 2014 at 1:33 pm

        Thanks Carrie! Coming over now. =)

        Reply
        • Carrie This Home

          January 31, 2014 at 9:39 am

          Thanks so much Ashley! I'll be featuring this post when our next party goes live Sunday night at 8PM Central time. Thanks so much for joining us!

          Reply
          • Ashley Mayes

            January 31, 2014 at 1:58 pm

            Thanks Carrie!

            Reply
    9. Victor

      August 13, 2016 at 7:10 pm

      Magic & beautiful! Sunburst mirrors are stunning and worth any prize!

      Reply
      • Ashley Mayes

        September 20, 2017 at 8:16 am

        and this one was super cheap! Thanks Victor.

        Reply
    10. Barbara

      June 19, 2023 at 3:06 pm

      Instead of cutting a circle out of plywood, I think I might try to find one at the dollar store or Hobby lobby

      Reply
      • Ashley Mayes

        June 22, 2023 at 10:57 am

        Would definitely be easier and work!

        Reply
    11. Virginia (Ginna)

      October 17, 2018 at 9:29 am

      Ashley this is a great idea!!! I totally love it!! I’m not crafty at all and this site really helps me with tons of ideas!! Thanks so much for sharing!!
      Ginna

      Reply
    12. Ashley Mayes

      October 17, 2018 at 10:45 am

      Thanks Ginna! I'm not super crafty either! ha! If I can make a sunburst mirror then you definitely can too. =)

      Reply

    Trackbacks

    1. Best Posts of 2014 - Bigger Than the Three of Us says:
      June 15, 2015 at 10:02 am

      […] Upcycled Mini-Blind Sunburst Mirror […]

      Reply
    2. Calm, Layered and Minimal Master Bedroom - Bigger Than the Three of Us says:
      March 1, 2016 at 9:30 am

      […] still really love the DIY sunburst mirror over the […]

      Reply
    3. 10 Brilliant Home Decor DIY Ideas for $10 or Less | Industry Standard Design says:
      March 7, 2016 at 6:29 am

      […] Tutorial: biggerthanthethreeofus.com […]

      Reply
    4. Amazing Ideas for your House Decor - talentista says:
      May 16, 2016 at 10:17 pm

      […] Tutorial: biggerthanthethreeofus.com […]

      Reply
    5. DIY Wreath for Spring Cute & Affordable Project! | Designer Trapped says:
      November 8, 2017 at 8:47 pm

      […] I hope you loved this project and if you did, then you might love my DIY Sunburst Mirror. […]

      Reply
    6. Placemat Turned Pillow Cover - Blue i Style says:
      January 7, 2020 at 10:46 pm

      […] Ashley recently turned a placement into a gorgeous pillow cover, and it only took here ONE MINUTE! What?!! That means you could make five of pillow covers in the time that it takes to make most of my Five Minute Friday projects. And get this…there is no sewing involved! Head on over to Bigger Than the Three of Us for all the deets, and while you’re there, check out some of Ashley’s other stylish projects from her master bedroom, like her DIY headboard that cost less than $30 and upcycled DIY sunburst mirror. […]

      Reply

    Primary Sidebar

    Bigger Than The Three Of Us - Family of Three

    Follow Me On

    • Email
    • Facebook
    • Instagram
    • Pinterest
    • YouTube

    Favorites

    Footer

    ↑ back to top

    About

    • Privacy Policy
    • Disclaimer
    • Terms & Conditions

    Newsletter

    • Sign Up! for emails and updates

    Connect

    • [email protected]
    • Instagram
    • Facebook

    As an Amazon Associate I earn from qualifying purchases.

    Copyright © 2023 Bigger Than the Three of Us All Rights Reserved

    412Shares