

I'm sharing all the details about enlarging a window in an existing wall including the process for installing larger windows, the price and the end result.
I'm always curious about how much renovation projects cost and have shared a bunch of other price breakdowns for specific projects we've tackled (cost to have wood floors installed, cost to replace gutters, cost to install a new front door versus just replacing the glass, etc.). So, hopefully this will help out those of you who are curious about enlarging a window.
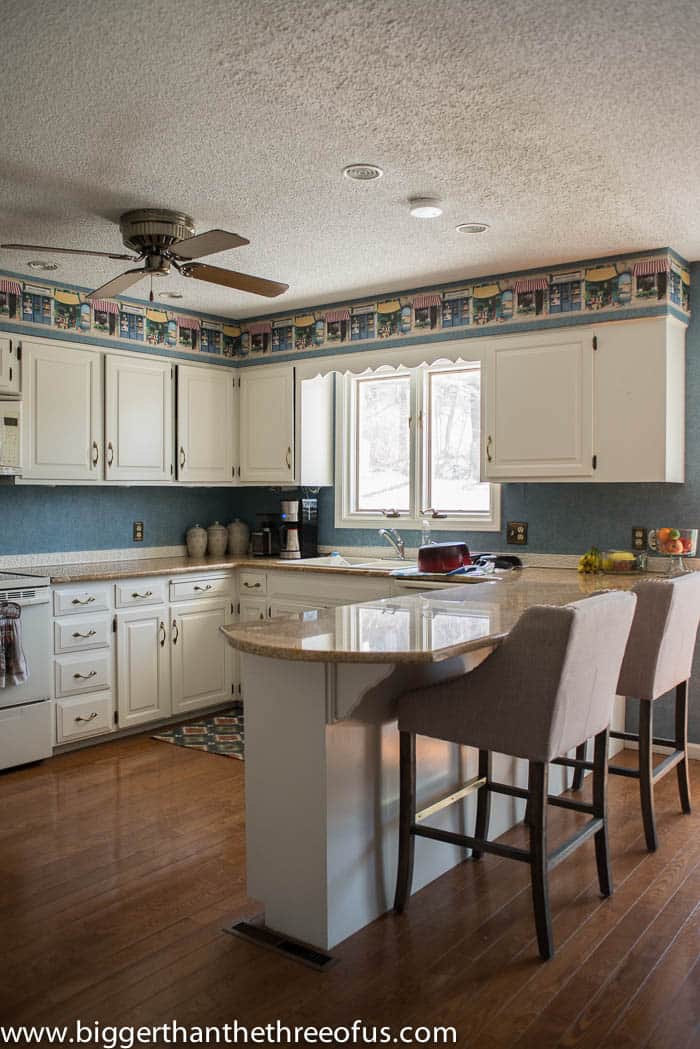
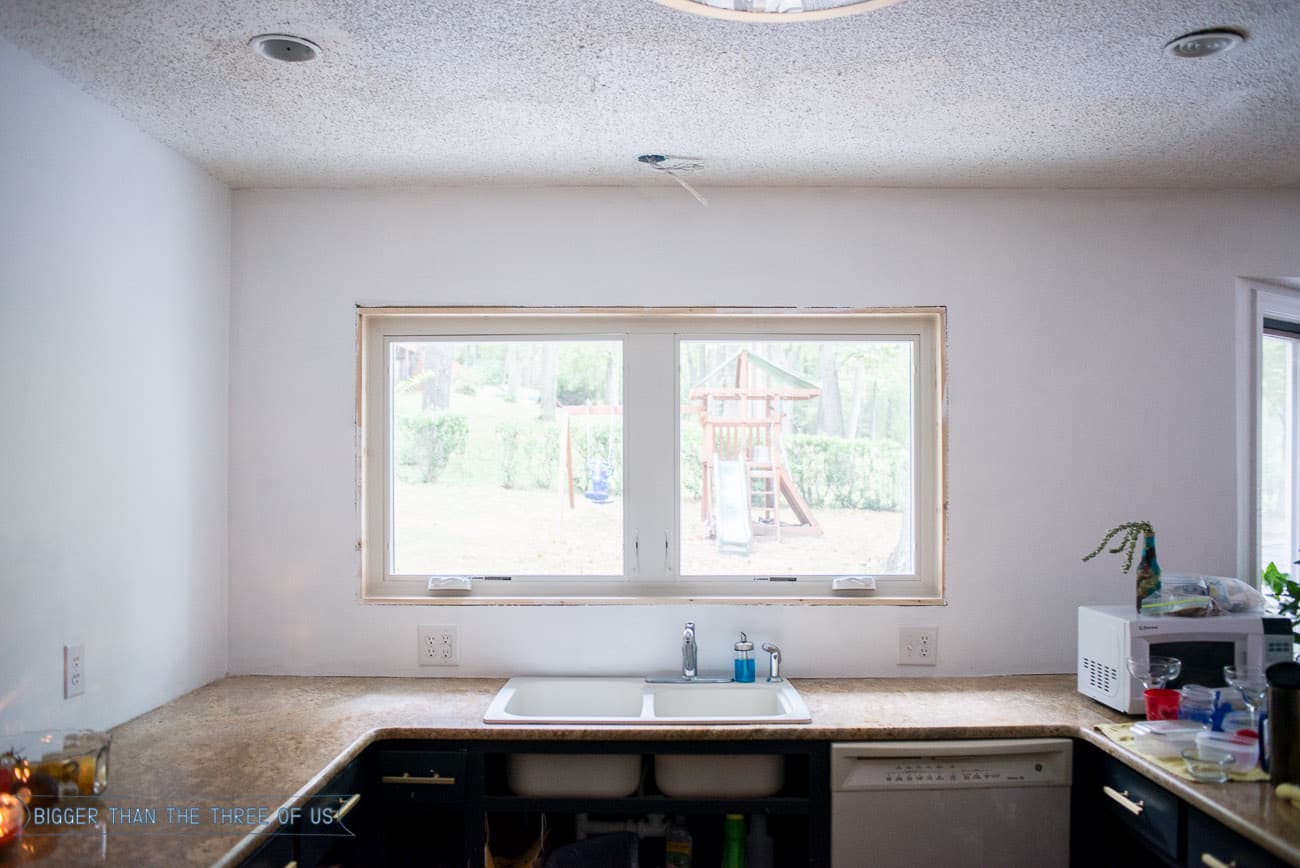
Before we dive in to the process to widen the window, let's look at what the window wall looked like before!
Before Photo of Kitchen Window Size
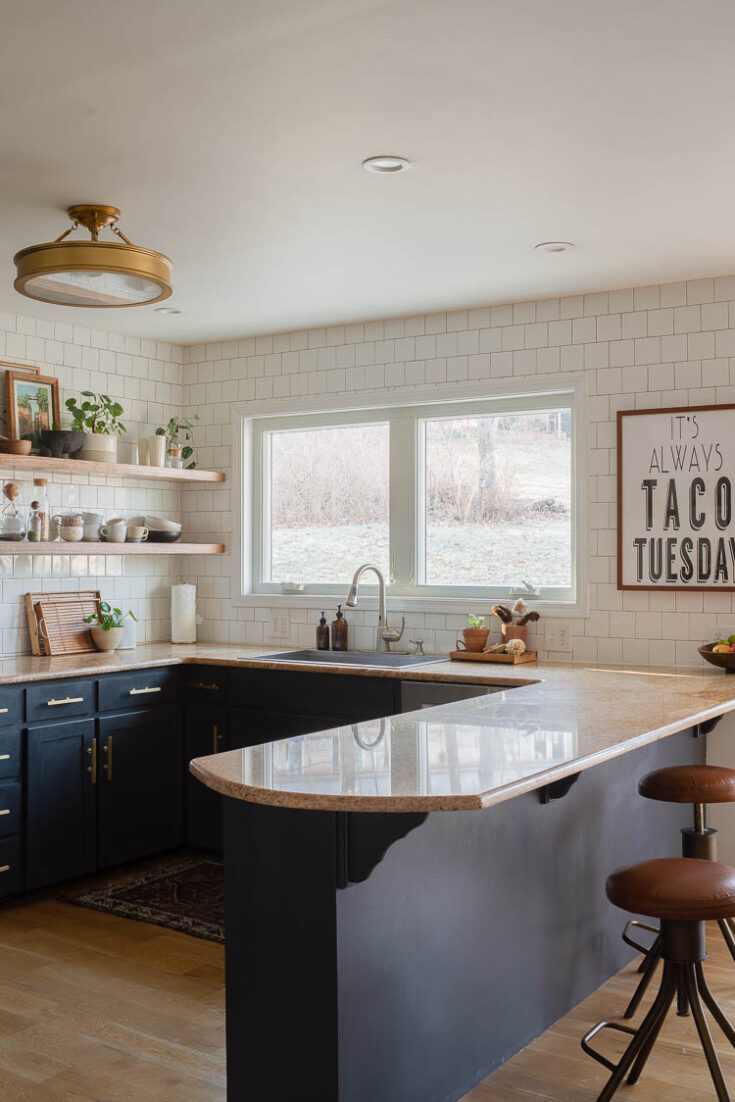
After Photo of the Enlarged Window
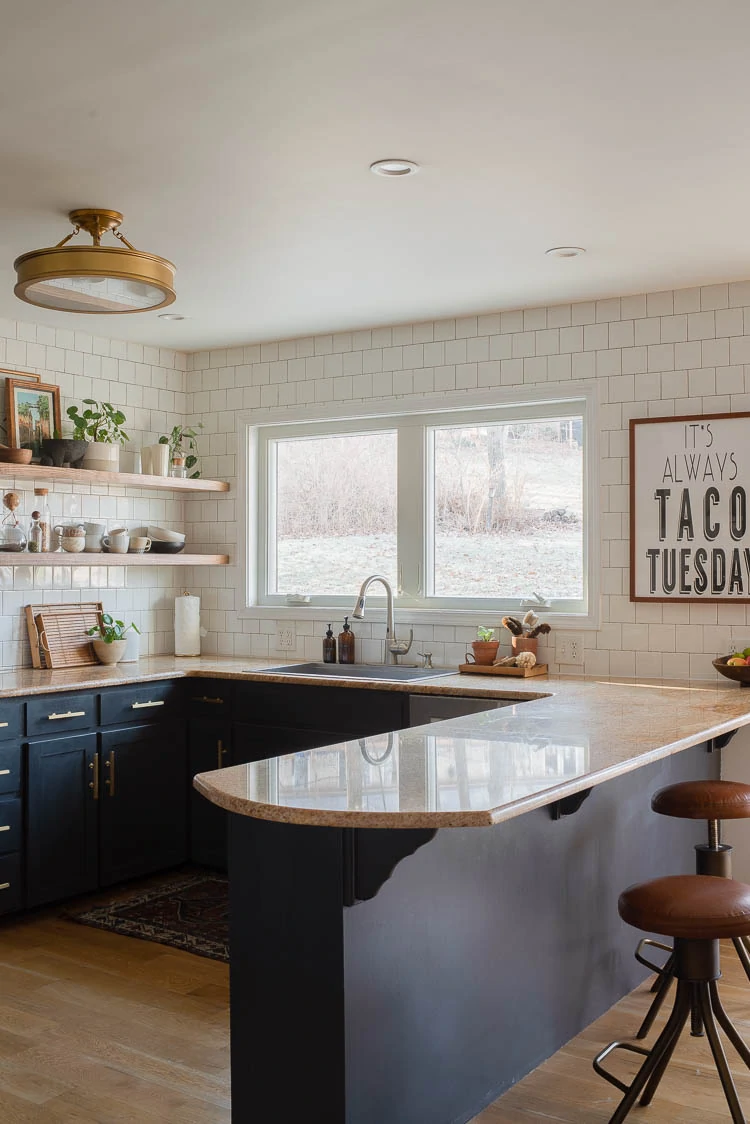
I still pinch myself that our kitchen (see kitchen reveal for all sources) has come so far and, although it's not my dream kitchen, I appreciate and love it so much.
After we started demo-ing the kitchen, I had the idea to have large windows installed. That would mean we needed to replace the window that was over the sink. To help visualize what it would look like to enlarge the window, I used metallic tape and taped a window size that I liked on the wall. The window replacement size is shown below with the original windows still in.
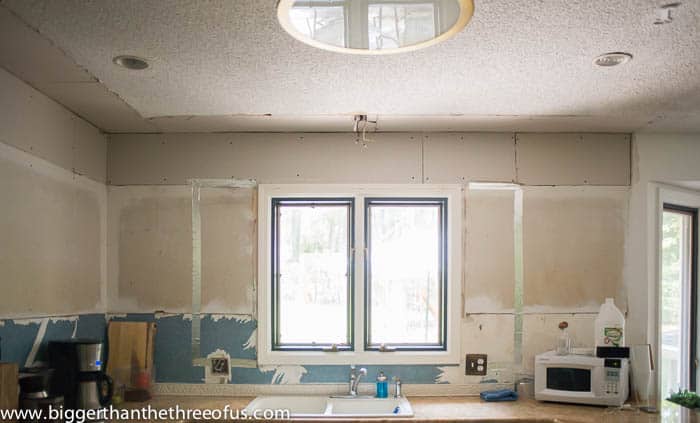
The original windows always bugged me because they weren't centered on the kitchen sink. Once we determined that we were going to replace the window in the existing wall, we knew that we wanted to have it centered at the same time.
Enlarging a Wall Window
The original window size was 38'' x 36" and the new window is 70'' x 36".
We specifically wanted a window that would match with the other windows in the home. I really liked the idea of a French casement. I thought that with French casement, we would be able to hand BBQ stuff in or out the windows and also possibly add a bar on the outside of the window on the patio. So, we ordered a casement window (lots of details linked if you want to see the difference between window options) for the kitchen.
I will say that now that we've had the new window installed for 4+ years, the idea of the window being a pass-through and it actually acting as a pass-through don't really match up. The counter and sink are in front of the window, so to reach through the window to hand something out to someone outside, it's a bit of a reach and not very useful. That being said, I do think the French casement is pretty and I like how easy they are to open to let the breeze in, but I don't think I'd pay more for them knowing what I know now.
The process for widening the window is more intense than the process for just replacing windows in a brick house. We knew that going in but weren't as prepared for it as we should have been.

Process for Enlarging a Window in a Brick House
- Take out existing window
- Take out drywall around window on the inside
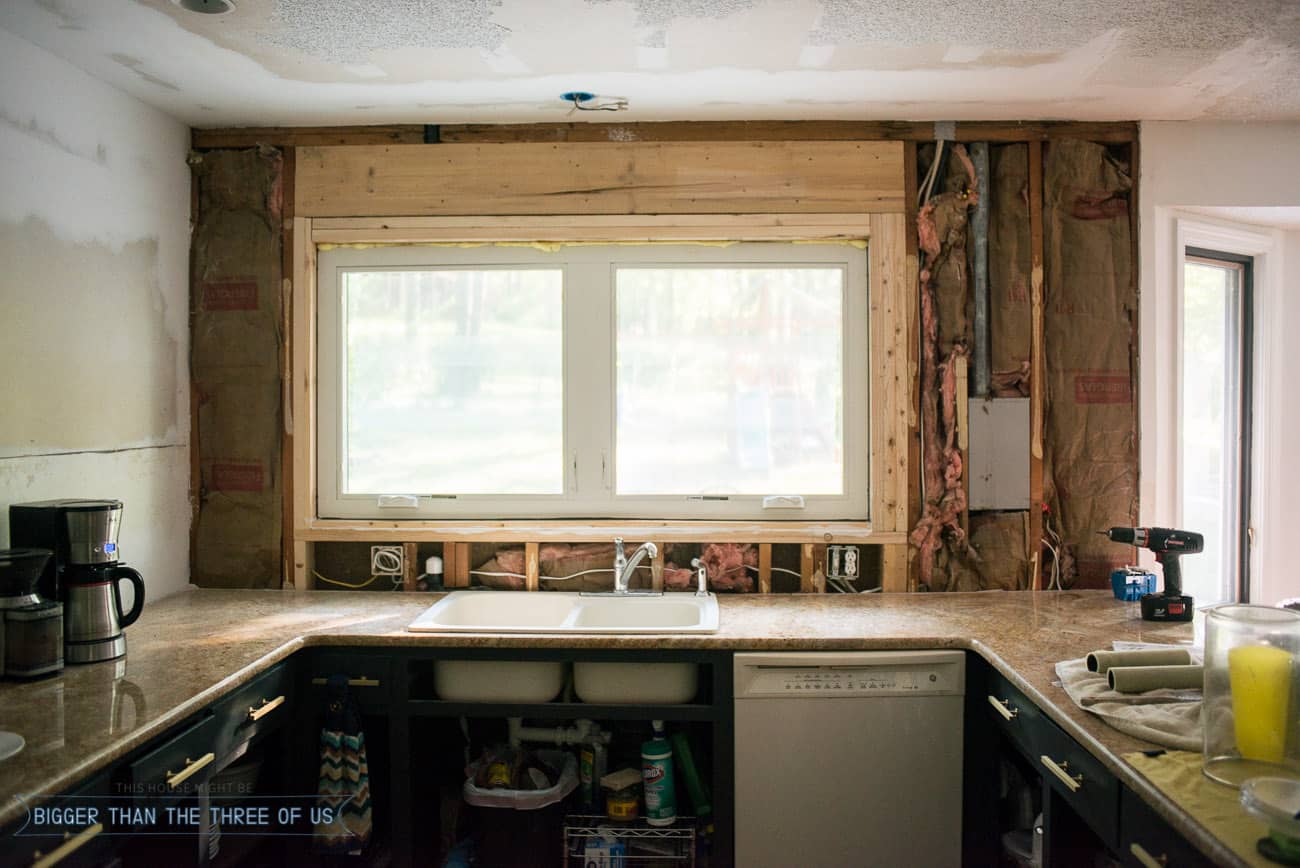
- Put up a support beam on the inside (shown above)
- Have plumbing rerouted
- Have electrical lines moved
- Put header in
- Add 2x4 framing
- Tack up plywood on the inside to protect kitchen
- Start working on taking out bricks to enlarge the window opening
- Put new window in
- Cut and place brick to fit around new window
- Mortar brick
- Weatherproof window
- Add drywall inside around window
- Seam, mud and finish drywall
This process was similar to the same process for enlarging the basement windows to put in two egress windows. If you've been thinking about having larger basement windows installed, I'd definitely recommend that project as well.
Back to the wall windows! There were around three guys here doing the job each day and it took almost four days. A big majority of the time was spent taking the existing brick out carefully. Apparently, our brick length and color can't be sourced, so each brick had to be chiseled out carefully so that it could be reused. Since we were enlarging the window, we didn't need all the bricks but some broke as they were trying to dislodge them. Our exterior windows have a soldier style casement brick detail too, which uses a bit more bricks than just a normal brick pattern.
As we were watching them take the brick out, they exposed so much of the exterior wall, that I asked how hard it would be to add some outdoor sconces. Now, I know that it's super easy to add electrical outlets and sconces when you have exposed walls but I didn't back then. I'm happy to say that they told me that it was an easy job to do so I ran up to Lowe's and grabbed these modern patio lights. For under $15, they really can't be beat when you need a small modern patio sconce.
Cost to Install a Window in an Existing Wall
We ordered a fiberglass window in the french casement style and it was just over $875.
Labor Cost to Install Windows
The labor was right around $1400. This is in Missouri and was contracted out in 2018. The cost to replace a window for just the labor has probably gone up a bit since then.
Total Window Install Cost
Our total for this project came to $2275.
The price did not include finishing the trim work on the inside of the window because that's something that we felt comfortable doing ourselves and saving a bit of money on.
Here's a good article on window casement trim options if you are looking for more information on that.
Replacing Wall Windows
If you are considering enlarging windows in your house, go for it! It was a big investment for us and one that we just weren't sure about at the time. Honestly though, it's the focal point of our kitchen and the reason our small kitchen feels light, bright and big. Honestly, this is one of our best renovation decisions to dat
Like I mentioned earlier, since this project, we've enlarged our basement windows as well. We knew that the window enlargement made our kitchen feel so much bigger and more inviting and we wanted that same feeling in the basement. We are just as happy with our larger basement windows, too!
Is it expensive to replace windows?
It can be especially if you are going with making a wall of windows larger like we did. Standard window pricing if you are just replacing though can be between $275-$1200 per window. It really just depends on what type of window you are looking to put in.
Window Installation and Cost to Replace a Window
I’m sharing all the details about enlarging a window in an existing wall including the process for installing larger windows, the price and the end result.
Materials
- Header
- 2x4
- Drywall
- Mortar
- New Window
Tools
- Chisel
- Saws
- Hammer
- Safety Gear
Instructions
- Take out existing window
- Take out drywall around window on the inside
- Put up a support beam on the inside (shown above)
- Have plumbing rerouted
- Have electrical lines moved
- Put header in
- Add 2x4 framing
- Tack up plywood on the inside to protect kitchen
- Start working on taking out bricks to enlarge the window opening
- Put new window in
- Cut and place brick to fit around new window
- Mortar brick
- Weatherproof window
- Add drywall inside around window
- Seam, mud and finish drywall
Notes
We ordered a fiberglass window in the french casement style and it was just over $875. The labor was right around $1400. Our total for this project came to $2275.
The price did not include finishing the trim work on the inside of the window because that’s something that we felt comfortable doing ourselves and saving a bit of money on.
If you want to see more kitchen details, check out the full kitchen reveal for all the details on the rest of the space.
If you want price breakdowns of other projects we've done, then check out some of these:
- Cost to Install Wood Flooring
- Replacing the Double Front Doors
- Price for New Gutters Installed
- Asbestos Removal Cost
PIN FOR LATER: Cost for Widening a Window


Julia@Cuckoo4Design
The after makes me want to go: aaaaahhhh! I so love it. What a difference! It might be a big expense but it was totally worth it.
Ashley Mayes
I know, right? I can't wait to see the finished space. It's pretty close, but the cabinet doors aren't finished yet.
Juanita
ABSOLUTELY LOVE THE KITCHEN!! Amazing space without the top cabinets!!
Would love to see the basement windows you replaced. I’ve been thinking about doing that in my basement where sunlight is minimal due to the short windows. I think I would get more sunlight by lengthening all the windows instead of widening. As in your home, the front windows are in brick.
However, the rest of the windows are not in brick.
Thank you.
Ashley Mayes
Thanks Juanita! We love the egress windows in the basement. Here's the post on that: https://biggerthanthethreeofus.com/basement-egress-window/
Katie McAteer
It was only 2275 to do that?
Melissa
Hi! I know this is an older post, but wow what a difference.! Your kitchen looks beautiful! We are looking to enlarge our kitchen window as well in our brick house, but I can’t find anyone willing to do the work. I’ve called every window place and they just don’t do that. I’ve tried some masonry places and people just won’t get back. Who did you hire to do the work? A general contractor?
Ashley Mayes
Hi Melissa,
We've had this done now, twice, and it's been hard to find the right contractor to do this type of work. So, last time, I called my local Pella store and asked for window contractors who did more than just window installations (more of a general contractor who would do a bit of everything). From there, I found the right contractor to enlarge the windows (in the basement).
Andrew
So you didn’t have to change the lintel?
Charlotte W
What a difference! I think you got a great labor price for the amount of brick work that was involved. A big investment, but when it's something that will last the lifetime of the house and will never go out of style, definitely worth it!
Ashley Mayes
I know, right?! I thought the price was pretty good. We had some ups/downs during the process, so I politely mentioned that I should get free electrical wiring added to the outside of the patio. I got it, but I think the contractor would rather not work with me again. Lol.
Sonny
How did you find a contractor to enlarge the window, what words did you google? Or did you just hire a general contractor?
Ashley Mayes
Hi,
If you are using one of the large window companies (Pella, etc.) then they have contractors that they work with. Otherwise, a general contractor works too. I like to vet by word of mouth first and then get a bid and feel it out in person.
Anni
Looks great and this was very interesting and helpful info for me! I think we are eventually going to enlarge some windows in our basement when we convert unfinished space into bedrooms.
Ashley Mayes
Thanks Anni! I think siding would be cheaper if you have that instead of brick, but the overall look is so worth it!
Naomi @ Plaster & Disaster
Oh I think that was such a good call! We did some windows when we first bought our house and it was the best thing we spent money on by far. Good light just changes everything. I can't wait to see how this space turns out!!
Ashley Mayes
When you are in DIY mode, it's so hard to actually pay for things! But, I think this was definitely worth it!
Amanda Rose
I love the outcome! You guys did a great job! My husband and I are planning a kitchen reno and we're on a tight budget so we're planning on doing most of the work ourselves. Our sink window is much like the one in your before picture and I really want a larger one put in but we're worried about cost so this was definitely helpful. I'm a little confused about what goes on with the brickwork though. We have an odd brick that I don't think can be matched and I worry about this part of the process. How much of the brick is actually removed? Is it just enough of an opening for the window to go in? And what do you do about the exterior ledge? Would you mind clarifying for me? Thanks in advance!
Ashley Mayes
Hi Amanda,
Thank you! So, removing brick is a really tough process from what I observed or atleast removing it without damaging the brick.
Our windows have a soldier style brick pattern that the window sill sits on. So, when they did the demo work, they had to remove enough bricks completely in tack so that they had enough bricks to mimic the soldier style window sill that the other windows had in it. If you don't have that added detail, then you probably have less to worry about with the demo process.
As far as how much brick is removed, more bricks than just what the window size were removed. They placed the window and then re-mortared the brick around it.
I hope that helps! For us, there was no way this would fit with a DIY project (but we don't have that skillset). BUT, for a professional, it's definitely doable and the change is crazy awesome!
Amanda Rose
OK. It looks like we have the soldier style sill as well; I just didn't realize that's what it's called. We actually found several bricks that match our house laying around our property so maybe we can use those for the sill. We were worried about the labor cost but I think after seeing the transformation it made in your kitchen, it's definitely worth it. Thanks so much for taking the time to respond and for being an inspiration!
Ashley Mayes
Of course! Good luck on your reno! We love our window and think it was the best decision ever. Hope you feel the same.
Katie
Hi, your remodel looks lovely. I’ve always been a fan of a clean, white subway tile.
What brand/line is your new window? Would you recommend it? I’m looking to put in a large French casement and a standard casement and to say the windows I’ve gotten quotes on are pricey is quite the understatement.
Thanks!
Ashley Mayes
I think it's Anderson. I can't remember! They are definitely pricey but anytime you can enlarge and get more light in... I think it's worth it!
Tracy
Hi. I realize this is a really old post. But I also have a blog and people comment on old posts all the time so...hi! I just wanted to say: thank you for this! You stated near the end that you shared the cost breakdown because you saw a lack of information online. And this was EXACTLY the info I was looking for! Thank you! Also the amount of time and effort this took was eye-opening! I'm embarking on a crazy reno project, and this post helped. Thank you! (I'm so replacing all of our uppers with windows and open shelving. I'm certain I'll regret that some day but whatever. Light! Space!)
Ashley Mayes
Hi Tracy,
Thanks for your comment! I don't think you'll regret the windows and open shelving! Seriously, we love how ours turned out. Thanks again for your comment. Good luck on the renovation!
Jennifer L Comstock
I have a question about the costs. You mentioned the cost for the window and labor. Did you also have to hire an engineer?
Ashley Mayes
No, we didn't. It's pretty standard here to just put in a larger header to accommodate going up in size for the window.
Tori
Did you have to get a permit to expand your window? I read elsewhere that expanding a window required a city permit?
Ashley Mayes
Definitely check your county/city codes for sure! They are all different.
Rena
Do you regret losing the cupboard storage?
Ashley Mayes
Hi Rena,
I don't but I'm also pretty minimalistic when it comes to dishes and kitchen extras. I think that's definitely something you'd have to consider before deciding whether to get rid of the cupboard storage.
Julie
My kitchen layout is almost exactly like. yours. So lucky that when I googled "cost to install larger windows" showed this. The exterior opposite my kitchen sink is stucco. My issue is that the sink cannot be centered, off by maybe 2-3 inches, and I don't want a larger or smaller sink or base cabinet. So I was thinking the window needs to be larger or smaller, to center at the faucet. It bugs me not being centered. I was even considering moving the sink to the corner with our reno, just so it at least wouldn't look like we tried and failed to center it! Thanks for the list breaking down all the steps and the photos. I think having fewer upper wall cabinets also helps it look larger, as well as the larger window.. We don't have much of a view, so as long as there's a window, I don't necessarily need one larger. I wonder how the cost compares to going smaller... in your case, matching bricks would be a challenge. In my case, I don't know if I could match the stucco and paint, but could perhaps add a larger trim around the window, since its such a minor change. And, my kitchen window isn't in sight near other windows, so doesn't have to match exactly.
Ashley Mayes
I want all the natural light so I'd hate to go smaller. Our window wasn't centered exactly on our before either. Drove me nuts, so I know how you feel.