

Enjoy this step by step tutorial for how to build a closet loft (or loft bed). This project will make a perfect kids reading nook, too!
We've had this closet reading nook now for quite a number of years and still love the concept. If you've been looking for bed in closet ideas or just want a fun reading nook, take some of this tutorial, or all of it, and customize to build a closet loft in your house. I know you won't regret it.
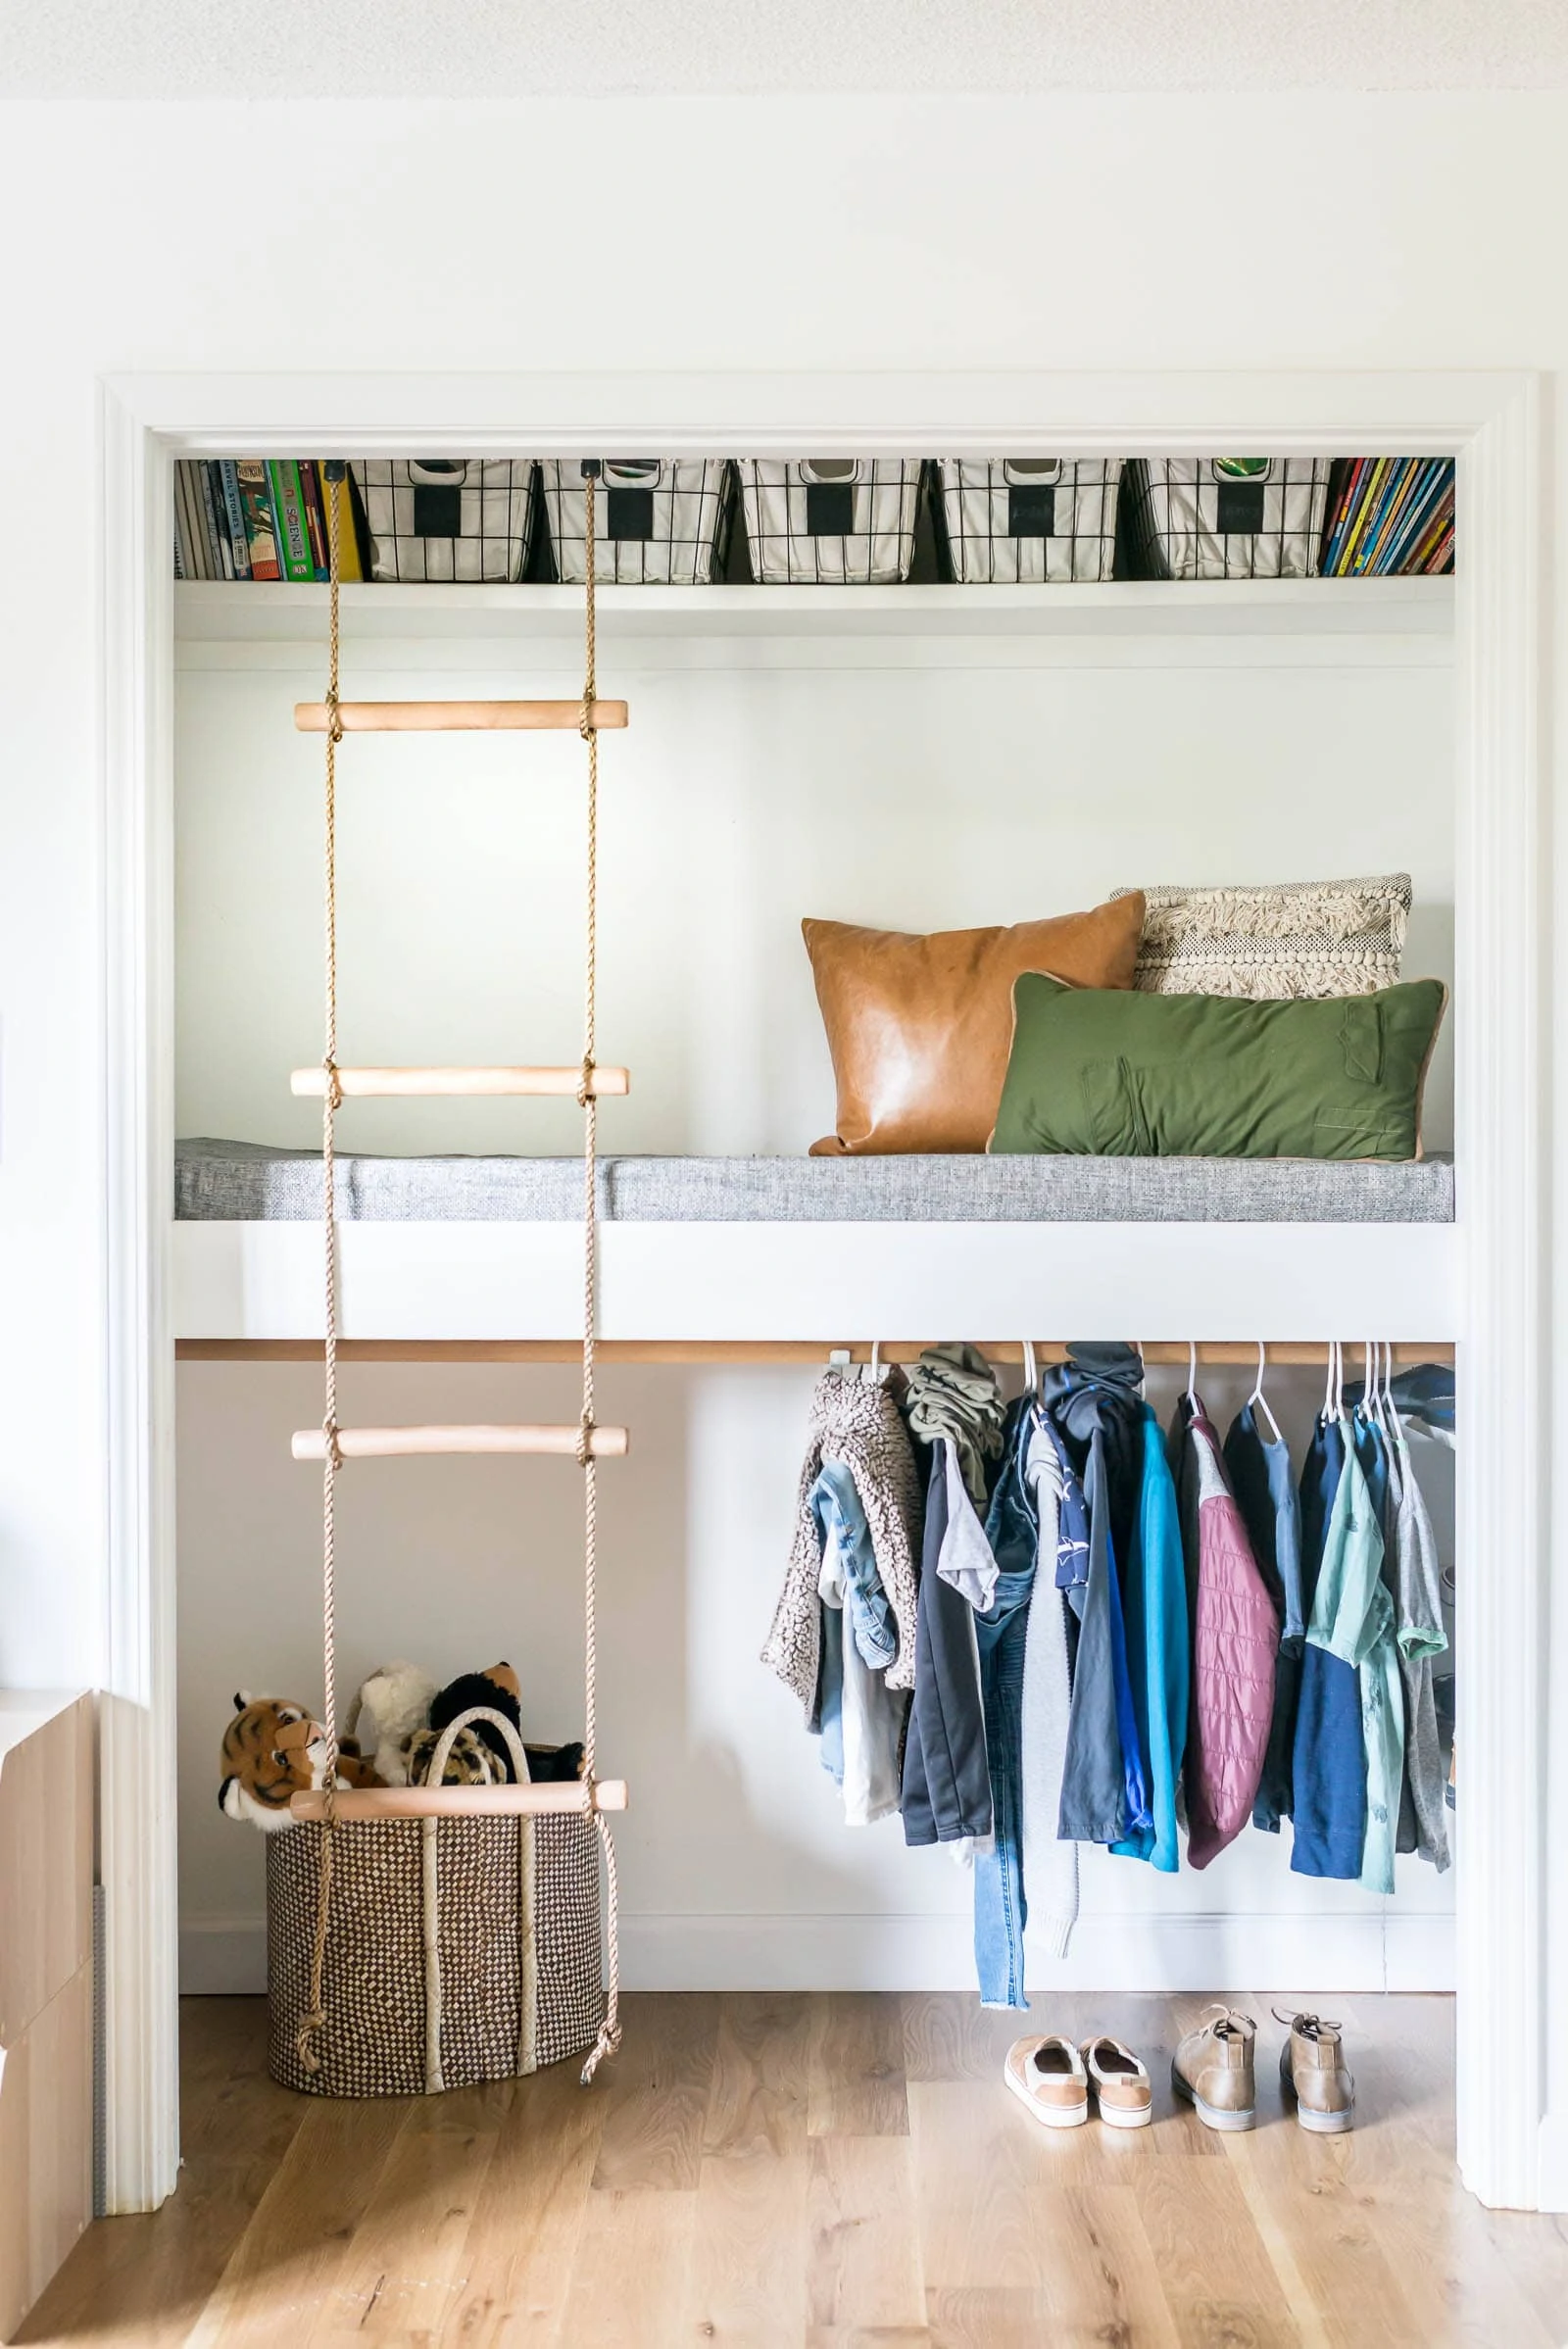
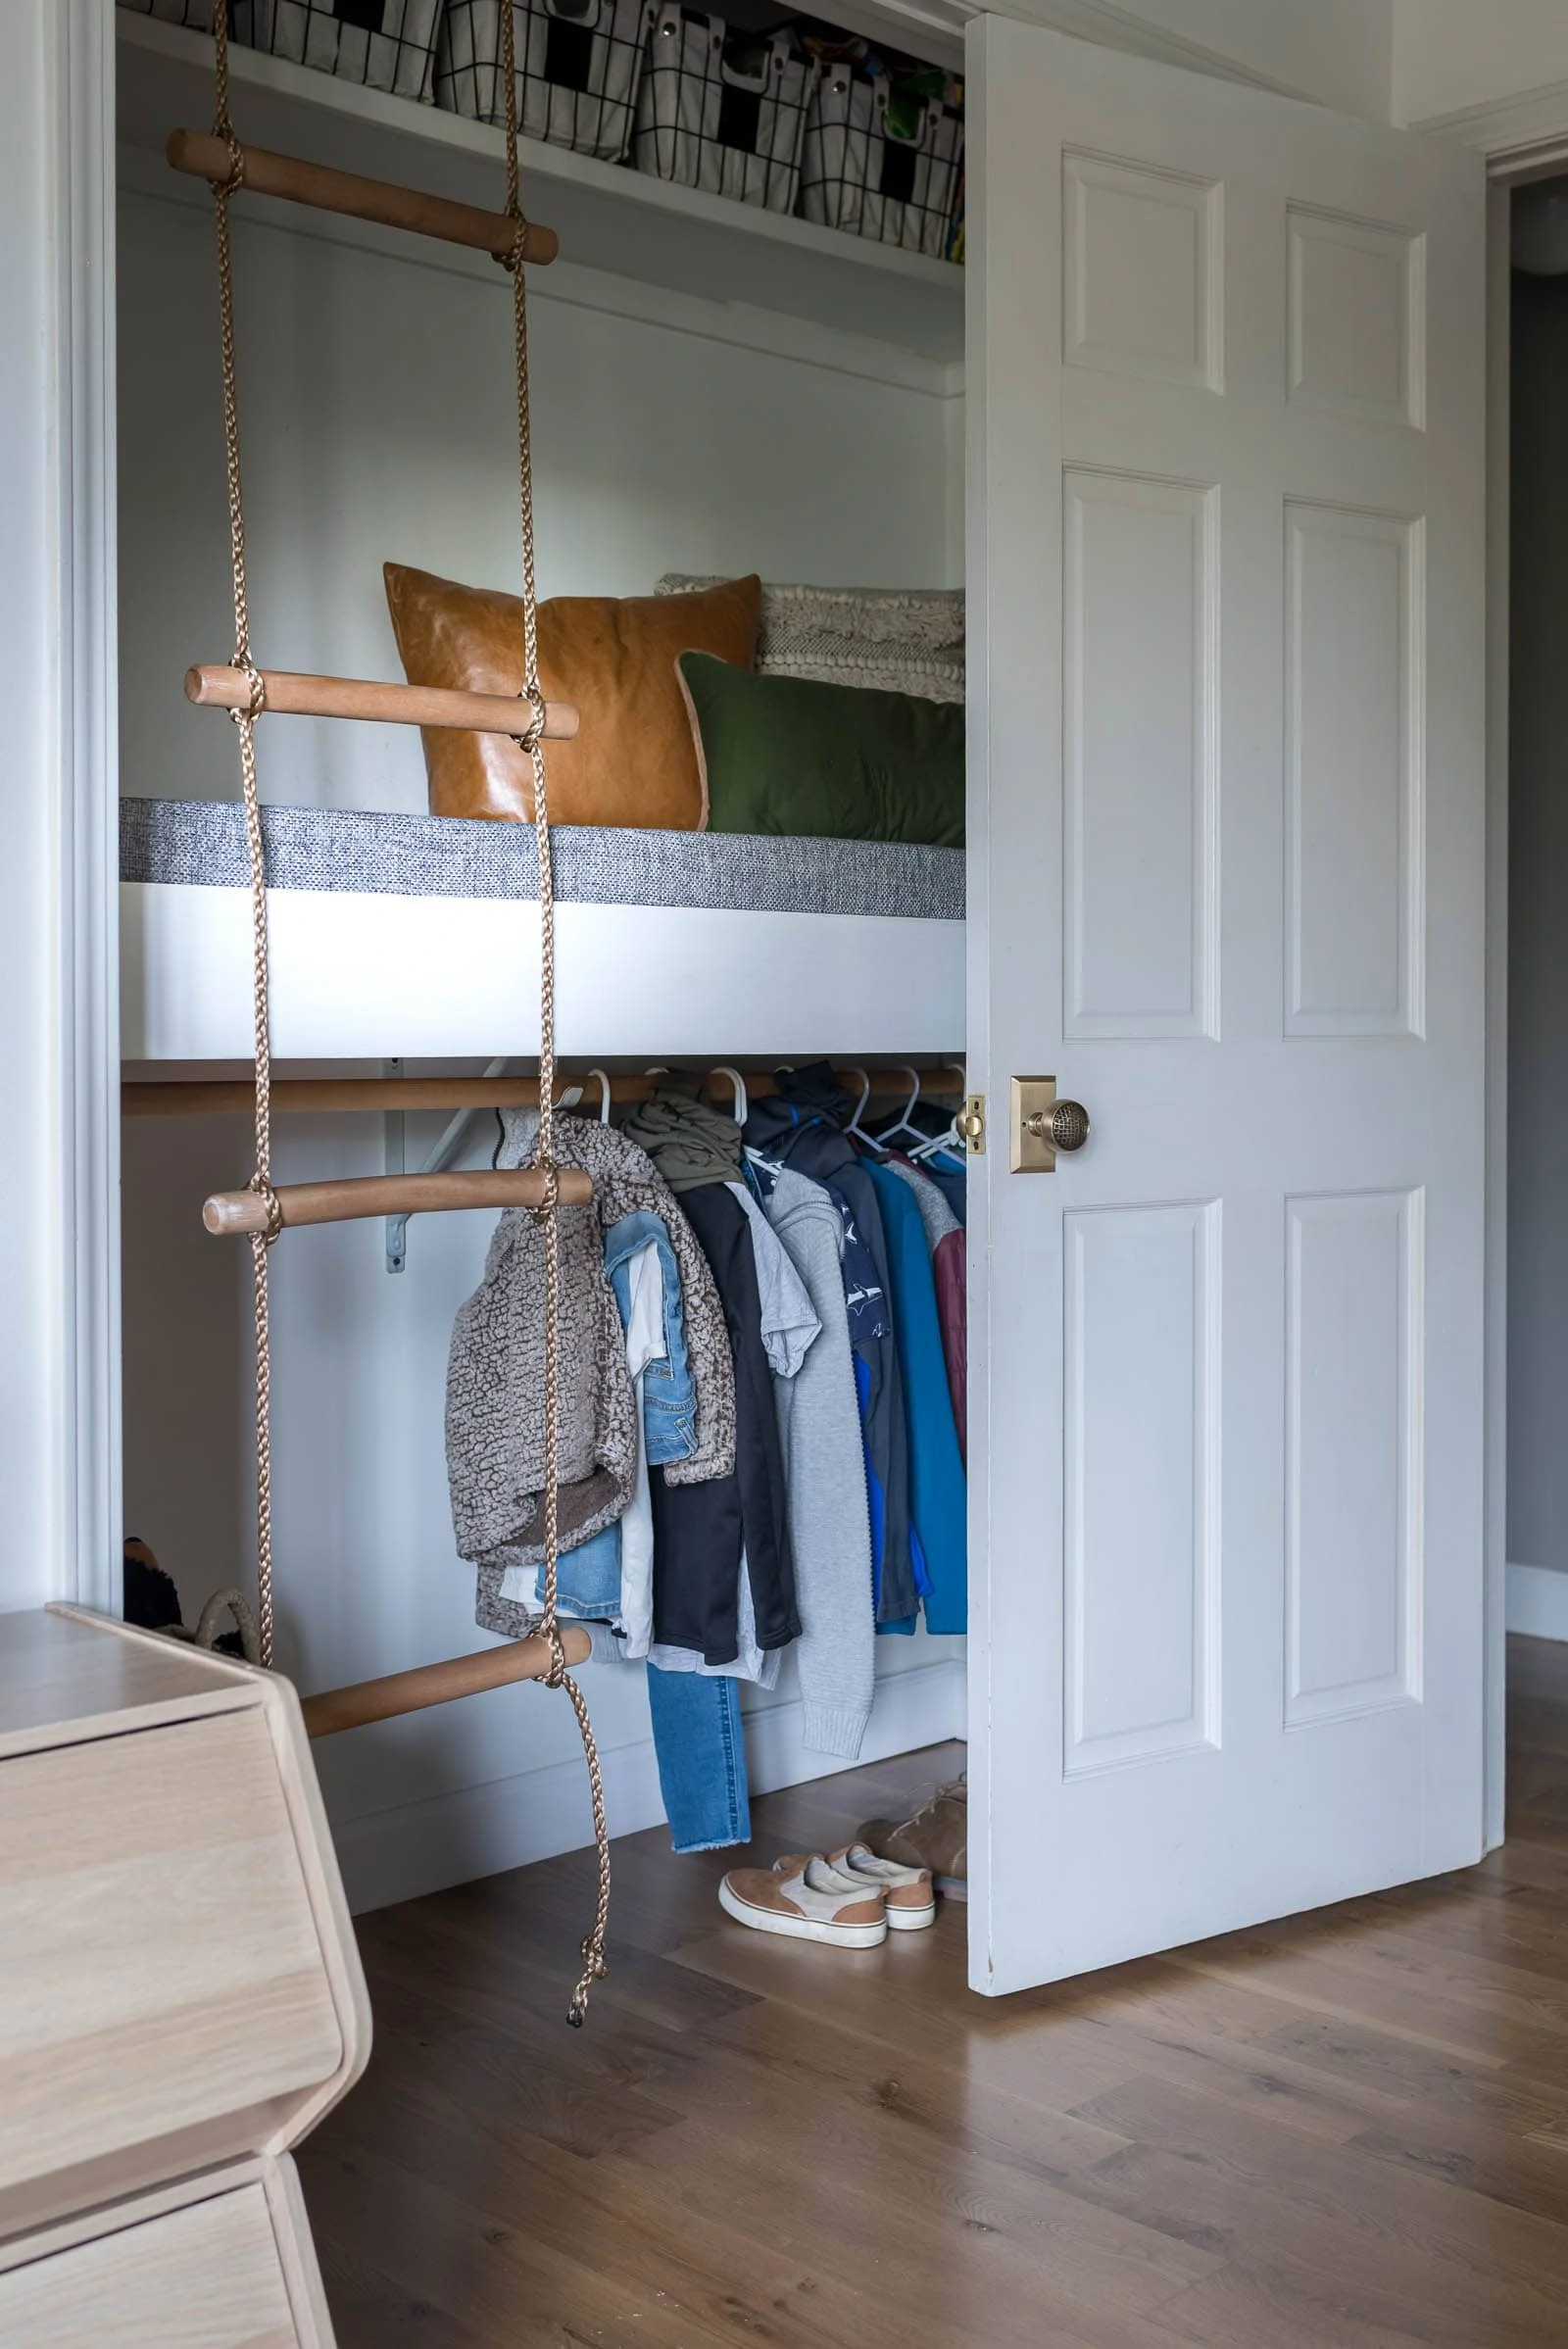
*As I mentioned earlier, we've had the kiddos closet with the loft bed DIY for quite a number of years. I updated this post to reflect the current look of the kid's loft space. Over time, the original ladder bit the dust so we installed a hanging ladder.
Project Overview: Time, Cost, and Difficulty
| Category | Details |
| Active Time | 6-8 hours |
| Difficulty | Moderate |
| Estimated Cost | $250-$350 |
Planning Your Closet Reading Nook
*Affiliate links below. Thanks for supporting this blog. Click to read my disclosure policy.
Essential Tools and Materials
Lumber and Hardware List
- 84" 2x4 (6)
- 92" 2x4 (1)
- Screws
- Nails
- 3" Foam pad - check out my post all about affordable foam!
- 8' Piece of finish hardwood
- Plywood
- Fence Brackets (2)
- 3" Angle Bracket (2)
Recommended Power Tools for the Job
- Hammer
- Jigsaw
- Level
- Drill
- Air compressor (This one is the one that we have and love - it's portable!)
- Nail gun
- Miter saw
- Stapler/Brad Nailer
Step-by-Step: Constructing the Loft Frame
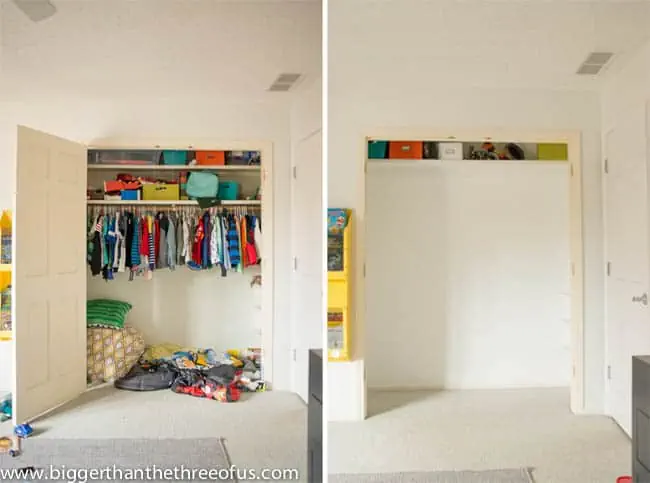
Before we started building the loft, we knew we needed to take out the clothes bar and the bottom shelf in the closet. We patched the areas where those had been. We also filled in the hinge holes (that the door hinges left behind).
Our closet had trim finished on the inside of the door jam, so we knew we would need to address that to make sure the closet loft would sit level against the door jam. For us, it worked best to take the trim off, install the loft bed, and then re-cut and re-install the trim.
Once you get to a blank slate in your closet, you can get to building.

How to build a reading nook for a kid
Step 1: Measure and decide on the height for the children's loft bed
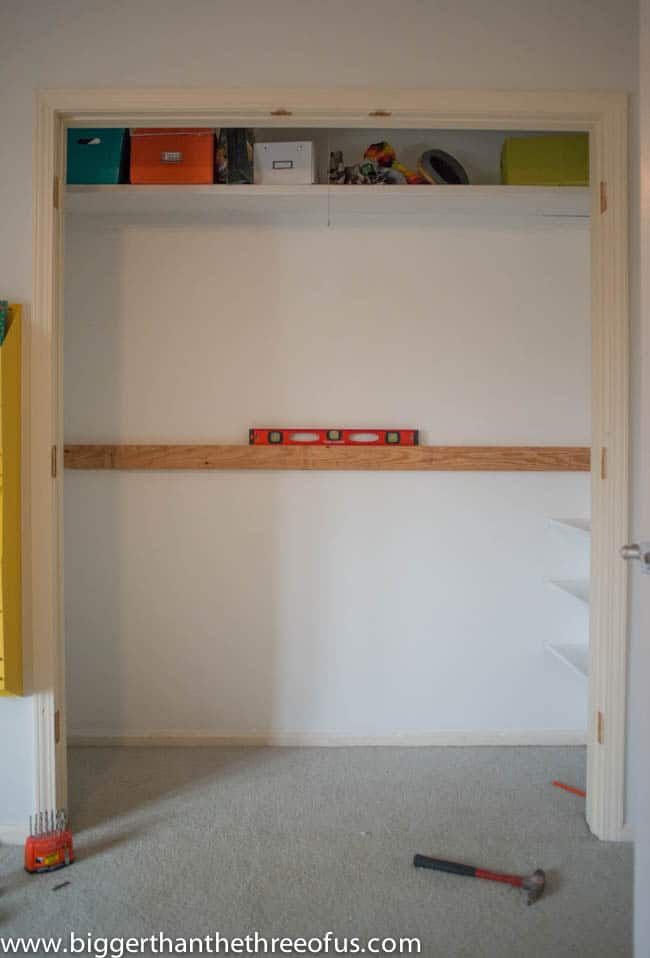
Step 2: Locating Studs and Installing the Back Cleat
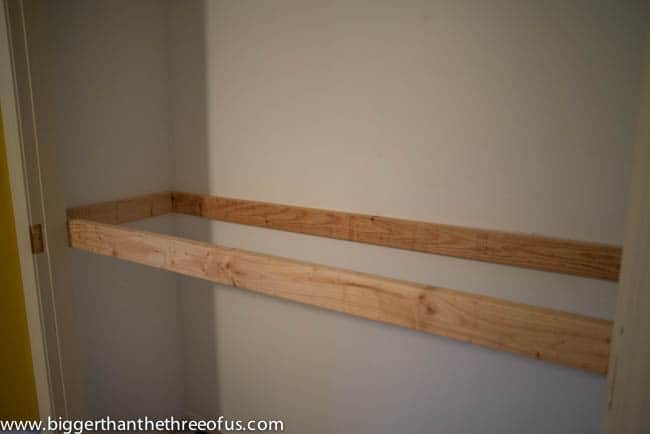
Start cutting 2x4's for frame. Our back wall measured 77 ¼". We cut a 2x4 on the miter saw at that measurement. Our side wall measured 22.5" each. We cut 2 2x4's to just a tick under 22.5".
Find the Studs and Attach the the back 2x4. Attach the back 2x4 (77 ¼ inches long) on the wall where you want the base of your loft to be. Ours started about 50 inches from the floor. Make sure you are using your level and then screw two (LONG) screws (we used deck screws) in on every stud on the back wall.
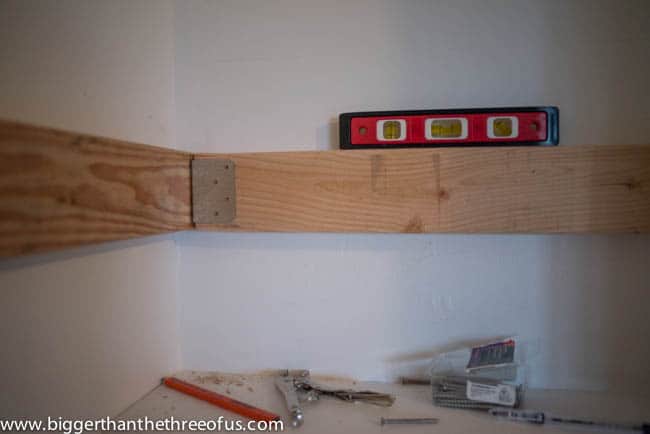
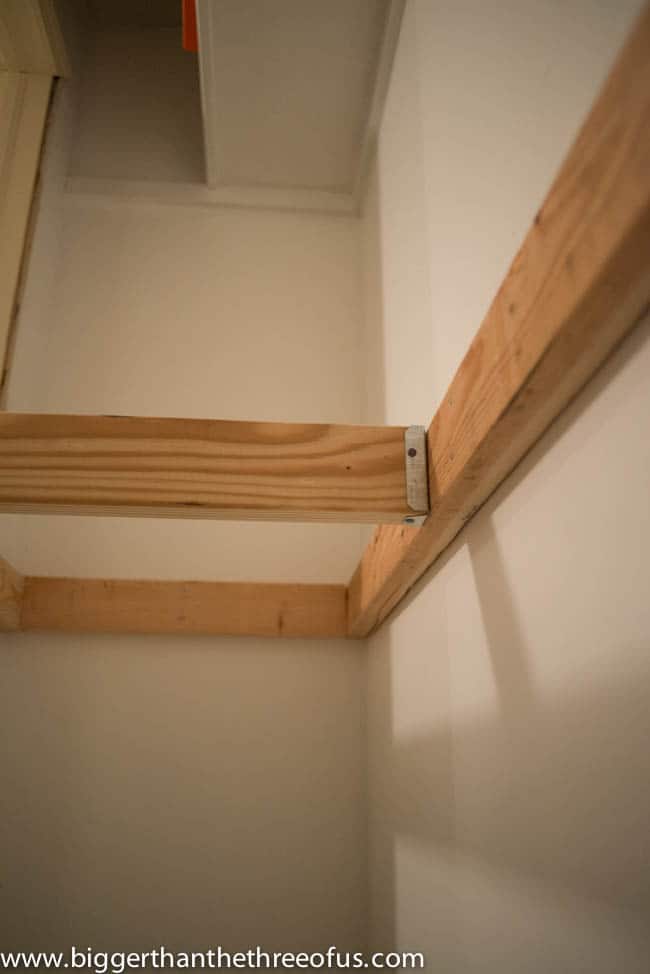
Step 3: Securing Side Supports and Angle Brackets
Take your two 2x4 side pieces (22.5" each) and attach them on the wall. Even though you have measured out your box, make sure each piece is level with each other as you add on. For one of the sides, we could only find one stud in the wall to attach our new board. This is where we used the angle brackets. They allowed us to fasten the back and side 2x4s to each other to add extra support on the end without a wall stud.
Step 4: Installing the Front Beam and Cross Supports
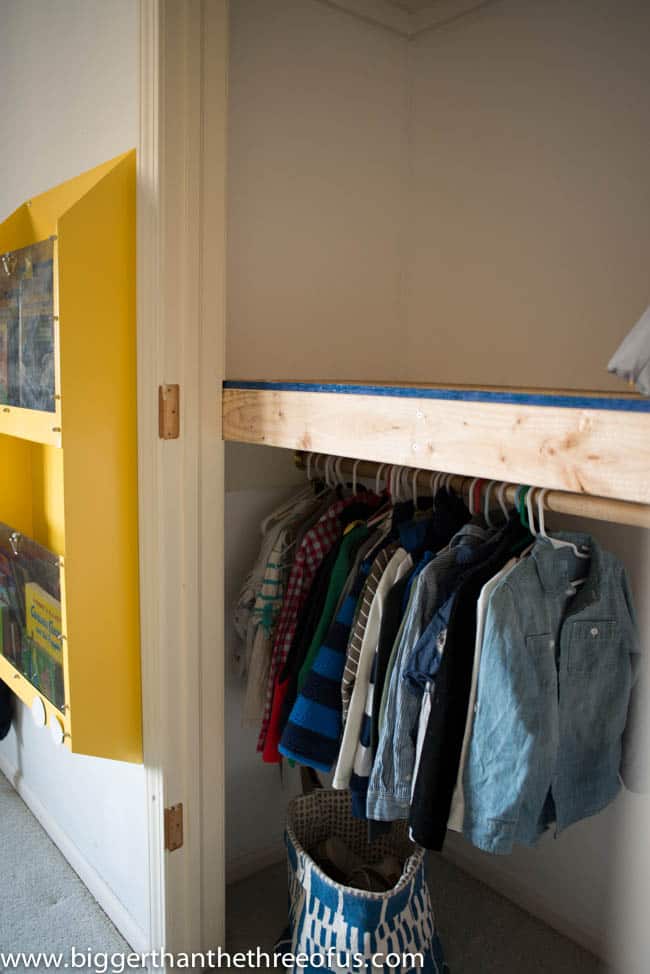
Measure for the front 2x4. For the front piece, we waited to measure until the back and sides were on. With the trim taken off where you need your front 2x4 to go (or notched out) measure how long you need your front board to be. Ours measured 74.3".
Cut and install front 2x4. Drill into the door jams for extra support.
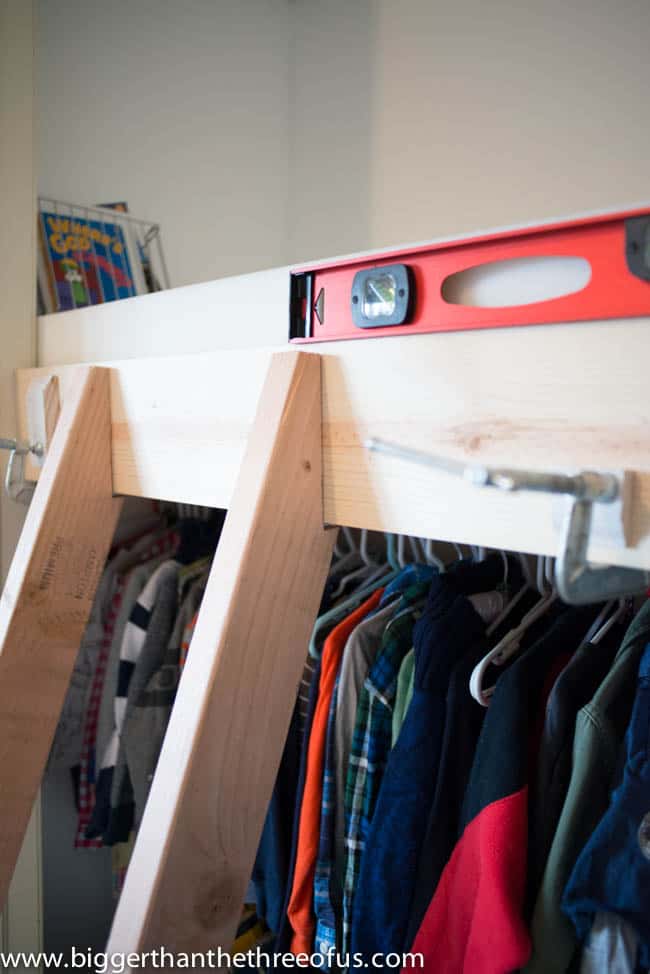
Add Cross Supports. Measure inside the box from the front 2x4 to the back 2x4. Ours measured 20 ¾". We decided to have two cross supports spaced evenly. We cut two 2x4s to a hair under 20 ¾" so that we could get our boards in. This is where your fence brackets come in.
Use fence brackets to attach to the back 2x4's. On the front, you will be able to drill through from the front 2x4 to the cross beams.
Step 5: Laying the Plywood Platform
Measure the "box" where your plywood will sit and cut the plywood top.
Cut and screw plywood in to the supports.
Adding the Finishing Touches
Installing White Oak Trim for a High-End Look
Trim the Closet Loft out: The front of the loft needed something a little bit nicer than a 2x4. We picked up a white oak board to have it be the face of the loft. We primed and painted it. Using a finish nailer, we attached it to the front of the 2x4.
Sanding, Priming, and Painting the Loft Structure
Make sure to fill any nail holes, sand, and give the whole loft a good priming before painting.
Creating the Ladder: Geometry and Safety
Build the Ladder (or buy a hanging ladder).
Calculating the Best Angle for a Kids’ Ladder
Estimate the length of the ladder and also the angle of the ladder (use a tape measure to help). We started with a 30 degree angle and made a sharp corner at the top end of the ladder. Once we took it upstairs to test it out, we decided that it took up too much room and that the ladder needed to be more steep. Since we cut before we knew what we were doing, we had some spare wood that we used to fine-tune the angle. I recommend grabbing some scrap 2x4s to start with. Start with a 30 degree angle, hold it up to the loft, and see how it looks. If that sticks out too far, take another 10 degrees off of the angle (20 degrees) and try it out again. For us, about 15 degrees ended up being right. Once we had the top angle fine-tuned, we needed to trim off the excess on top. The notches underneath the front face aren't necessary, but they look nice and make it easier to cut a 15 degree angle on a small miter saw. For the step-width, we just put the two side rails in place and eye-balled the width and height between the steps. Just make sure you think about where the top step is going to lie and leave enough room up there.
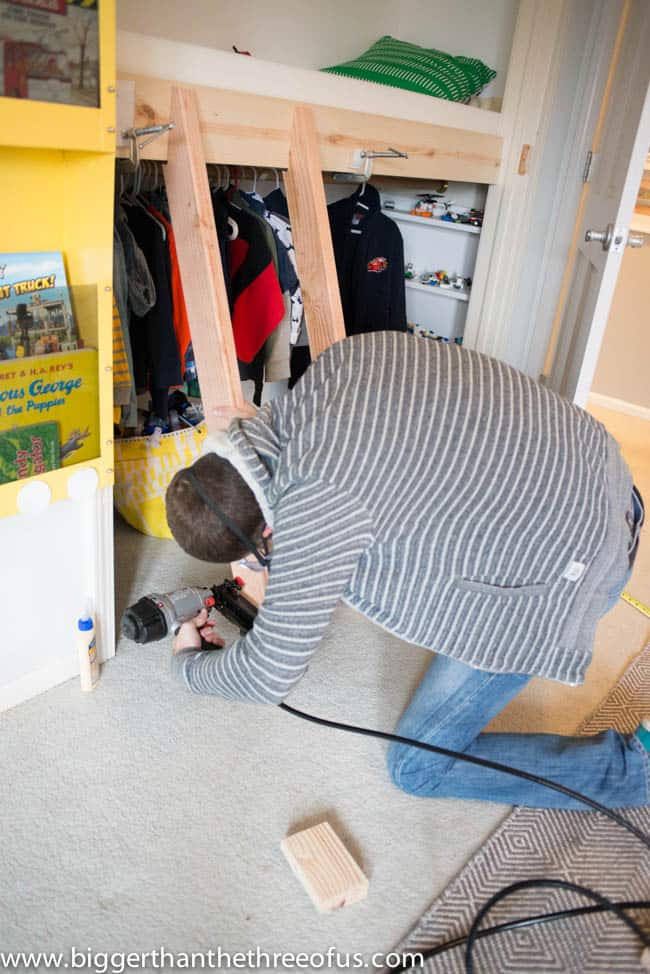
Structural Upgrades: Choosing Screws vs. Nails
Once we know how many steps we needed and where they should go, we marked lines on the side rails, cut our wood, and then installed them with wood glue and 3" finish nails (the finish nails weren't quite strong enough and are why our ladder broke eventually). To improve this and make sure the ladder is safe, we would try using glue and larger deck screws or notching out slots for each step in the side rails.
Upholstery and Comfort
Install Foam and Fabric: Cut your foam to the size of the loft. We didn't have enough foam to be a perfect fit, so we just slipped a few extra strips in on the side to make it work.
Cover the foam with fabric (kinda like you would a headboard) and staple the fabric into the plywood.
Maintenance Tip: Creating a Washable Slipcover
If we were doing this again, I would probably make a fitted slipcover for the foam instead. Luke had that idea after the fact and I think it's great. That way, you could take if off and wash it easily.

We put the clothing bar up earlier in the loft build, but you could easily leave that until last. On the right side of the loft, we have shelving. That shelving was original to the house, but you could easily add that. More pictures of the original children's loft bed can be found in the loft reveal post!
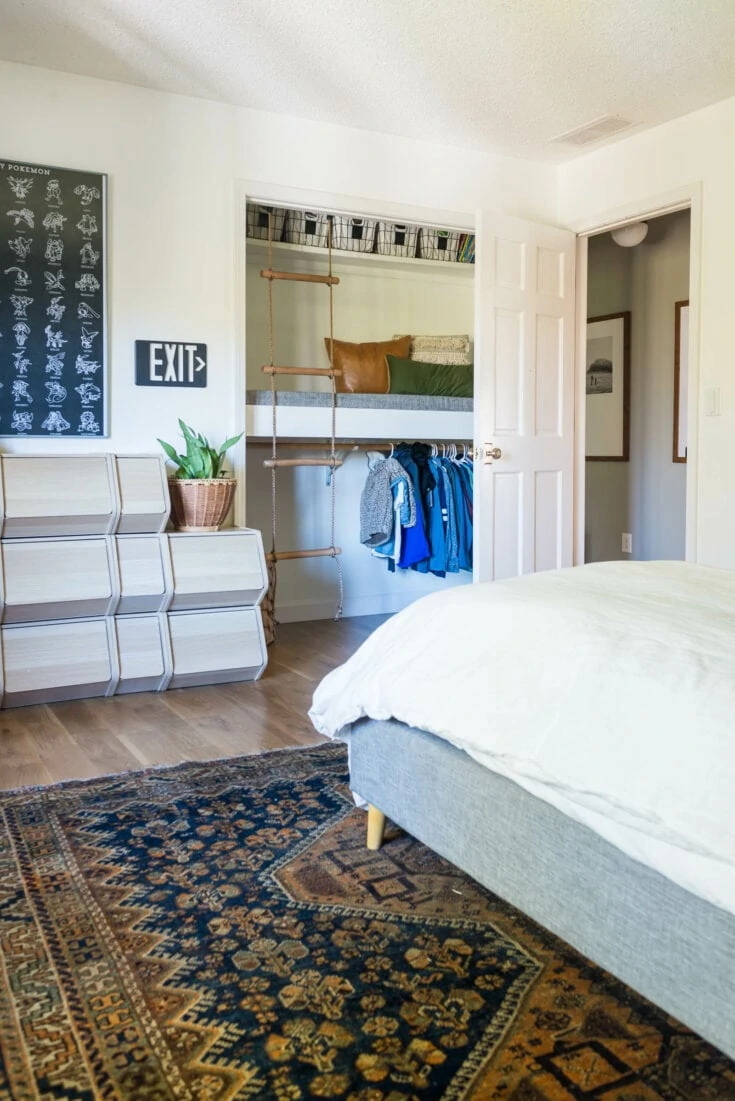
9 Years Later: How This DIY Loft Has Held Up
Like I mentioned, up above, we've used and LOVED this closet loft for quite a few years (over 5!). All the kids that come over love hanging out up there and jumping from it. It definitely gets some use, but that's the great thing about it.
Since we originally wrote this post, we've changed the flooring, upholstery and the ladder. The main part of the DIY loft didn't change other than adding a hanging ladder instead of the original DIY ladder.
Since the closet loft doesn't have a railing, I would say it would be best suited for kids 5+.
Yes, you can. A table saw would make it easier but we don't have one and were able to do this whole project without it.
Use a stud finder.
Building a Loft Bed or Kids Reading Nook
Step by Step Tutorial for How To Build a Closet Loft (or Loft Bed). This project will make a perfect kids reading nook, too!
Materials
- (6) 84" 2x4's
- (1) 92" 2x4
- Long screws
- Nails
- 2" upholstery foam
- 8' Finished hardwood
- Plywood sheet
- (2) Fence Brackets
- (2) Angle Brackets
Tools
- Hammer
- Jigsaw
- Level
- Dril
- Air Compressor
- Nail Gun
- Miter Saw
- Stapler
Instructions
- Measure and Decide on Height for the children's loft bed
- Start cutting 2x4's for frame. Our back wall measured 77 ¼". We cut a 2x4 on the miter saw at that measurement. Our side wall measured 22.5" each. We cut 2 2x4's to just a tick under 22.5".
- Find the Studs and Attach the the back 2x4. Attach the back 2x4 (77 ¼ inches long) on the wall where you want the base of your loft to be. Ours started about 50 inches from the floor. Make sure you are using your level and then screw two (LONG) screws (we used deck screws) in on every stud on the back wall.
- Take your two 2x4 side pieces (22.5" each) and attach them on the wall. Even though you have measured out your box, make sure each piece is level with each other as you add on. For one of the sides, we could only find one stud (on one end). This is where we used the angle brackets. They allowed us to fasten the 2x4s to each other to add extra support on the end without a stud.
- Measure the for the front 2x4. For the front piece, we waited to measure until the back and sides were on. With the trim taken off where you need your front 2x4 to go (or notched out) measure how long you need your front board to be. Ours measured 74.3".
- Cut and install front 2x4. Drill into the door jams for extra support.
- Add Cross Supports. Measure inside the box from the front 2x4 to the back 2x4. Ours measured 20 ¾". We decided to have two cross supports spaced evenly. We cut two 2x4s to a hair under 20 ¾" so that we could get our boards in. This is where your fence brackets come in.
- Use fence brackets to attach to the back 2x4's. On the front, you will be able to drill through from the front 2x4 to the cross beams.
- Measure the "box" where your plywood will sit. and cut the plywood top.
- Cut and screw plywood in to the supports.
- Trim the Closet Loft out: The front of the loft needed something a little bit nicer than a 2x4. We picked up a white oak board to have it be the face of the loft. We primed and painted it. Using a finish nailer, we attached it to the front of the 2x4.
- Build the Ladder (or buy a hanging ladder): Estimate the length of the ladder and also the angle of the ladder (use a tape measure to help). We started with a 30 degree angle and made a sharp corner at the top end of the ladder. Once we took it upstairs to test it out, we decided that it took up too much room and that the ladder needed to be more steep. Since we cut before we knew what we were doing, we had some spare wood that we used to fine-tune the angle. I recommend grabbing some scrap 2x4s to start with. Start with a 30 degree angle, hold it up to the loft, and see how it looks. If that sticks out to far, take another 10 degrees off of the angle (20 degrees) and try it out again. For us, about 15 degrees ended up being right. Once we had the top angle fine-tuned, we needed to trim off the excess on top. The notches on bottom aren't necessary, but they look nice and make it easier to cut a 15 degree angle on a small miter saw. For the step-width, we just put the two side rails in place and eye-balled the width and height between the steps. Just make sure you think about where the top step is going to lie and leave enough room up there. Once we know how many steps we needed and where they should go, we marked lines on the side rails, cut our wood, and then installed them with wood glue and 3" finish nails (the finish nails weren't quite strong enough and are why our ladder broke eventually).
- Sand and Paint Ladder
- Attach the Ladder and Patch
- Add wood filler to the nails. Sand and paint.
- Install Foam and Fabric: Cut your foam to the size of the loft. We didn't have enough foam to be a perfect fit, so we just slipped a few extra strips in on the side to make it work.
Cover the foam with fabric (kinda like you would a headboard) and staple the fabric into the plywood. If we were doing this again, I would probably make a fitted slipcover for the foam instead. Luke had that idea after the fact and I think it's great. That way, you could take if off and wash it easily.
p.s. If you love kid projects, we have a bunch of them. We painted a magnetic map wall, installed a car light switch, made a firetruck lamp and even installed a bucket and pulley on our play set. And, I recently saw another style of reading nook made out of a closet. If you didn't want a high loft, that might be a good option for you.
}


Julia@Cuckoo4Design
That's a great tutorial! And it's something anyone can tackle and every kiddo would love to have.
Ashley Mayes
Thanks Julia! In depth tutorials are kinda rough! =)
Corinna - For My Love Of
I LOVE IT SO MUCH! 😀
Christine from So Domestically Challenged
That came out great! What a fun little space! I would have loved that as a kid 🙂
Ashley Mayes
Thanks Christine! I would have as well!
Ashley ~ 3 Little Greenwoods
Oh my kiddos would flip for one of these! Love it!
Ashley Mayes
Ha! Possibly flip out of it? Im waiting for the moment that our little man decides to use it as a jumping off point. Thanks so much Ashley!
Laura Irion // Avery Street Design
My mind is officially blown!! This is truly amazing...what kid wouldn't love this?! I'm totally forwarding this post to my husband (aka general contractor). Thanks for all the great detail. AWESOME job!
Ashley Mayes
Thanks Laura! It's the perfect little spot and I'm hoping it will grow with him. Time will tell. Good luck getting the general contractor on board! =)
Amanda @ Dwelling in Happiness
This is TOO CUTE! Such a clever idea!! Totally pinning for future reference. Thanks for sharing! 🙂
Ashley Mayes
Thanks Amanda!
Katie @ Little House of Four
Wow, this turned out great! My son would LOVE to have this cool little hang out space in his room! Thanks so much for linking up to Your Designs This Time. Have a great week 🙂
Ashley Mayes
Thanks Katie! You could totally do one!
Julie (Being Home)
This is amazing and well done! You now have me rethinking about my son's closet. Thank you so much for the descriptive tutorial. I know those can be very time consuming to write. 🙂
Ashley Mayes
Thanks Julie! You nailed it on the head... it was super time consuming. Thanks again!
Heather
HOW PERFECT!!! We’re moving and my sons room is extremely long and narrow. He has a loft bed now but it would top the ceiling fan. HOWEVER, he has a major spaced walk in closet (why not have the room bigger!?) and I can actually fit his bed in it, create a room inside his room and have more space for play! Thank goodness grandpa builds professionally, I’m forwarding this ASAP! Thank you for your inspiration!!!!
Ashley Mayes
So fun! I'll probably be jealous of how yours turns out... having a professional woodworker will up the look for sure! Excited for you.
Mandie
Awesome post! Just came across your blog and I love your style! I've been sifting through tons of rustic cottage style DIY blogs and its refreshing to see someone with a similar design esthetic to mine.
Ashley Mayes
Thanks so much Mandie! There are a ton of cottage style blogs out there. Have you happened across Brave New Home or Hello Lidy? Both of their styles mesh up as well.
Sarah
I love what you have done here! So cute and fun.
Ashley Mayes
Thanks so much Sarah!
Kyla @HouseOfHipsters
I've been so excited to see this reveal. I'll bet your little man was soooo excited for his own space. You guys nailed it!!
Ashley Mayes
Thanks Kyla! He loves it and it totally works for us...
Candice
Holy cow- this is genius!!! What a great idea for a fun little reading/hangout space and still have closet space too! So smart!!!
Ashley Mayes
Thanks Candice!
Alice @ Mums Make Lists
Totally love this - fantastic. Am now trying to work out if we could do something similar in my daughter's room. Pinned.
Ashley Mayes
Awesome! Thank you!
Anna
This is SO cool!!! What a fun idea, I bet he loves it!
Anna
Ashley Mayes
He does! Thanks Anna.
Ashleigh
I love this idea!! The step by step pictures are great! Thank you so much for sharing! Pinned it! xx Ashleigh @SimplyWright #linkpartypalooza
Ashley Mayes
Thanks Ashleigh.
Cynthia Cotmen
I followed this tutorial and it was AMAZING! thank you SO much!! (I'd post a pic but I don't have my own website)
Ashley Mayes
Oh my gosh, it turned out so well! I hope it gets lots and lots of use.
Mickie
I love this! I also love the yellow book shelf! Did y'all make that too?
Ashley Mayes
Thank you! Actually that was a find at Habitat Restore. It was an old magazine rack for a doctor's office. We gave it some paint and hung it up. It's HUGE but we love it! Thank you!
Michael W. Perry
Oh, I'd love to have that Boy Cave as a kid, although having the top bunk was half-way there.
Kids grow up fast, so some parents might want to tweak this design to make restoration easier. Just leave as much of the hardware in place as possible and save the materials.
--Michael W. Perry, author of My Nights with Leukemia: Caring for Children with Cancer.
Ashley Mayes
Definitely. Thanks Michael.
Kate
I love this, and the closet is nearly identical to my daughter's. Can't wait to start. Question for you, and I'm sorry if you've answered this elsewhere...when do you work on projects? Or more relevantly, what are your kids doing while you saw and sand and nail gun?
Ashley Mayes
Thanks Kate! We only have one kiddo. He "helps" on projects that he can help on or plays with legos. We usually have one work night a week that he knows he has to entertain himself during. Usually from around 5:30-8pm on that night... it's strictly work. It works for our family pretty well.
Sam @ DIY Just Cuz
Awesome, definitely something I would consider trying when we moved into our own house - renting right now and can't really do this unfortunately! I love the final result!
Ashley Mayes
Thanks so much! Definitely keep it in mind for the future.
Caroline
It's really great - my girls had something like this - they are born 11 years apart, My older daughter thought she had her own room, and the little one thought she was sharing!! Everyone was happy
Ashley Mayes
That's so awesome!
Veronica
Maybe you mentioned it somewhere and I just missed it, but could you tell me how deep the bed is please?
Ashley Mayes
The 'bed' or loft area is just as big as your closet will be. In this case, the foam part is 24 inches wide. Hope that helps!
Heather P
This is fantastic! I had this idea in mind but didn't know where to begin. Thank you so much for all the details and how to. We are putting it in my sons closet and hope to make it in a way that we can convert it to a desk when he's older. Great job!
Ashley Mayes
oh yay! Let me know if you try it - I'd love to see pictures.
Becky, Pahrump, NV
The closet is so darn adorable!!!! This is so awesome. Thanks so much for sharing!!!
Ashley Mayes
Oh, you are so sweet! Thanks Becky!
Lindsey
Approximately how long did this project take?
Ashley Mayes
We are pretty slow but you can definitely do it over the course of a weekend!
Lauren
Super cute! I’d love to do this in my boys’ room! One thing I wanted to mention to you though is that when I was a kid, I had a foam pad on a piece of plywood on my bed and it molded pretty bad because there was no air circulation between the wood and foam. Slats rather than plywood would allow he foam to breathe.
Ashley Mayes
Thanks for all that information Lauren! I had no idea!
Katie
Hi! I know this has been out for a while, but I just found it. I've been trying to get my husband to help build something exactly like this for weeks (months? years?) and I think showing him this finally convinced him. He's a carpenter with years of experience building houses, but we couldn't quite agree on the project and I think he was over-thinking it. After seeing this, he agreed to do it this weekend! Thank you!
Ashley Mayes
Yay! I'm sure he tweaked it to make it better! Tag me on IG if you share!
Natalia
Hi Ashley! I love this project!
I am building a reading nook for my daughter based on this tutorial and can't figure out how to install the hanging rope ladder. Could you please explain?
Ashley Mayes
Hi, It's attached on the inside of the loft where the header (2x4) of the original frame of the closet is.
Natalia
Thank you so much!
I ended up attaching it to the ceiling because it kept bumping into something hard on the inside wall when I tried to drill into what I thought was wood behind the drywall. It seems stable (I tried climbing onto it), so hopefully it was a stud (at least, that's what the studfinder "said").
I also connected the ladder to the floor with screws because it was hard climbing up since the ladder would hit the wall. Now that it's stable, it's a lot easier.
Now, I just need to put the top piece and the side board, paint, and make a cushion. Did you attach the cushion directly to the loft or had it as a separate piece? If a separate piece, how did you connect it to the loft so it would not slide? I'm thinking of using velcro. Do you think it would work or is there a better way?
Here's the current status: https://imgur.com/a/lsDOfYj
Ashley Mayes
It looks amazing and I think it sounds like you solved your problem well.
I would recommend keeping the cushion as a removable cushion (so you can wash the cover!). The first time I did this, I stapled it down and that was a mistake. The last time, I just folded the fabric under (the cushion is TIGHT) and that has worked well. I just remove the cover and wash as needed. It doesn't slide because it's a really tight fit.
Lucie Brault
Hello
I am building a binked bed in a closet for my grand kids. I was wondering if the hanging ladder (wich is beautiful) is practicle ? My husband thinks it will be to difficult for the kids to climb up and down ? And where is it fixed ?
Thank you so much
Lucie
Ashley Mayes
Hi. If they are going to sleep in it, then I would do a traditional ladder. I think getting out of bed in the middle of the night when they are half asleep would be tricky. We loved the hanging ladder for our reading/play loft but we didn't use it for any overnight sleep.
We attached the ladder inside the loft at the top in the frame header. We didn't attach it to the floor, but you could definitely do that to make it easier to climb.