

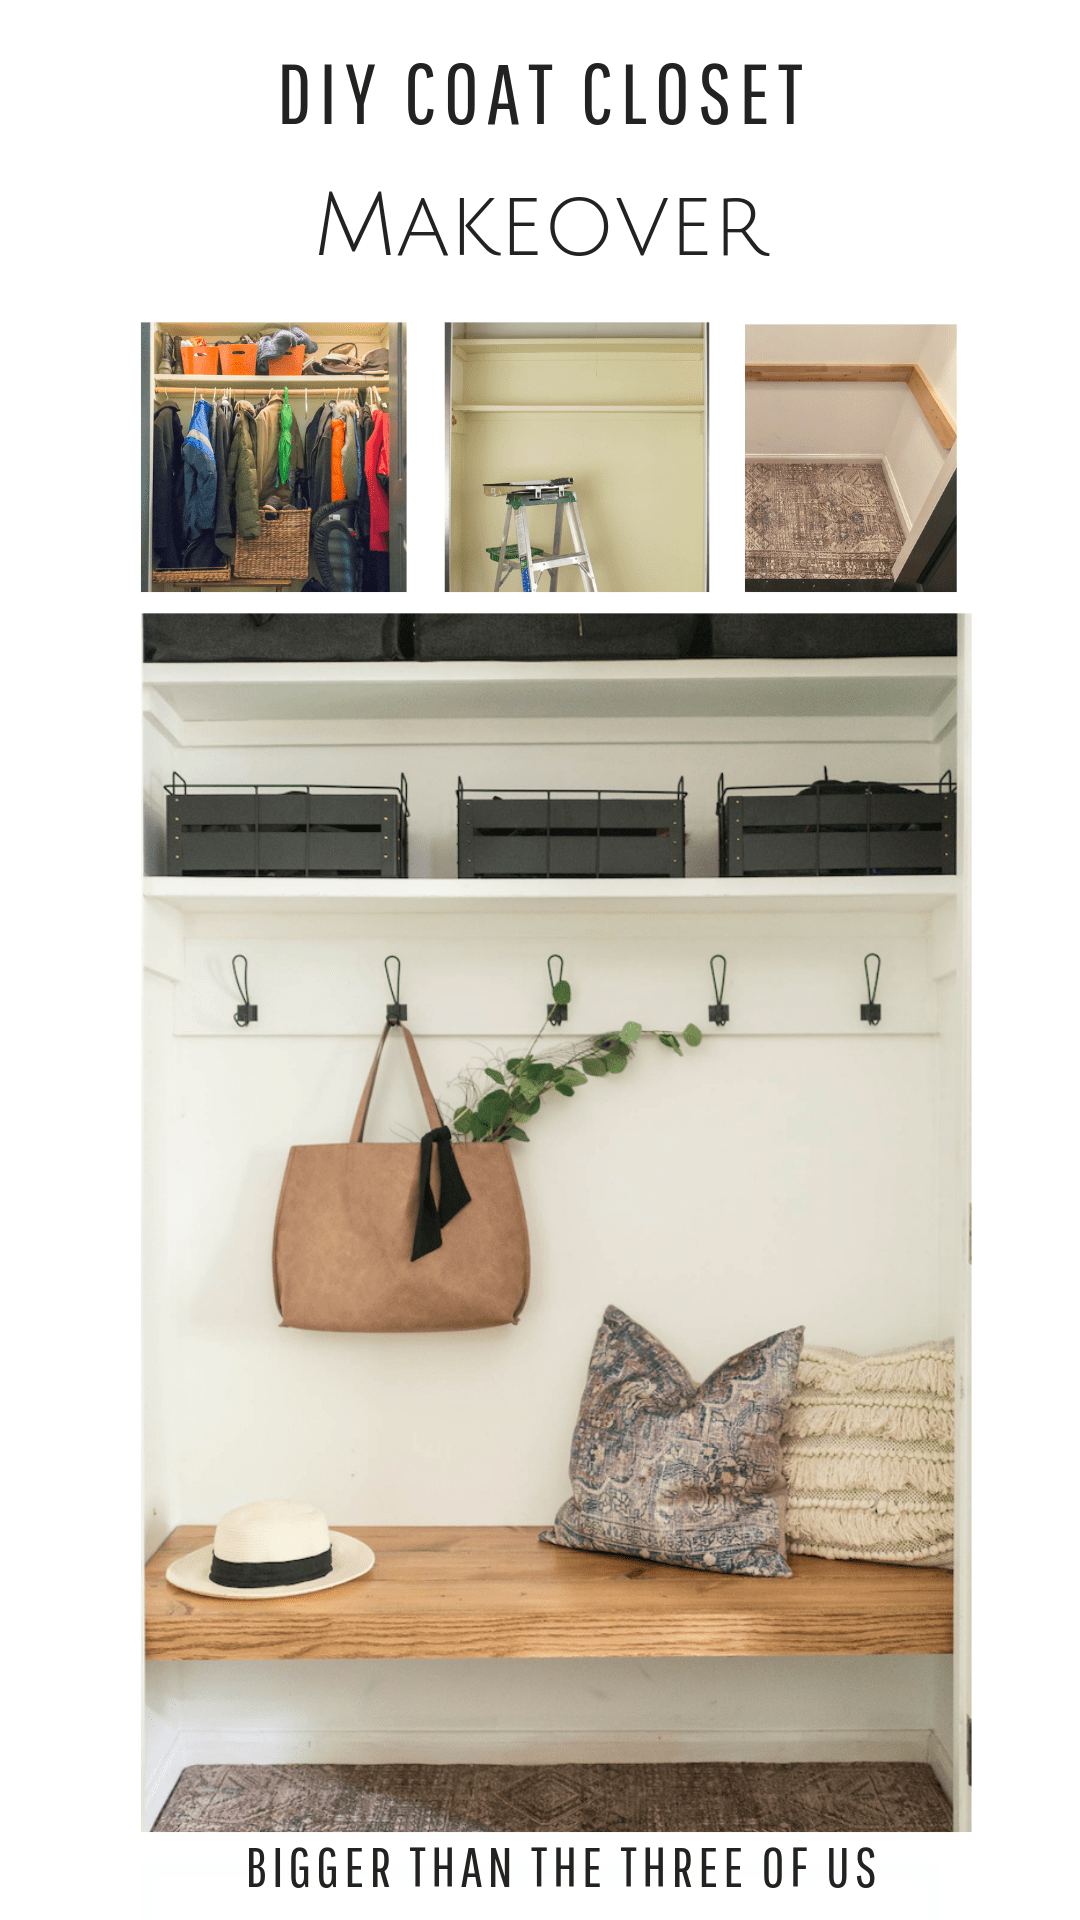
This entryway coat closet makeover features DIY closet bench, coat closet organization, a rug installed as carpet and more. If you are needing entryway closet help, look no further! A few of these entryway closet ideas will take your space from bland to organized in no time!
Have you ever finished a project and then kicked yourself for taking so long to start that project in the first place? That's exactly how I felt when I traded in our crammed closet of coats for this entryway closet makeover. Sometimes, projects can sit and sit around here but I'm happy to say that I finally got the coat closet done and I'm so happy.
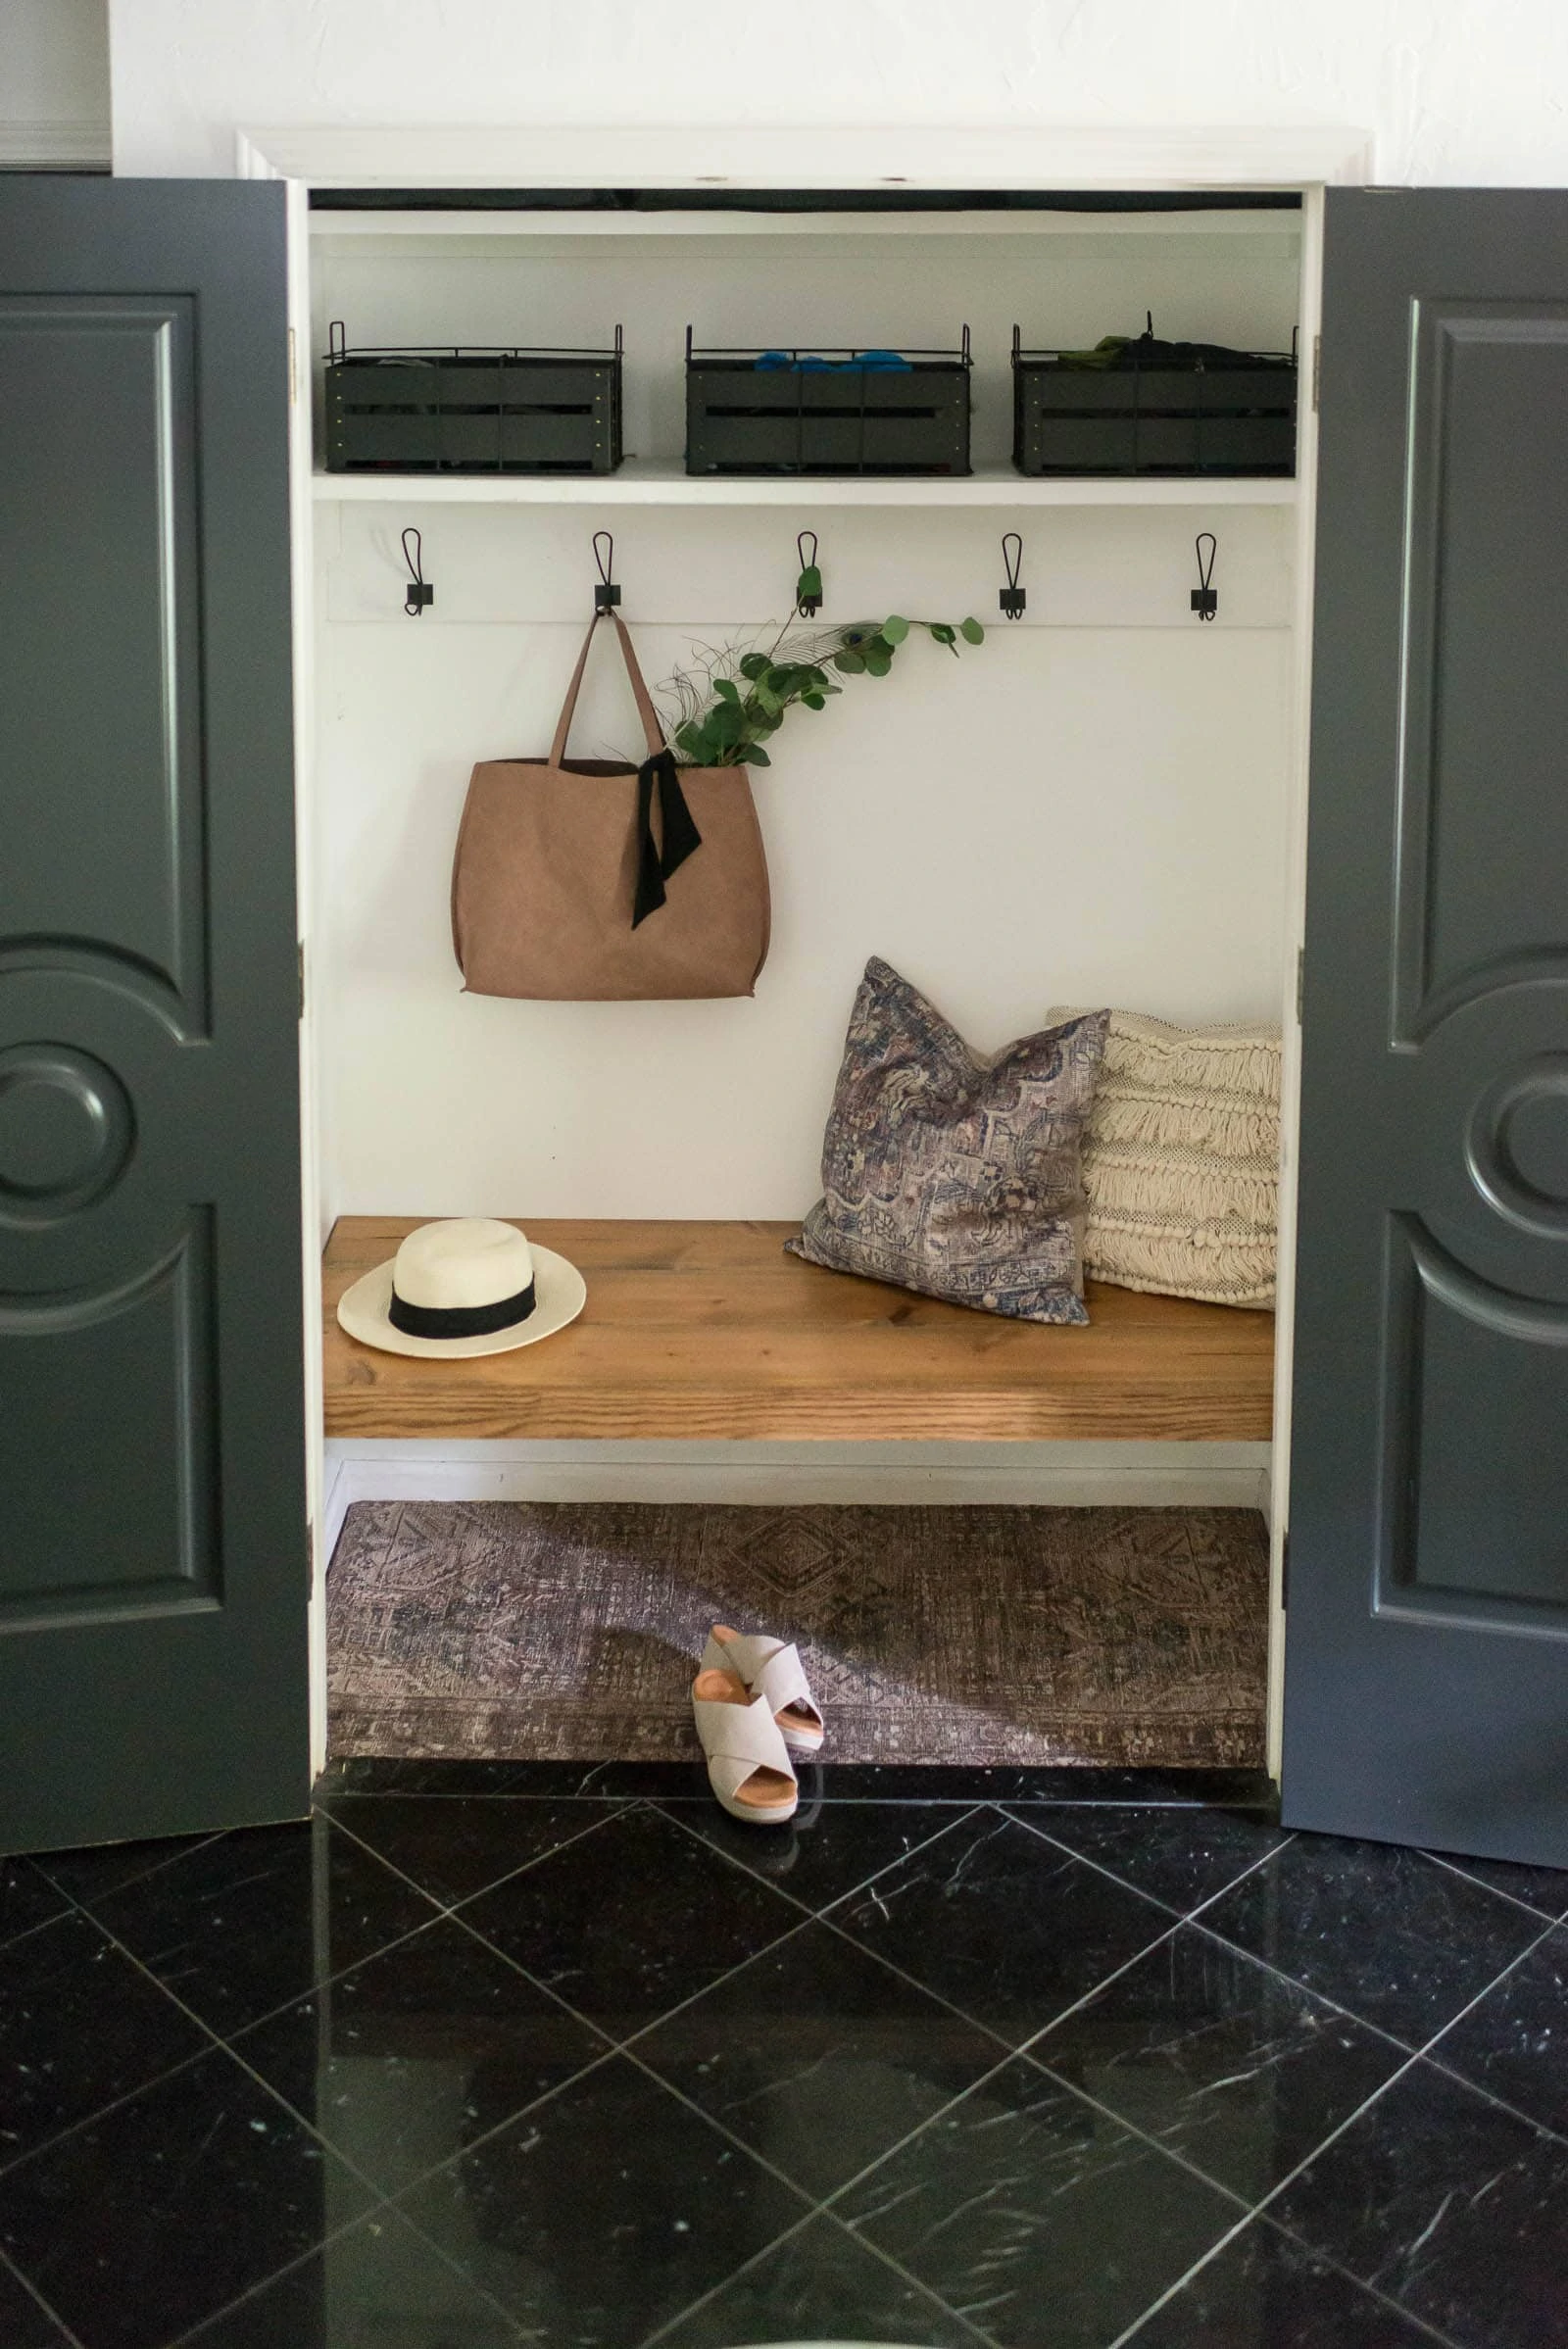
One thing to note about our coat closet is that it is right by our glass front doors. I wanted the space to be organized, contained and pretty when the doors were open. I also wanted it to feel like an extension of our foyer in style and looks.
I'm always such a sucker for seeing the before pictures so you can actually see how far a space has come. This is embarrassing but here's what we were living with in our entryway closet.
Before Photo of Coat Closet
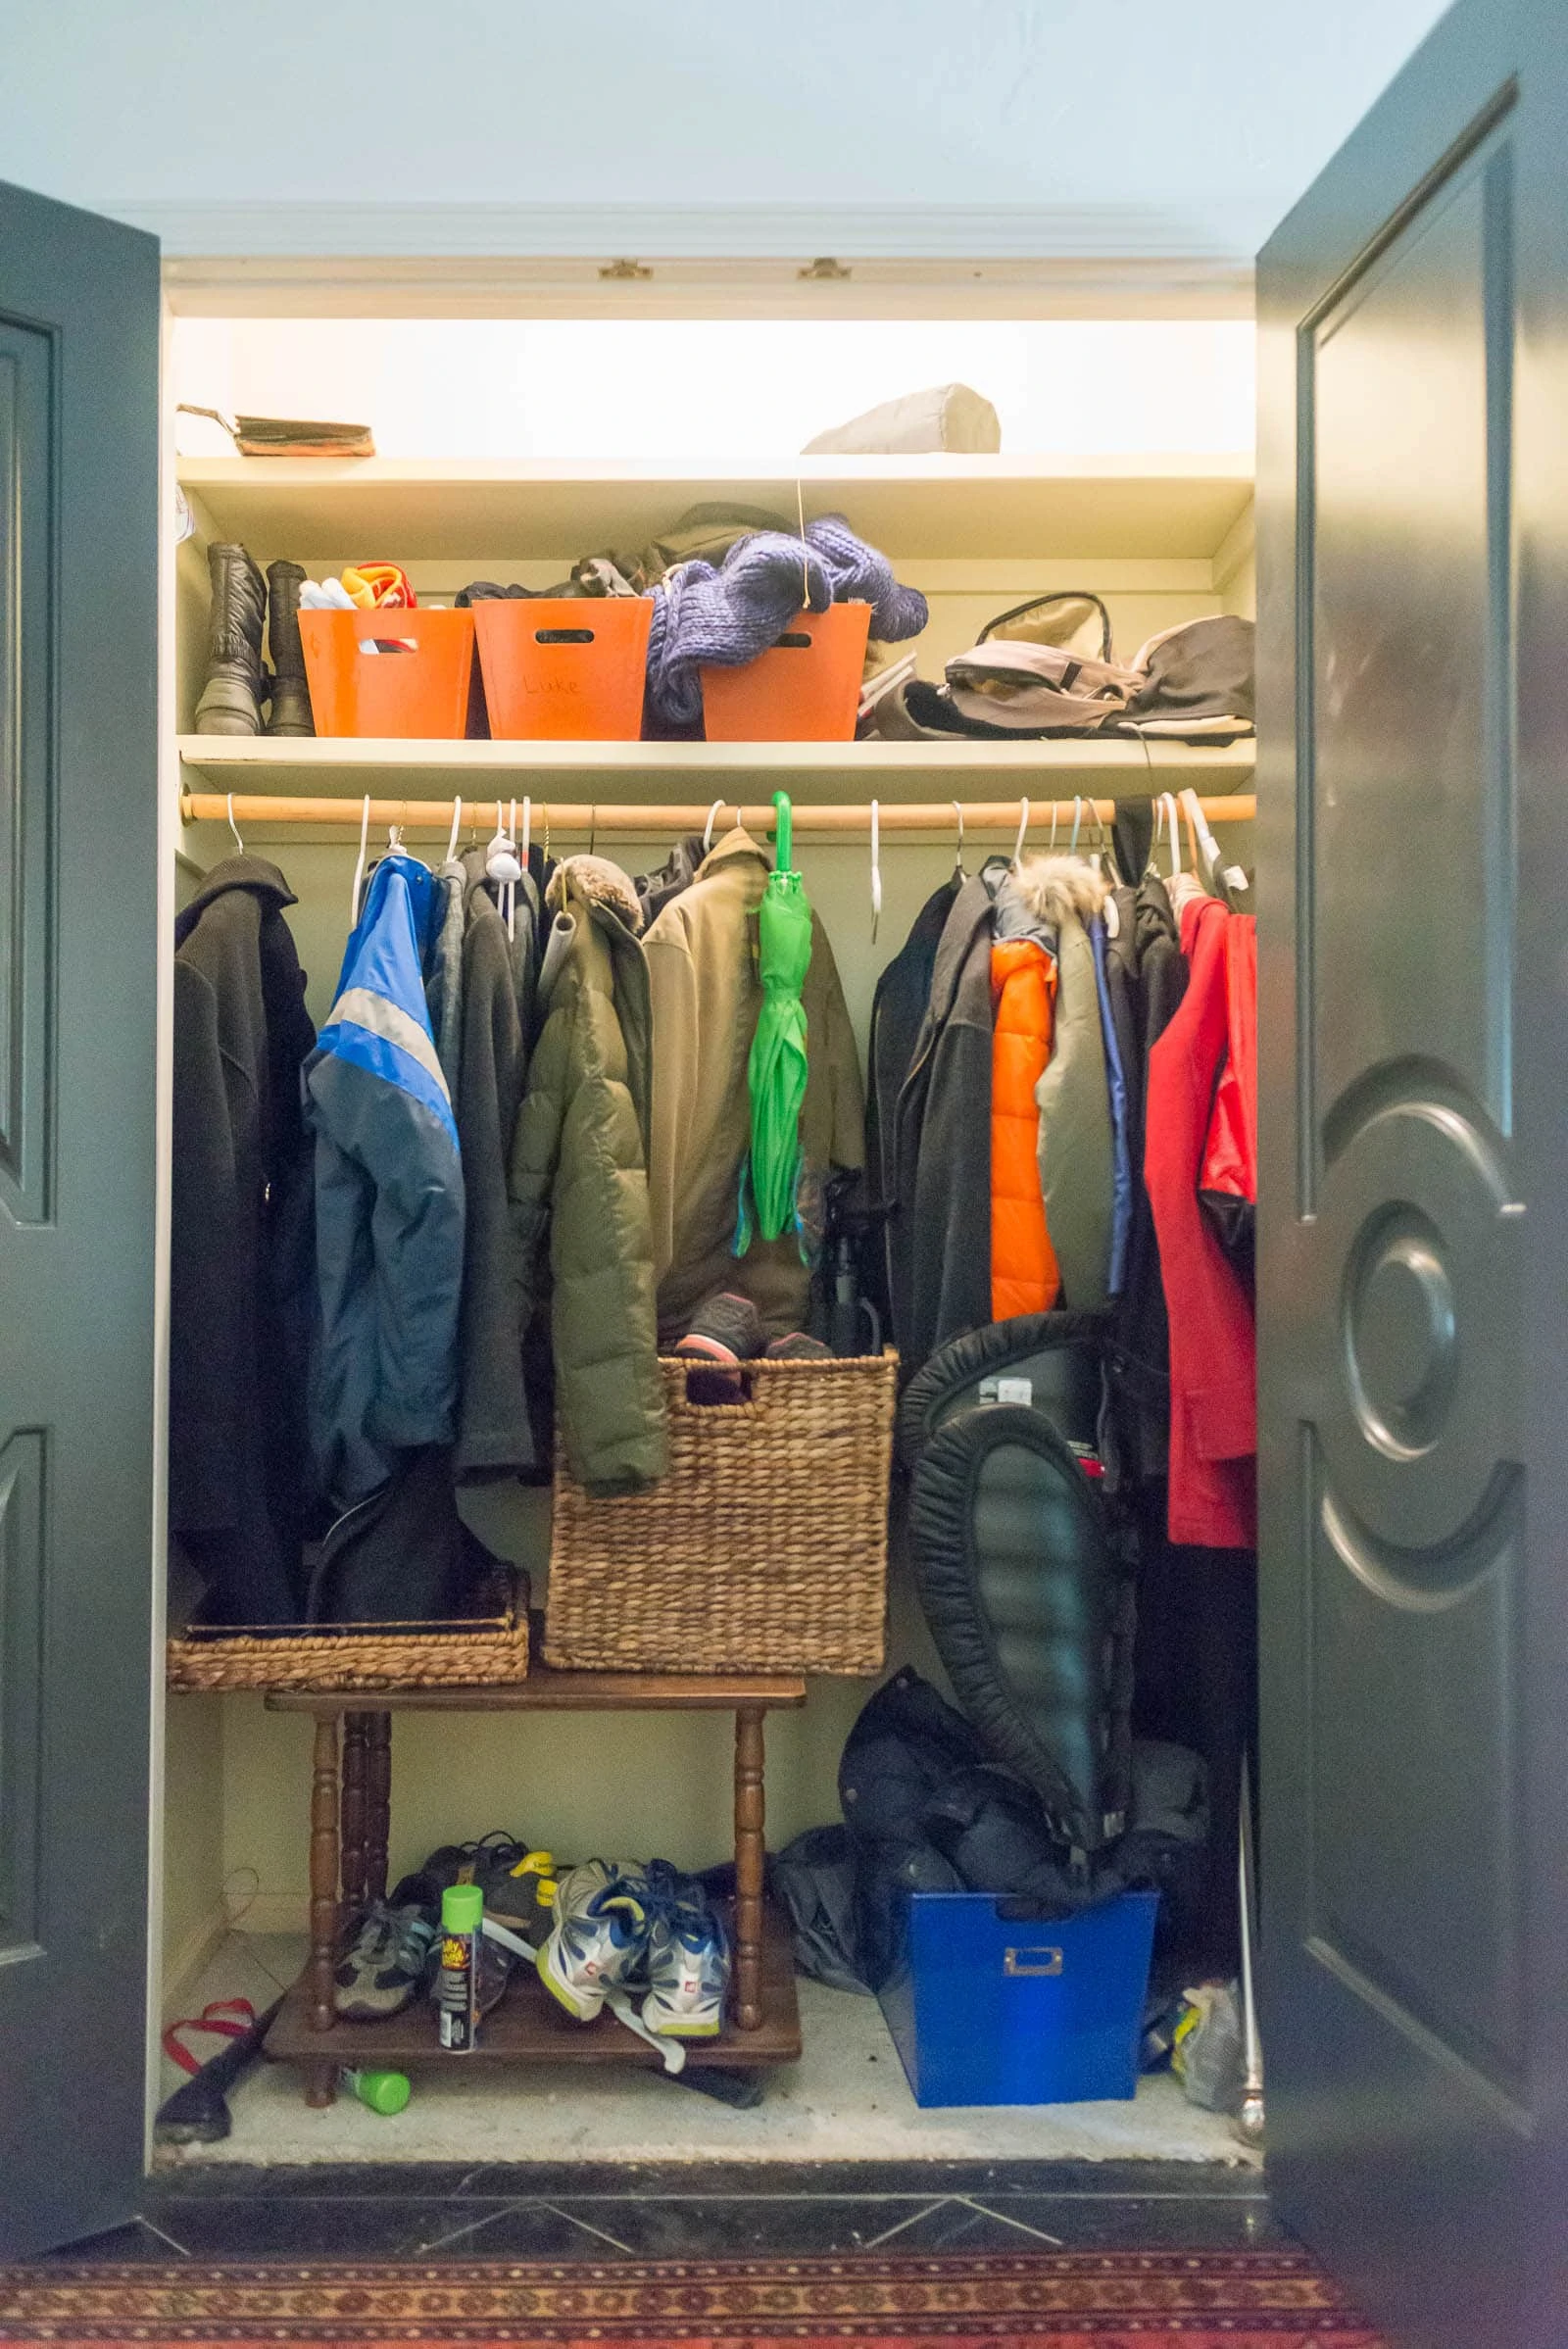
Tell me that's a standard-looking before picture. Or at least tell me that you have one closet that has gross walls, is over-stuffed and has no rhyme or reason to the organization of the closet. =)
I'm definitely going to get into the coat closet organization and talk about how we are now storing coats, shoes, gloves, scarves, etc., but first, let me remind you of the plan for the entryway coat closet. I shared some inspiration pictures in the post about the organization plan if you care to check those out.
I also have a few pins on Pinterest that really inspired my makeover. I love this simple storage solution as well as the "feel" of this space.
So, let's talk about the plan or the plan when I first talked about the space.
Coat Closet Ideas For My Space
Purge+ Share tips on thisExamine how much space we need for whatCleanPaint- Convert pull string light to light switch
Build bench in closetBuild out cubbies or buy basketsHang hooksEnjoy!
As you can see, I accomplished a lot out of my original list and when your original list is over a year old, that's pretty darn good!
Organizing the Coat Closet
The first thing I did was to PURGE and really evaluate if the coat closet was the best place to store each item. Some pieces were easy to decide on and others were harder. For example, I could immediately tell you that I did not need the random end table in my coat closet. I also didn't need silly string (you have that in your closet too, right?!), curtain hardware parts and a car seat back that we were no longer using.
Other pieces were a bit harder to determine. For example, our snorkeling equipment. I have room in the closet to keep it but does it make the most sense for it to be in the coat closet or stored in the same closet that we store our luggage? How about snow boots and ski gear? We live in Missouri so we do get snow but it's only 2-3x per year and generally all within the same 3-4 weeks. Does it make sense to have those things on the shelves in the closet?
I went item by item to determine if it needed to stay in the coat closet, be donated or be stored elsewhere. After pairing down the "easier" items, I went on to the harder things such as the excess amount of gloves, scarves, backpacks, coats and rain gear that we had.
I read the book, The Life-Changing Method of Tidying Up, and that changed my outlook on having lots of things. I wouldn't say I'm a minimalist now, but I really take notice of what we have, what we use and what never gets used. So, I used part of her method when I started going through all the extra clothing items that we had.
It sounds simple, but if you don't wear a coat, there's probably a reason. For me, I'm tall and if the coat doesn't have long arms.... I'm not going to use it. So, getting past the mindset of keeping something just because it's "nice" even if you don't use it has to be hurdled over.
With all of that in mind, I went item by item and purged. I'd say that I easily got rid of half of what was in our closet. We don't each need four winter coats. We can only wear one winter coat at a time and tend to pick the same one over and over again. Luke and I don't vary in weight so we've had coats in our closet that we had in high school. They were still nice, yet for one reason or another, we didn't wear them. Those are the things that I purged.
Entryway Closet Organization Starts with Purging
Like I said, I got rid of about half of what was in the coat closet. So, what did I do with all the winter items that you can't see? On the top shelf of the closet, there are two collapsable foldable bags. Inside one of those bags is all of our rain gear, red gear and hot hands. All the stuff that we travel to Chiefs games with. In the other bag, we have all of our neck pillows, luggage tags, carry-on extra's (battery packs, etc.) that we use every other month or so.
To know how to organize your coat closet, you really have to think about what you need, how much of it you need and how often you get into it.
For example, the Chief's bag is great for us to be up high and stored away because we only get into it three times a year. I know exactly where it is and what is stored in it. It just works. When you are thinking about organization, it needs to "just work" for your daily life.
For the lower shelf, I added three see-through black bins, one for each person in our family. Every person has their own bin filled with a scarf, 2-3 pairs of gloves (light, medium and waterproof), a baklava and a beanie or two. That's really all we need. Nothing is overflowing out of the bins, it all fits nice and tidy.
Instead of having a coat bar that spanned the length of the coat closet, I decided that it would be helpful to just have coat hooks. The coat hooks are easier for all of us to quickly drop our coats on and we can hang backpacks, lunchboxes, gym bags, etc., on them as well.
It's summer right now, so you aren't seeing any winter coats on the coat hooks but I promise there will be when the cooler temps roll in. Right now, we have our library bag (it will always hang there) and a purse and backpack that are pretty consistently there.
So, where are our coats right now?! Well, our coats (the one's we kept - about two each) are stored in our closets upstairs. They fit nicely at the end of each of our clothing bars and when it's time for them, we will bring them out and they will be stored on the hooks. Each person will have a hook for their coat and then the other two hooks will be for the random bags that we all have.
So far, this has been working GREAT! So, let's talk about what we did after we purged and organized.
Entryway Closet Makeover
After purging, the next thing I did was to wipe everything down. The walls were super dirty, the shelves were gross and the trim was disgusting. From there, I painted. I painted everything and it made SUCH A HUGE DIFFERENCE.
If you look closely in the next photo you will see, above the top shelf, I had primed over the original closet color (a dingy creamy yellow).
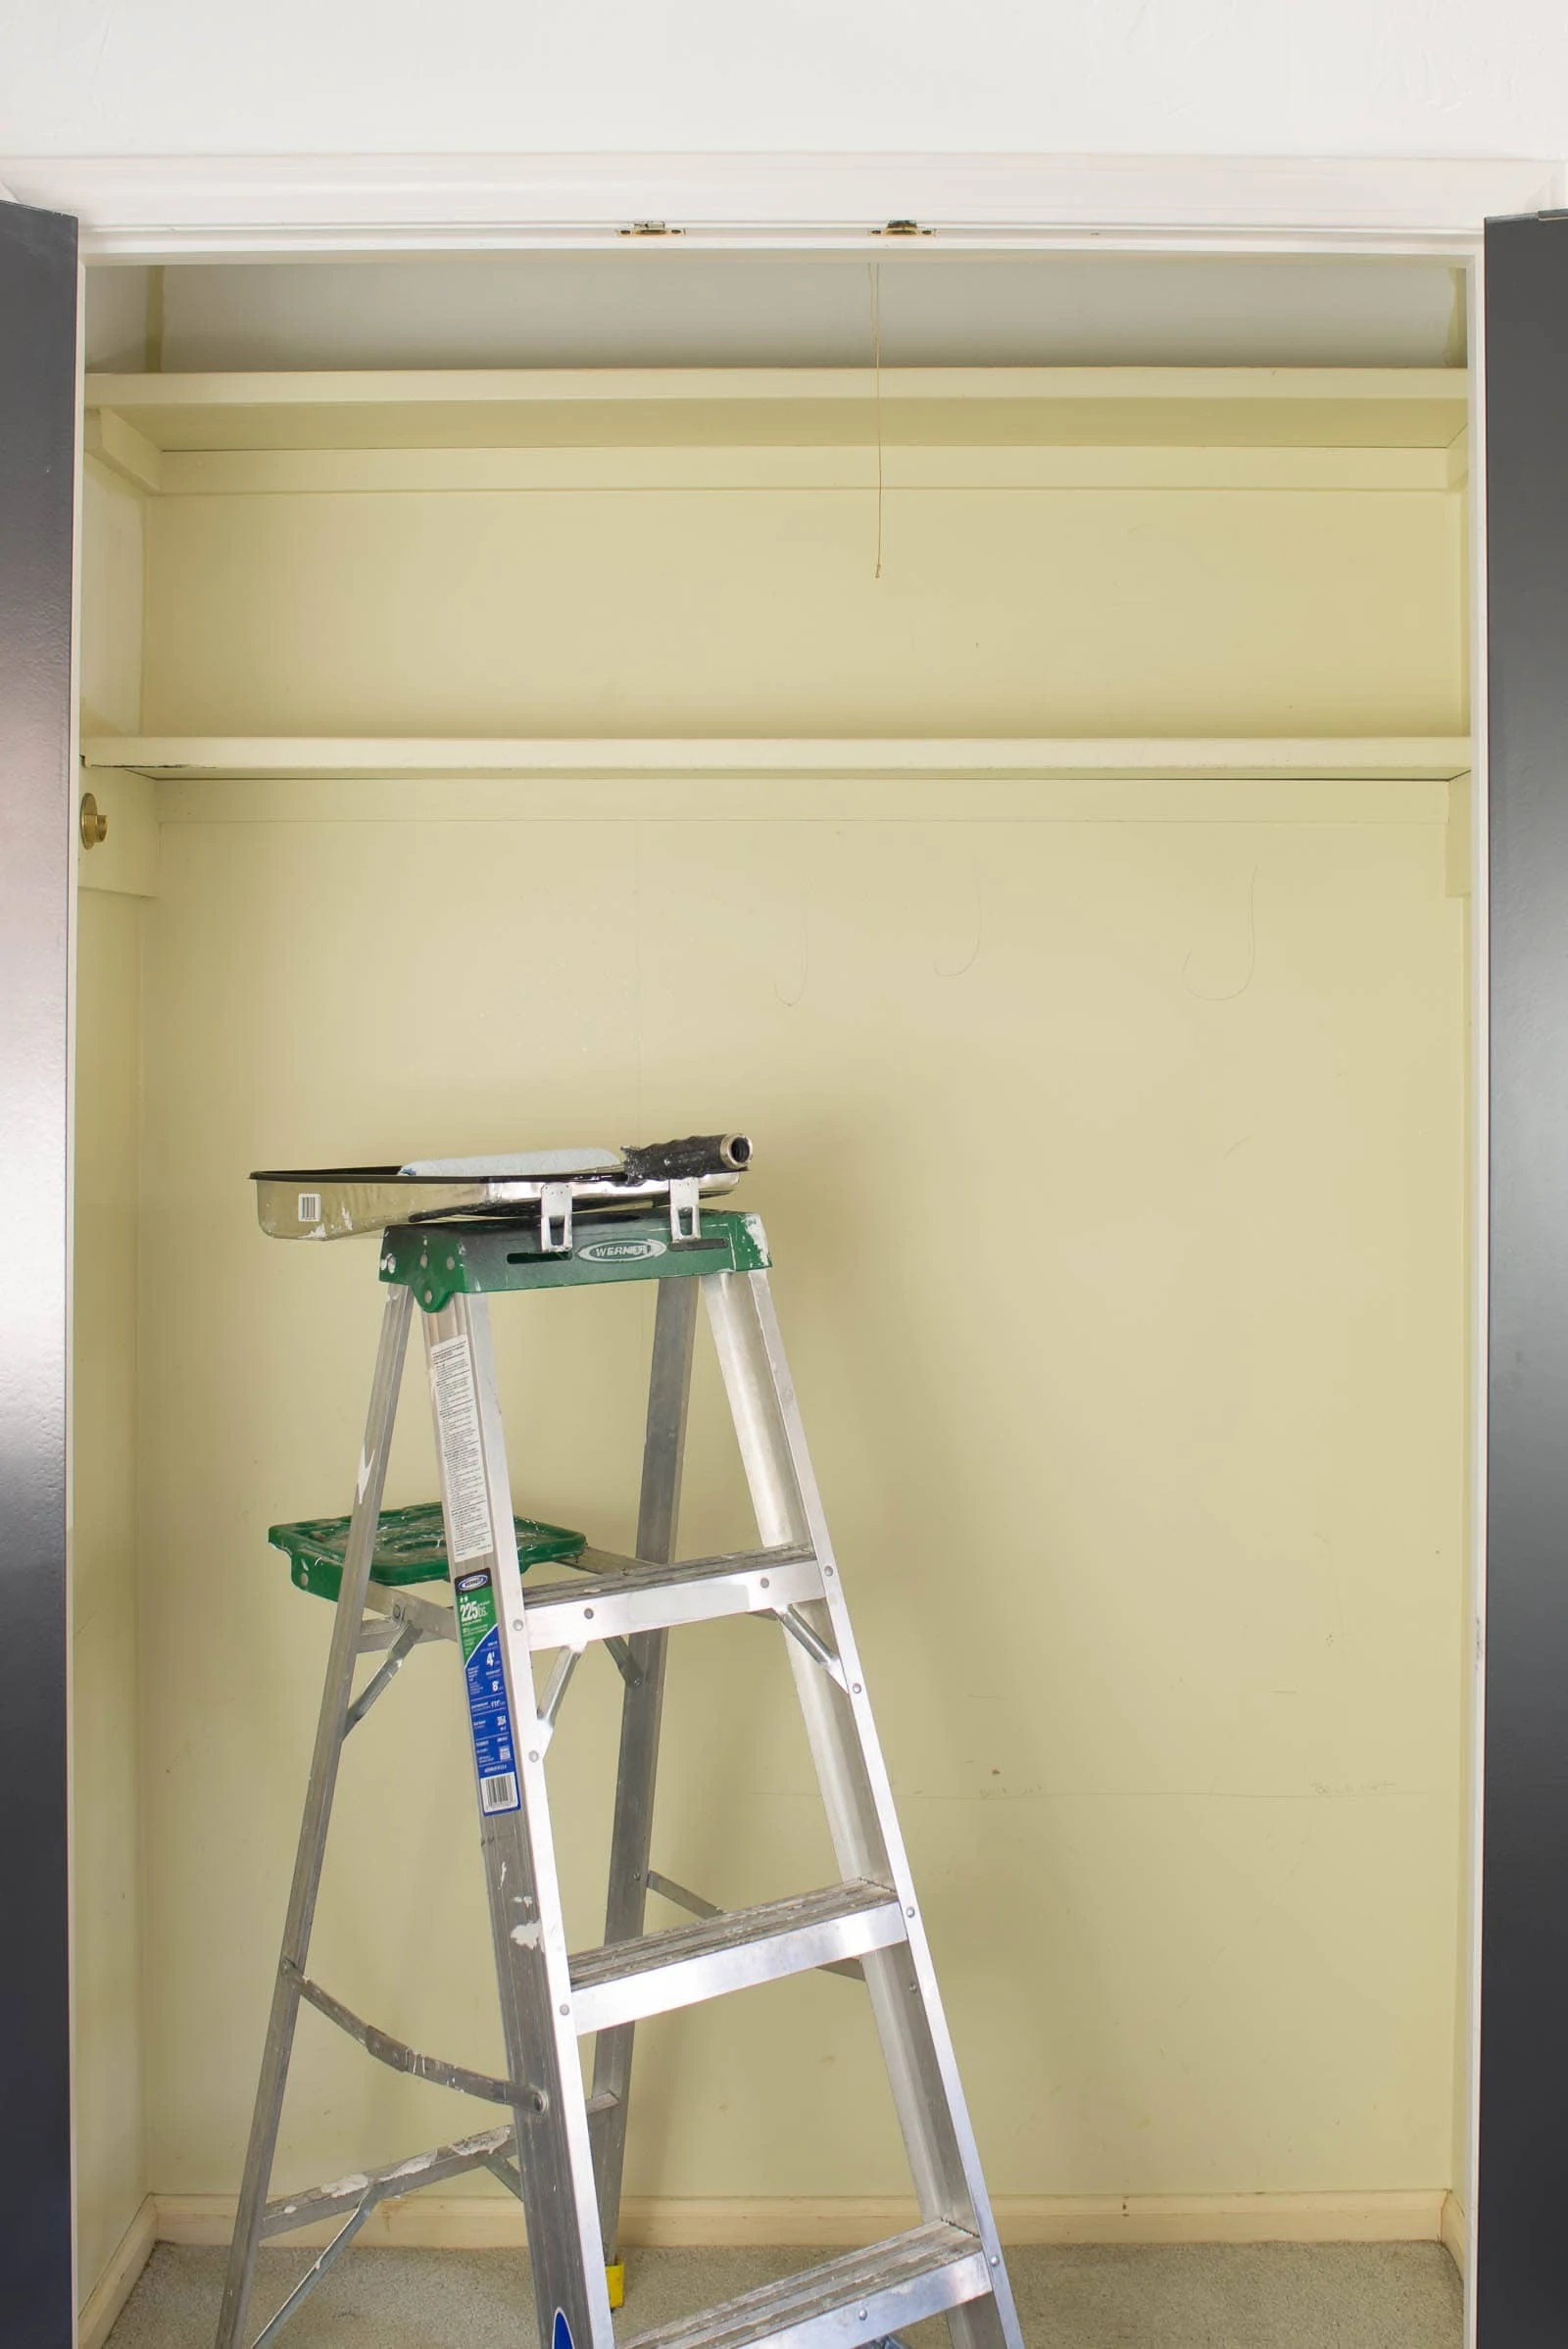
After painting everything, my eye kept being drawn to the disgusting carpet. I had the carpet replaced in our master closet makeover and knew that it wasn't a pricey thing to do but, to be honest, I was just being lazy. I didn't feel up to going to the carpet remnant store and then coordinating with the installer to come out and install a remnant in the tiny closet.
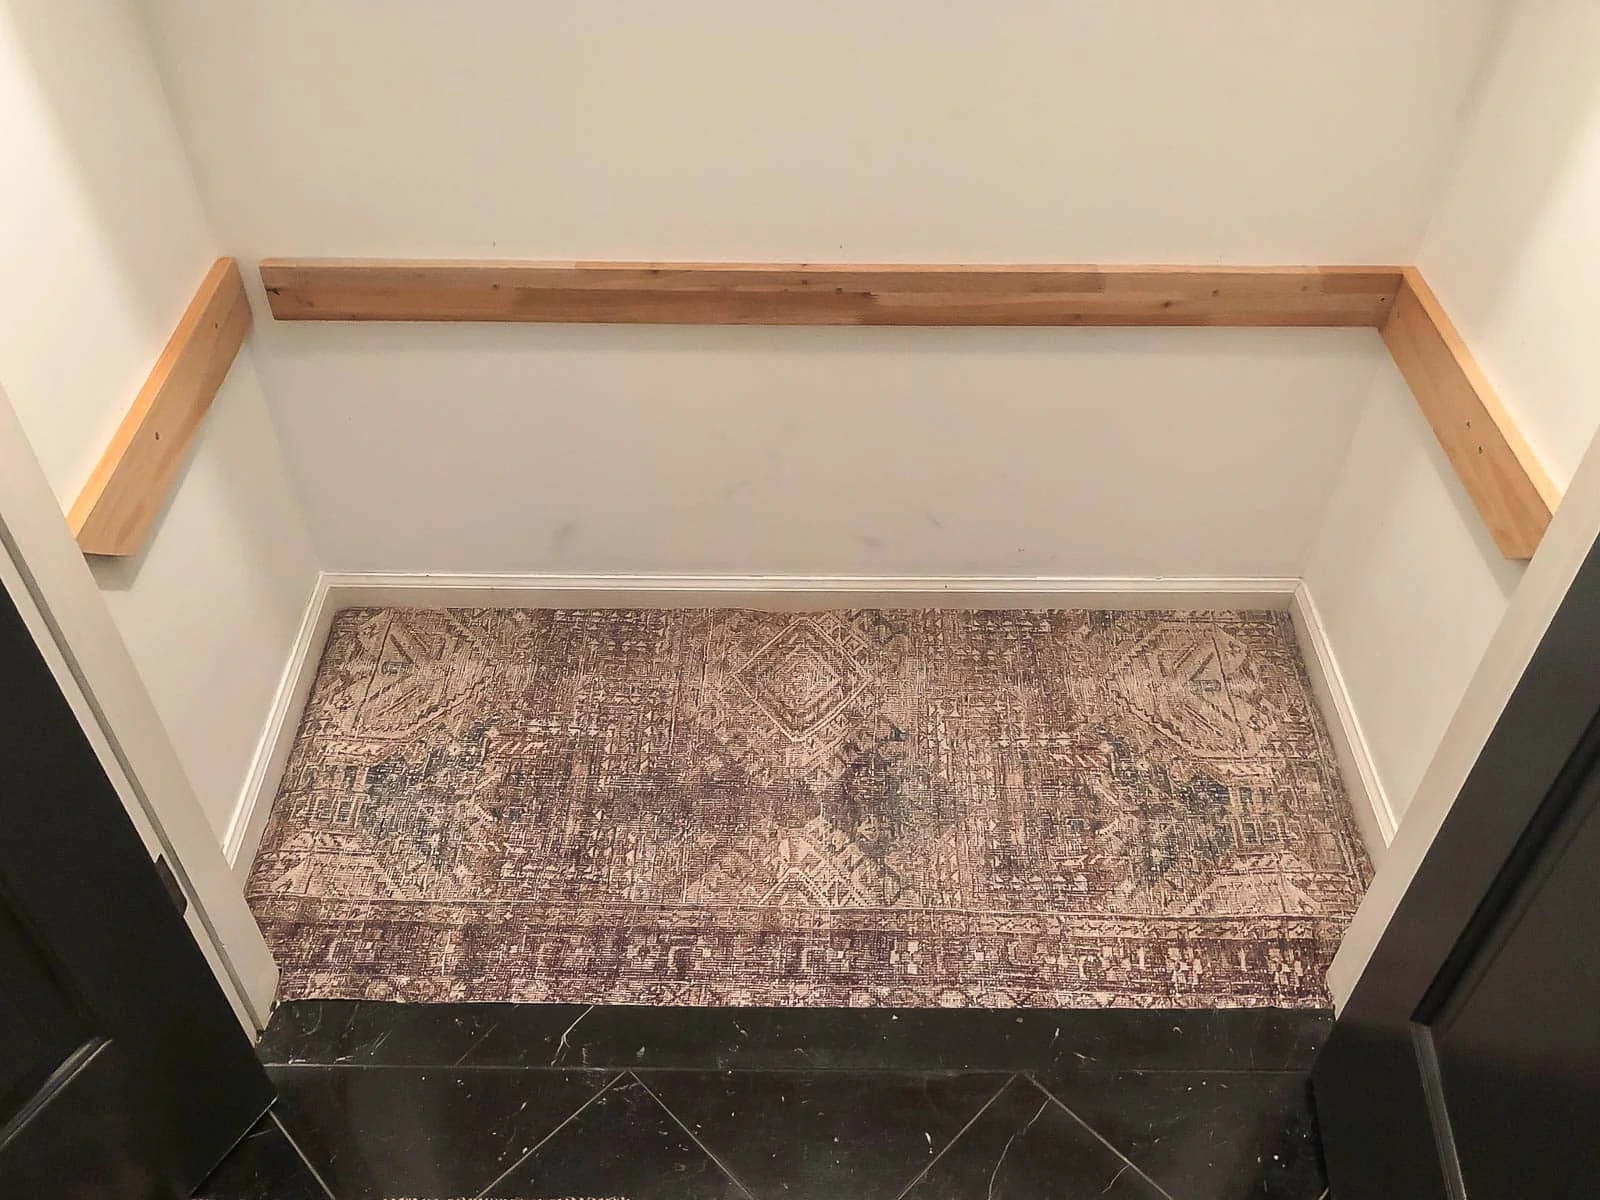
After thinking about it for awhile, I decided to rip the carpet out and try my hand at installing a rug (just like you'd install carpet). I used the old carpet as a template to cut my rug. I cut my rug and then put it into place and pushed it down over the carpet tacks. Guess what?! It worked! I had the rug on hand so it ended up being free. I don't think this method would be great for a high-traffic closet but for a closet that is just opened and not walked all over all the time, it's perfect. Here's a quick mini tutorial on that process.
Entryway Closet Ideas: Install a Rug as Carpet!
Next up on my list was to change out the pull-string light but, it's one that I decided to skip. The pull string works fine and the light is never seen so it seemed silly to invest in changing it when it worked and wasn't going to add anything design-wise to the space. So, after that, it was closet BENCH building time.
Building a Small Closet Bench Seat
When thinking about this transformation, I kept thinking that it would be nice to turn the closet into a mudroom (mini style, of course!). To do that, in my mind, it needed to have an area that we could sit to take shoes on and off. I'd love to be more of a shoes-off type of house anyways so having a place that could store shoes, too, was a plus.
I had the idea to build the bench seat and, ultimately, my son and I started building it. I didn't plan out the bench seat, I just went for it. The goal was to have a pretty, functional bench seat in the closet by using the wood and screws that we had on hand.
From the experience of building our banquette in our eat-in kitchen and the reading loft in Greyson's room, I knew the general idea of how to build the bench.
**For the bench tutorial, below, I had some cedar finish boards in the garage that I wanted to use for the top of the bench. So, I took the width of the cedar boards (I used three) to determine my bench depth overall. I don't have a table saw so ripping a cedar board down by width is challenging for me. I made sure to determine my bench depth off of the finish board size that I had to make it easy.
How to Build a Closet Bench
- Decide on height for bench seat (I wanted about 18" high).
- Using a stud finder, mark your studs. I marked mine at 16" from the floor.
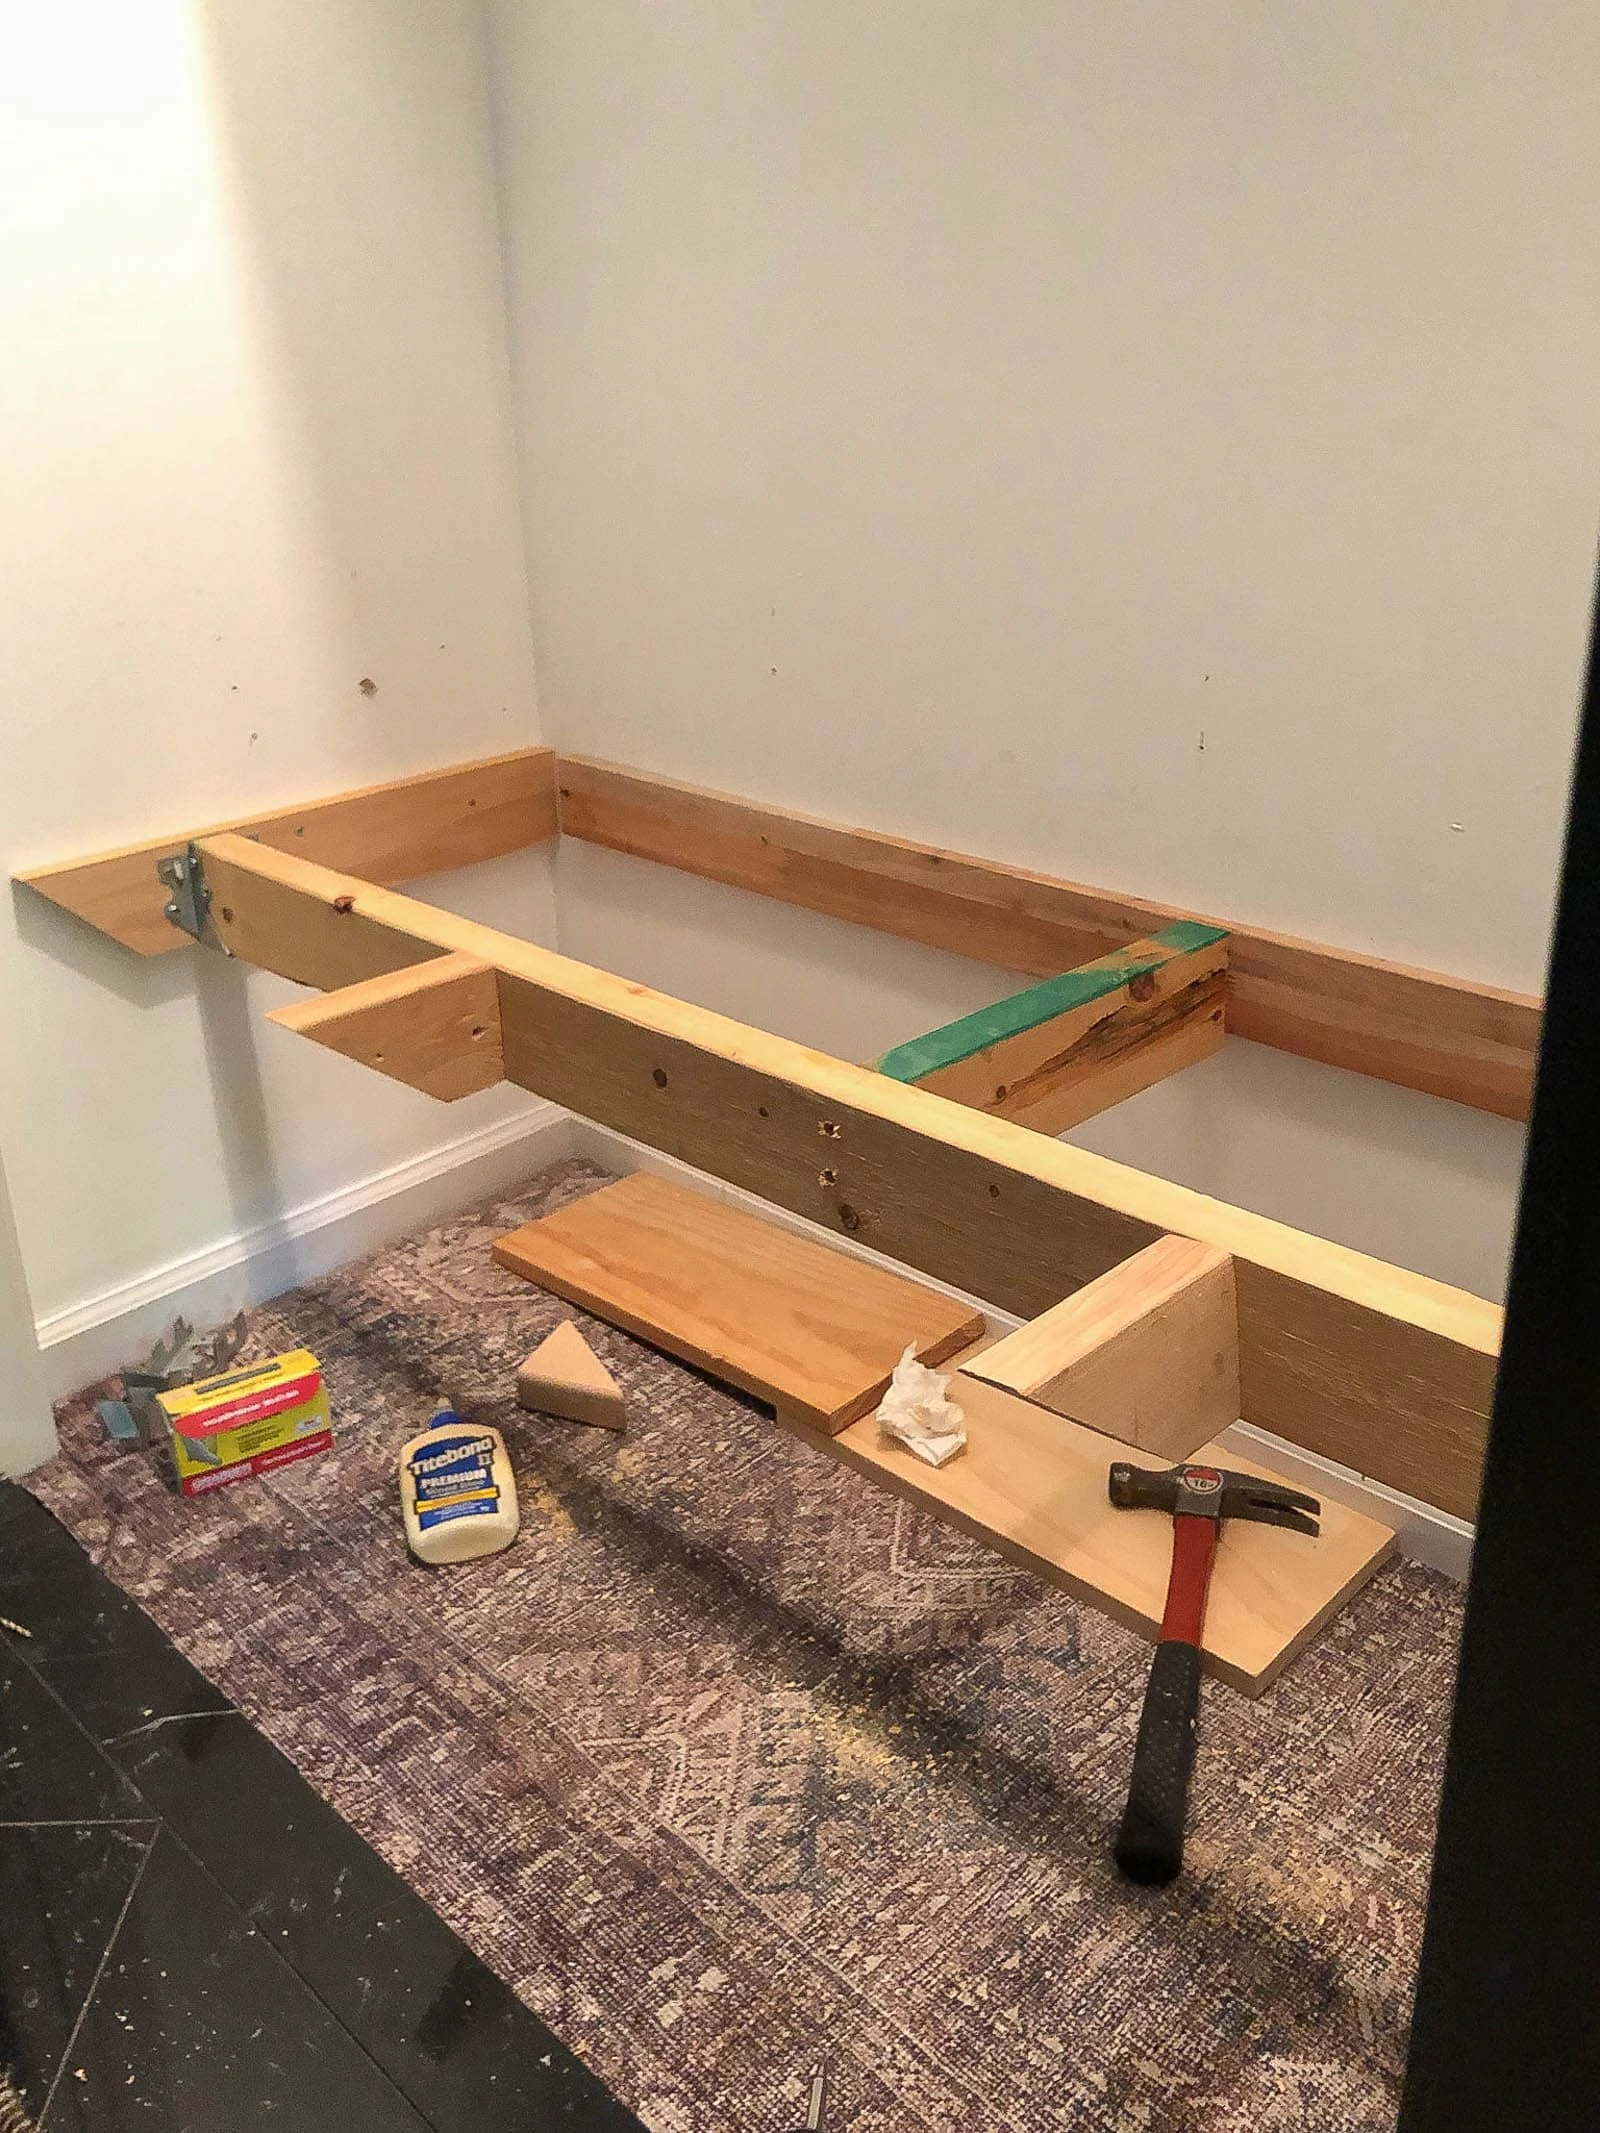
- Cut (1) 2x4* (or similar size board) to the length of your back wall ( I used a miter saw to do this). *I was using random wood that we had in our garage so my back board was a tad short, but it works!
- Attach the 2x4's to the back wall (make sure to hit the studs that you marked).
- Decide on depth of bench seat. Figure out what type of boards you are going to use for the top (or maybe you are going to use plywood that you can cut to any size), but figure out what you want to finish the top off with and how you are going to do that to help determine the depth.
- Once the depth of the bench seat has been determined, from the back 2x4 that is attached, measure out toward the closet entrance to determine the length of your next 2x4 supports.
- Cut (2) 2x4's to length. If wanted, angle the front of your board using the miter saw (this will help hide the supports when viewing the front of the bench). Use wood screws and a drill to attach to each side of the closet.
- At this point, you will have two side supports and a back support attached to studs in the wall.
- Grab two support brackets for 2x4's and attach them (as shown below).
- Add a wood support in the bracket that spans the closet. Continue adding supports as needed.
- Using finish boards (or plywood), cut those to length. Sand and stain at this point.
- Using a finish nailer and compressor, nail the boards (or board) into place.
- To get a finished look, sand and stain a finish board (we used a 3" cedar board) and nail it to the front of the bench.
Hallway Closet Ideas for More Storage
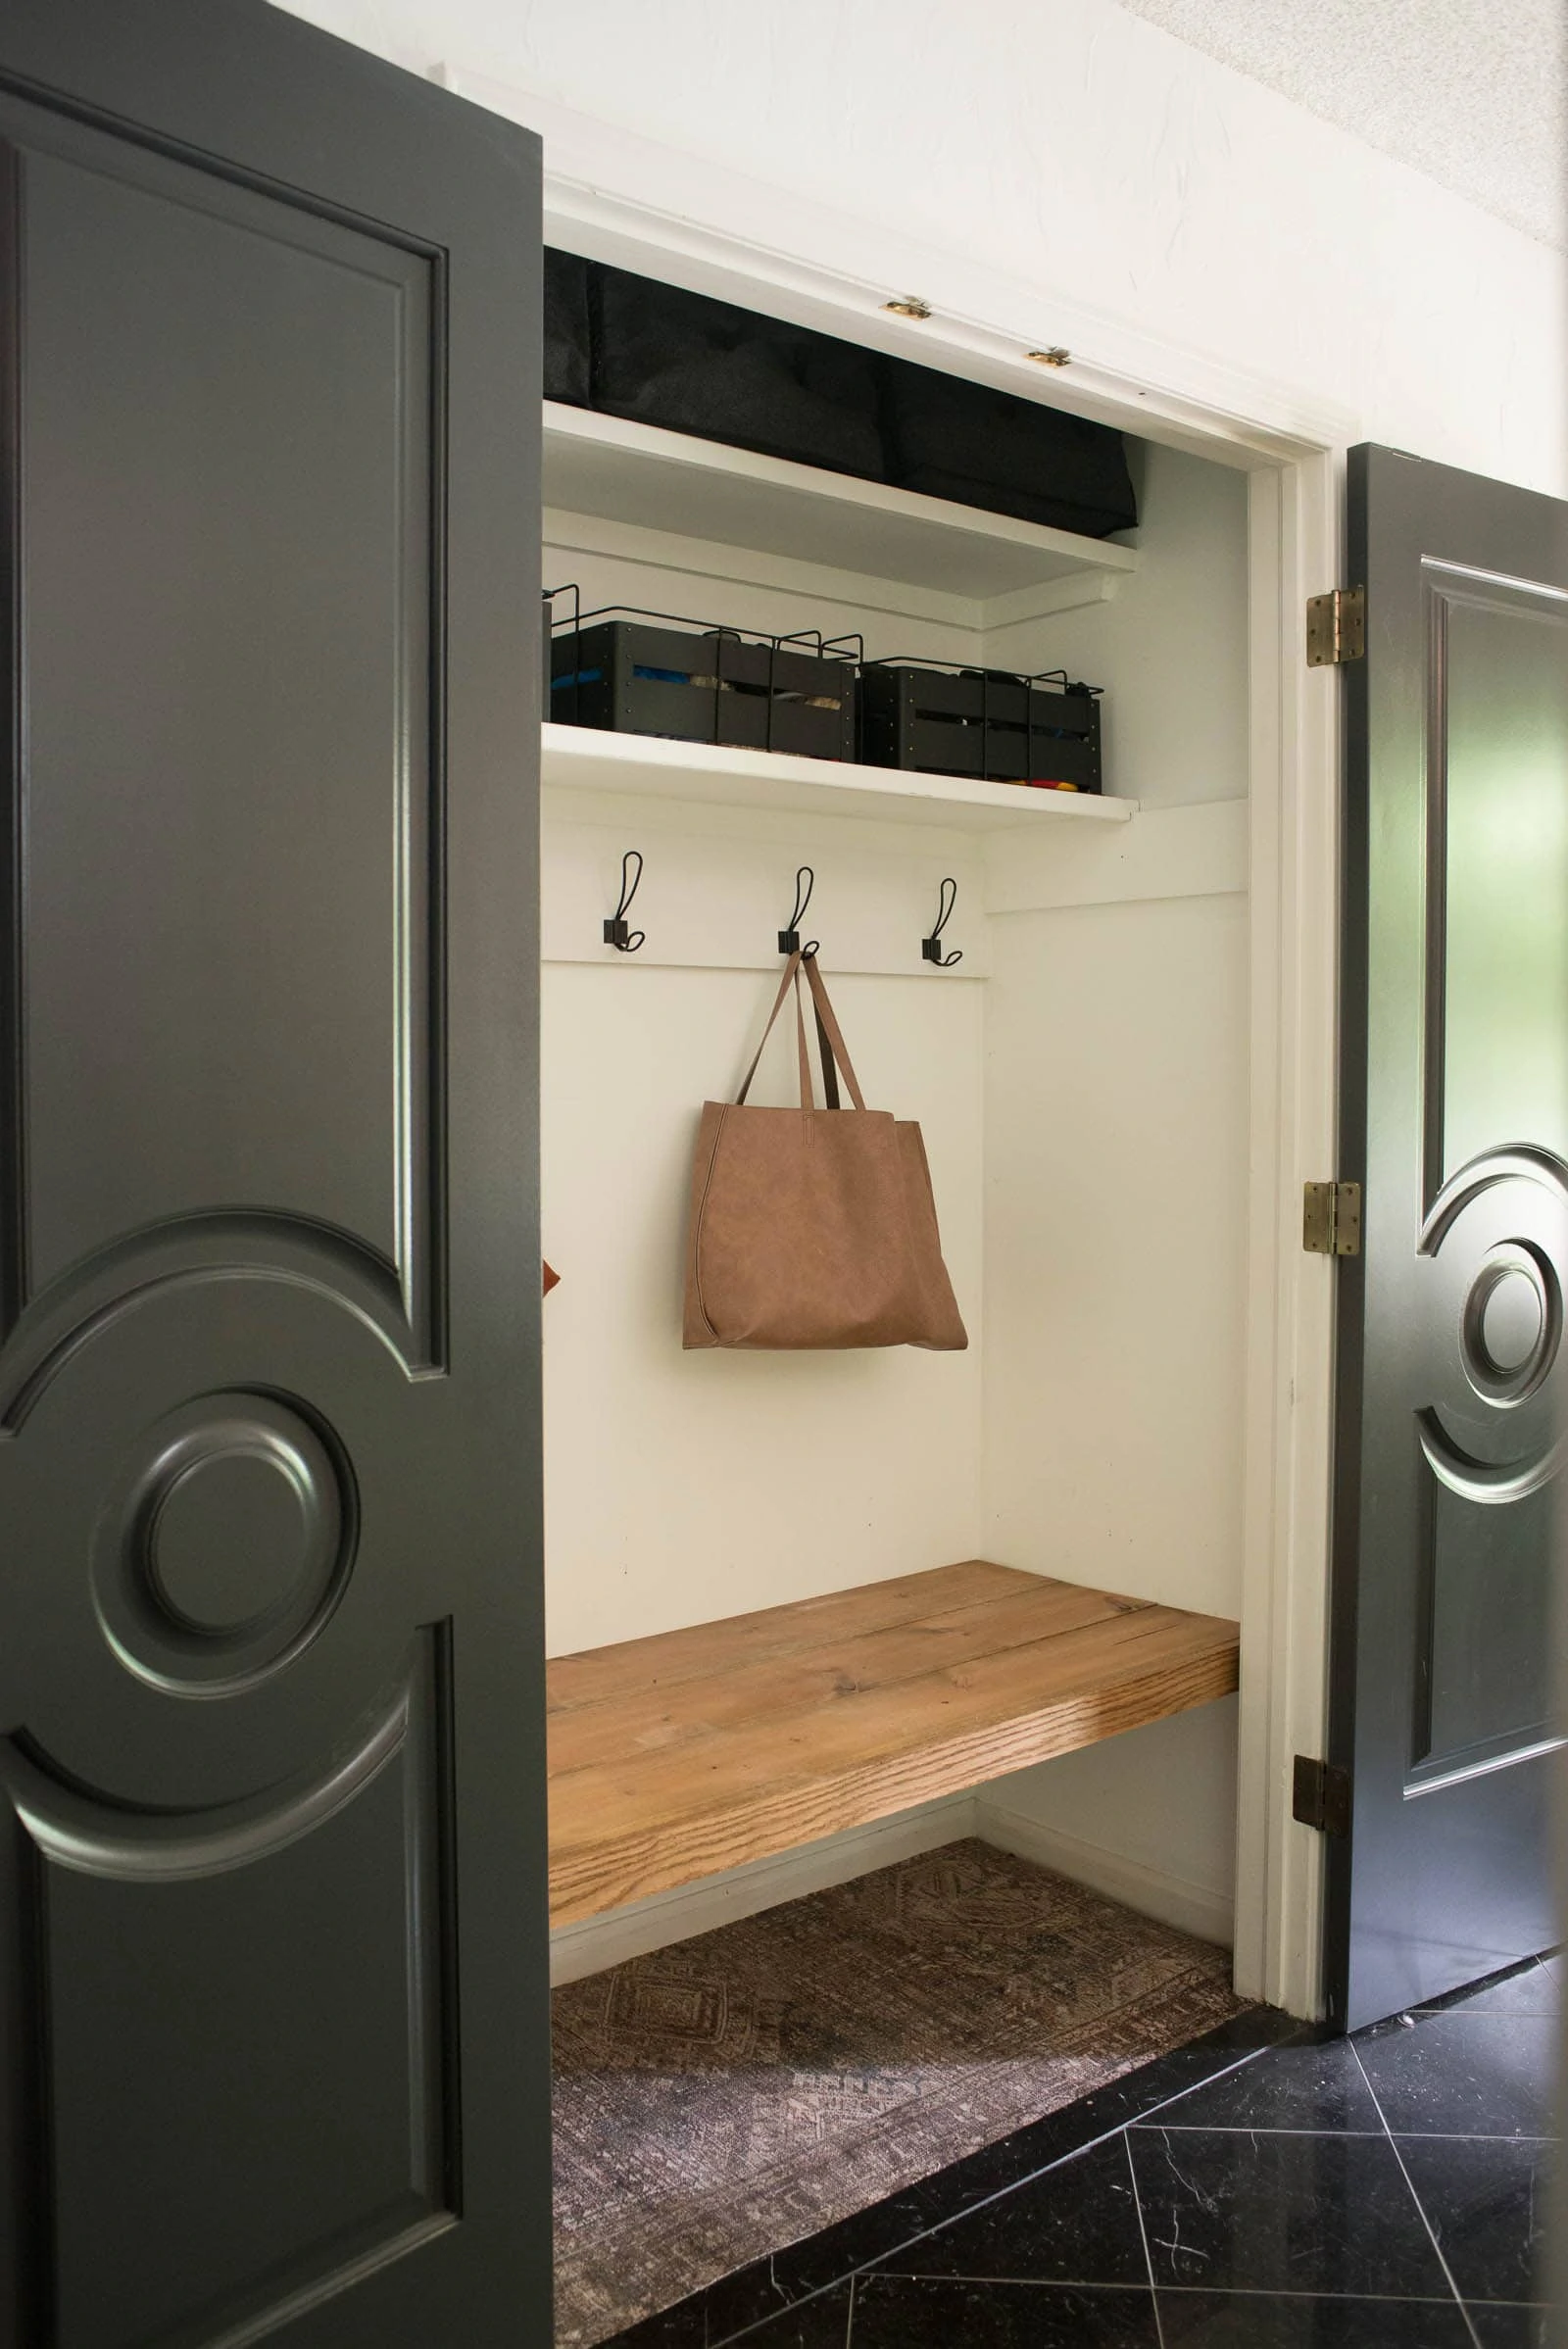
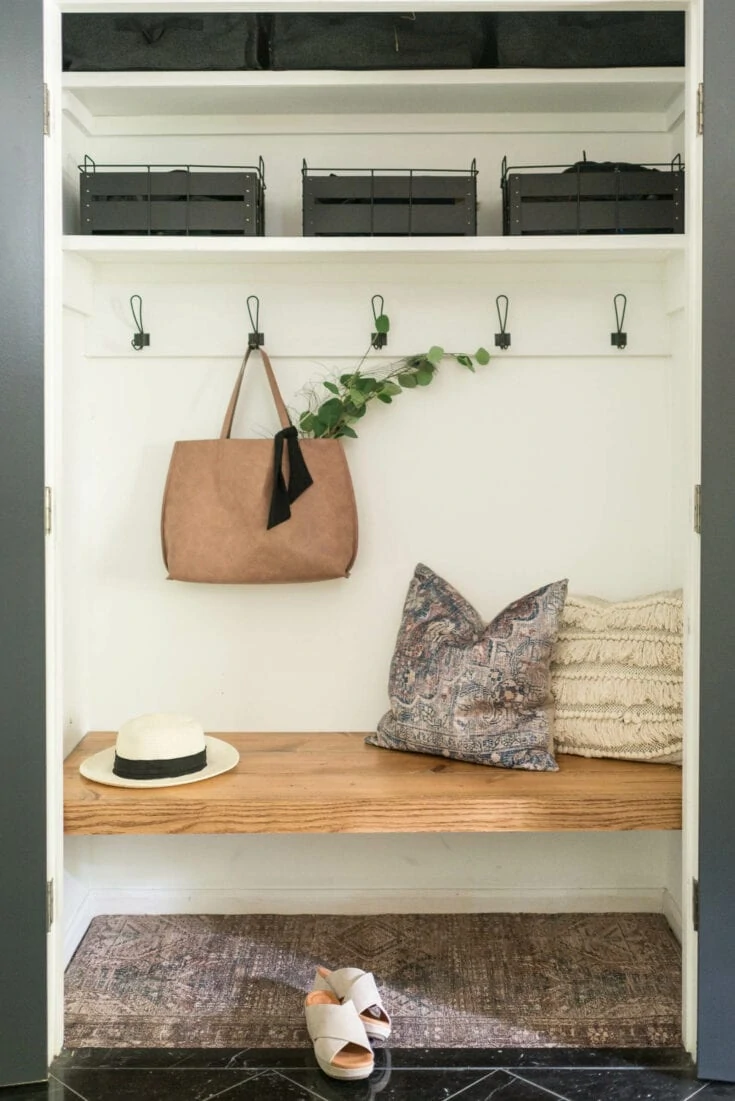
To finish off the closet, I added the hooks for the coats. Adding five hooks with drywall screws (four screws per each hook) is a super annoying project. To save some annoyance, we cut a board to the length of the closet and screwed it in. After painting and caulking it, we used wood screws to hang the hooks. The board doesn't look out of place because it sits right up flush with the shelf. If you were hanging hooks on an open wall, I wouldn't recommend this method but if you have a situation like we do, where the wood piece just looks like a part of the built-in, then it's definitely an easier way of hanging a bunch of hooks.
After the hooks, I brought down a few pillows and called the coat closet done! It's been especially great since school started. I love having a "home" for items that we use everyday or every week. We didn't have a "home" for our library book bag and now everyone knows where it is at all times. When we finish a book, we drop it in the bag and when we are headed to the library, we grab the bag from "it's spot". It's great.
Since you all know that I prettied the space up a bit for photos, here's how the entryway closet looks on the daily...
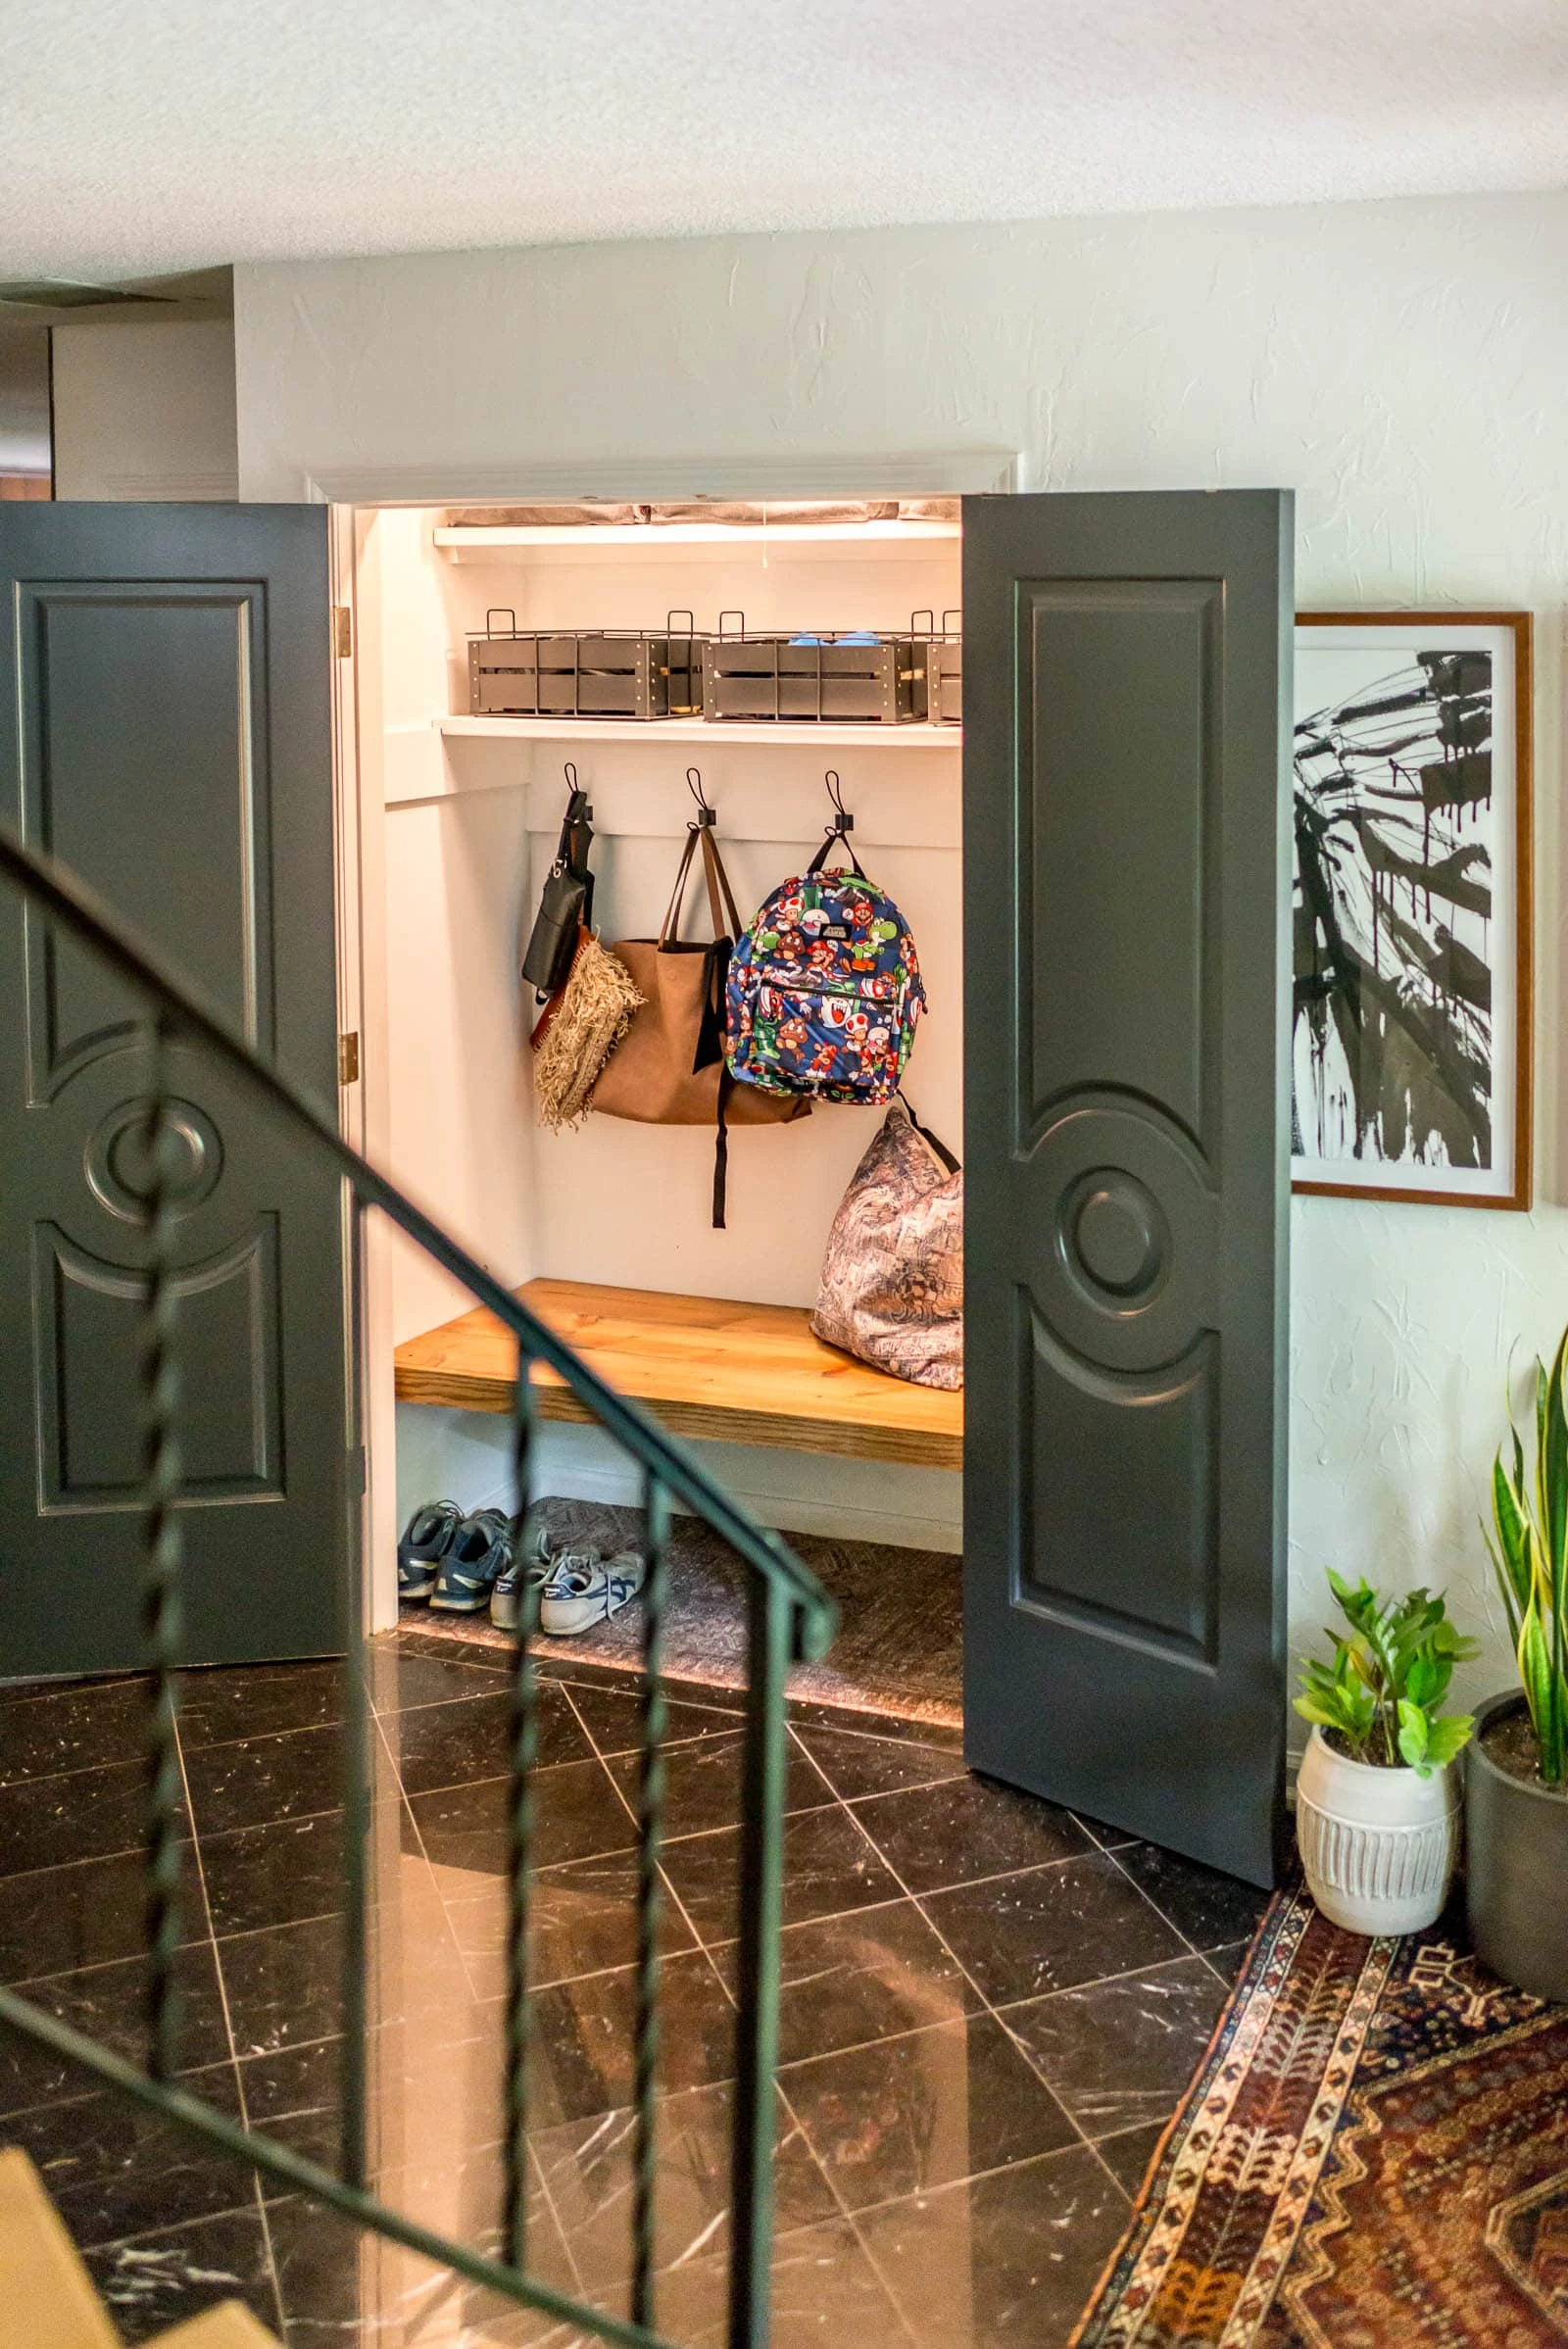
I think the takeaway is that adding function to your house is ALWAYS a good idea so think about what spaces aren't working for you and figure out how to make them work for you. Spy our home tour for more photos of how this space relates to the rest of our home.
If you are a family that doesn't wear shoes in the house, adding more clever entryway shoe storage would be good!
So, tell me what you think! Would you ever do something similar? Or, would you consider adding a wallpaper surprise inside your coat closet? I'm pretty smitten with that idea, too!
Coat Closet Makeover with a Simple Closet Bench & a Rug as Carpet
Makeover your coat closet with by building a simple closet bench with scrap wood! Plus, other ideas for entry closet organization and more!
Materials
- Hardwood
- Wood Screws
- Nails
- Stain
- Poly
Tools
- Miter Saw
- Air Compressor
- Finish Nailer
- Level
- Drill
- Tape Measure
- Pencil
Instructions
- Decide on height for bench seat (I wanted about 18" high).
- Using a stud finder, mark your studs. I marked mine at 16" from the floor.
- Cut (1) 2x4* (or similar size board) to the length of your back wall ( I used a miter saw to do this). *I was using random wood that we had in our garage so my back board was a tad short, but it works!
- Attach the 2x4's to the back wall (make sure to hit the studs that you marked).
- Decide on depth of bench seat. Figure out what type of boards you are going to use for the top (or maybe you are going to use plywood that you can cut to any size), but figure out what you want to finish the top off with and how you are going to do that to help determine the depth.
- Once the depth of the bench seat has been determined, from the back 2x4 that is attached, measure out toward the closet entrance to determine the length of your next 2x4 supports.
- Cut (2) 2x4's to length. If wanted, angle the front of your board using the miter saw (this will help hide the supports when viewing the front of the bench).
- Use wood screws and a drill to attach to each side of the closet.
At this point, you will have two side supports and a back support attached to studs in the wall. - Grab two support brackets for 2x4's and attach them.
- Add a wood support in the bracket that spans the closet. Continue adding supports as needed.
- Using finish boards (or plywood), cut those to length. Sand and stain at this point.
- Using a finish nailer and compressor, nail the boards (or board) into place.
To get a finished look, sand and stain a finish board (we used a Cedar 3" board) and nail it to the front of the bench.
Coat Closet Before and After

cassie bustamante
awesome job, ashley! love the rug inside, too!
Ashley Mayes
Thanks Cassie! I think the rug part turned out great.
Jessica | House Homemade
Looks awesome! Love how it turned out
Ashley Mayes
Thanks Jessica! It's really working well for us.
Haley Hill
Ashley, this looks amazing! I have an entry way closet right inside my front door and I think a little makeover like this would be perfect!
I think I will add a mirror or maybe try my hand at wallpapering the back wall if I do mine. The carpet in my little closet is NASTY so this rug idea is great!
Ashley Mayes
Thanks Haley! Our carpet in there was so nasty too. I like your plan to add a mirror!
Sally
A big improvement for not too much expense/effort!
I’m fairly sure you meant that you stored a balaclava per person rather than baklava - although truth be told...!
Ashley Mayes
Great catch Sally! ha. =)
Diane
Looks so good that I would leave the doors open all the time. Well done!
Ashley Mayes
Thanks Diane! It will get messier as it gets colder, but I do love it!
Cindy
Hi Ashley. I’ve just recently discovered your blog; I love it and have since subscribed. I love your style and many diy projects- I have very similar taste and see many things I’ve chosen for my home reflected in your design.
I did a similar Reno to my entry closet choosing coat hooks over using a rod. Although, we struggle to declutter our outerwear as we get a good and proper winter here and often need a couple of coats at hand, ie. one respectable coat and a work coat (and of course, a library bag, too). To accommodate, Ive added a double row of hooks.
I’d like to add an upper shelf and envision a bench as you have done but not sure we can squeeze it in with the double sets of hooks. Could you tell me the height of your bench and the height of your row of hooks?
I may just remove the second row of hooks so I can have a bench. I really love how yours looks.
Ashley Mayes
Hi Cindy,
Thanks for following along! Our bench seat top is at 19" and the hooks are at 60". You've inspired me to focus on my entryway this week. It's gotten to be a hot mess inside that closet lately. =)
Hope that helps. Let me know if you have more questions.
Ashley
Cindy
Excellent, thanks so much for the heights. I will have to get out the tape in the morning and see if I can fit a bench. Much appreciated
Kyra Lopez
What color did you use on your doors⁉️
Also thanks so much! I plan to do this to my front closet very soon!
Ashley Mayes
Hi, It's cracked pepper by Behr! Thanks!!
Alaina
Love it! What are the dimensions of this closet?