

Cut the scrolls off your old iron stair spindles and transform your stair spindles into fresh black stair railing. By grinding off the scrolls, sanding and painting the railing black, you'll get a more modern handrail look without breaking the bank.
Modernizing Balusters
When we first moved in, to be honest, the out-of-date wrought iron stair rails didn't even compare to some of the worst design offenders in our house. I didn't give the wrought iron staircase much thought at first. As we started updating the house, putting in new front doors, and having the wood flooring installed, etc., the metal stair railing started to stick out like a sore thumb. Well, that and my poor choice of spray painting my entryway chandelier purple (what was I thinking?!). Let me show you!
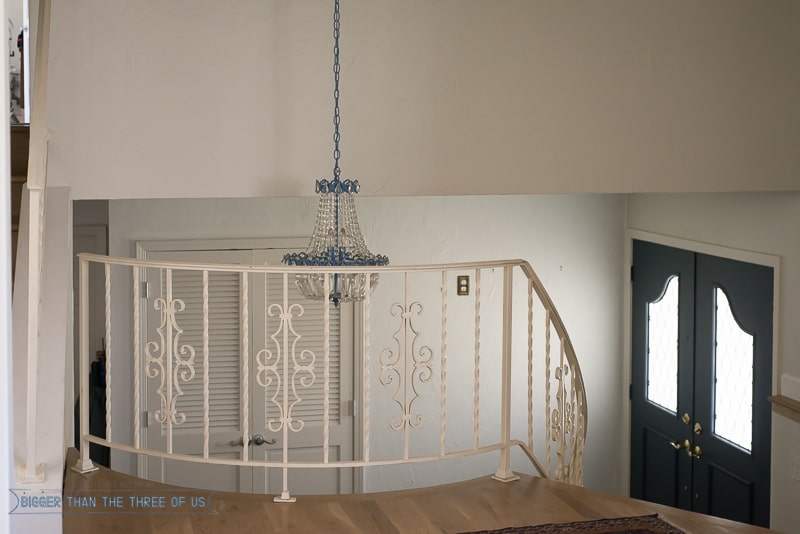
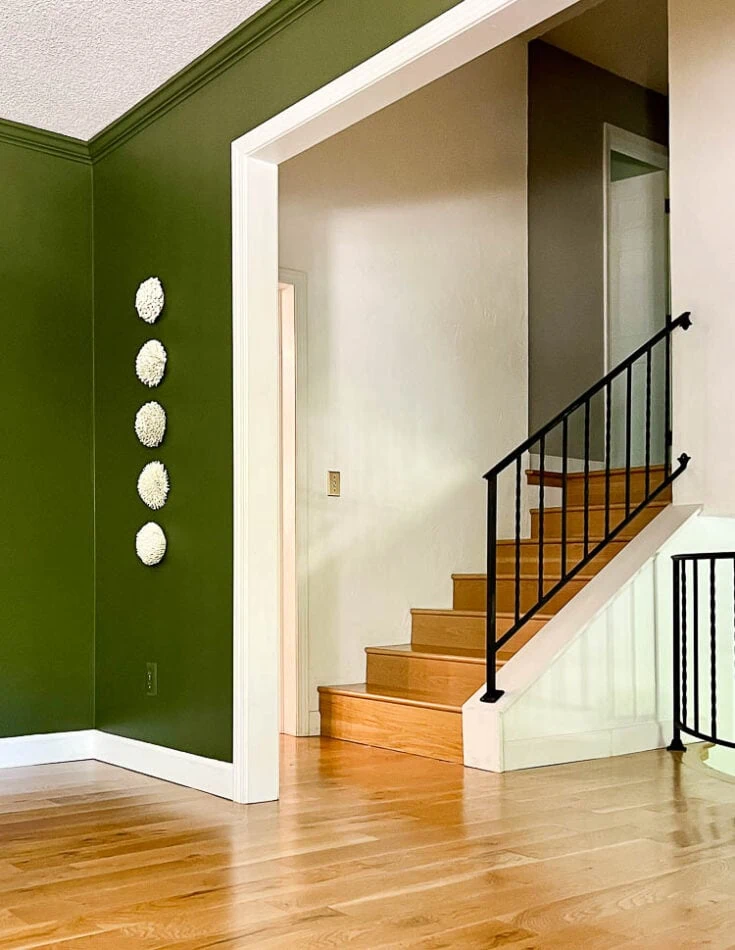
BEFORE Wrought Iron Staircase
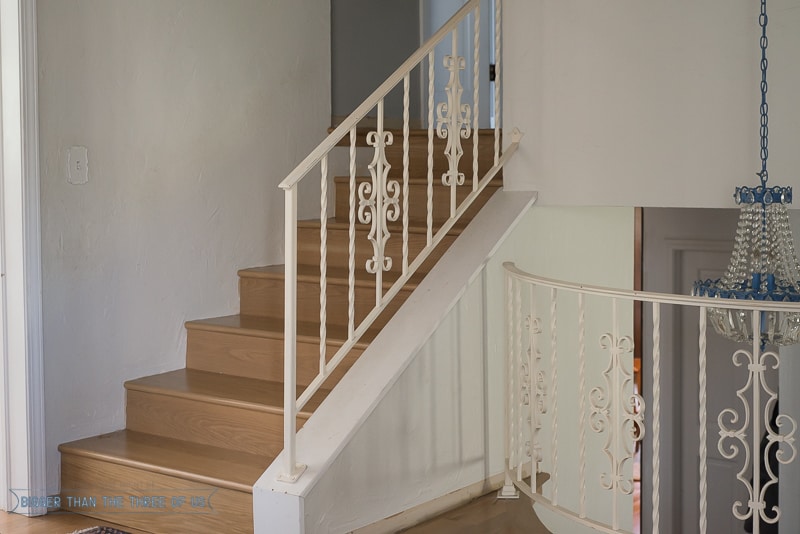
When people came over to the house, I got quite a few comments about how they liked the original detailing of the iron stair spindles.
If there was just a small section of the original iron railings in the house, I might have liked them, too. Overall, we have a big circle wrought iron staircase, iron stair rails going upstairs and then another bigger iron handrail that is in our eat-in kitchen (going downstairs to the entryway).
It was just too much, it felt too dated and overwhelming to the eye. Plus, as the other updates were happening, the older staircase railing just felt like the oddball in the space.
I talked to Luke about the idea of trying to update the stair railing without replacing and he was game to try it. We had already reached out locally to see what it would cost to just replace the staircase railing with something simple, like a black metal stair railing.
Because of our custom circle stairs, the price was insanely high. I believe, on the circle staircase alone, the cost was somewhere between $5-7k depending on what type of railing we wanted to put in. I'm sure that cost has sky-rocketed now, because I got that quoted in 2010 in Missouri.
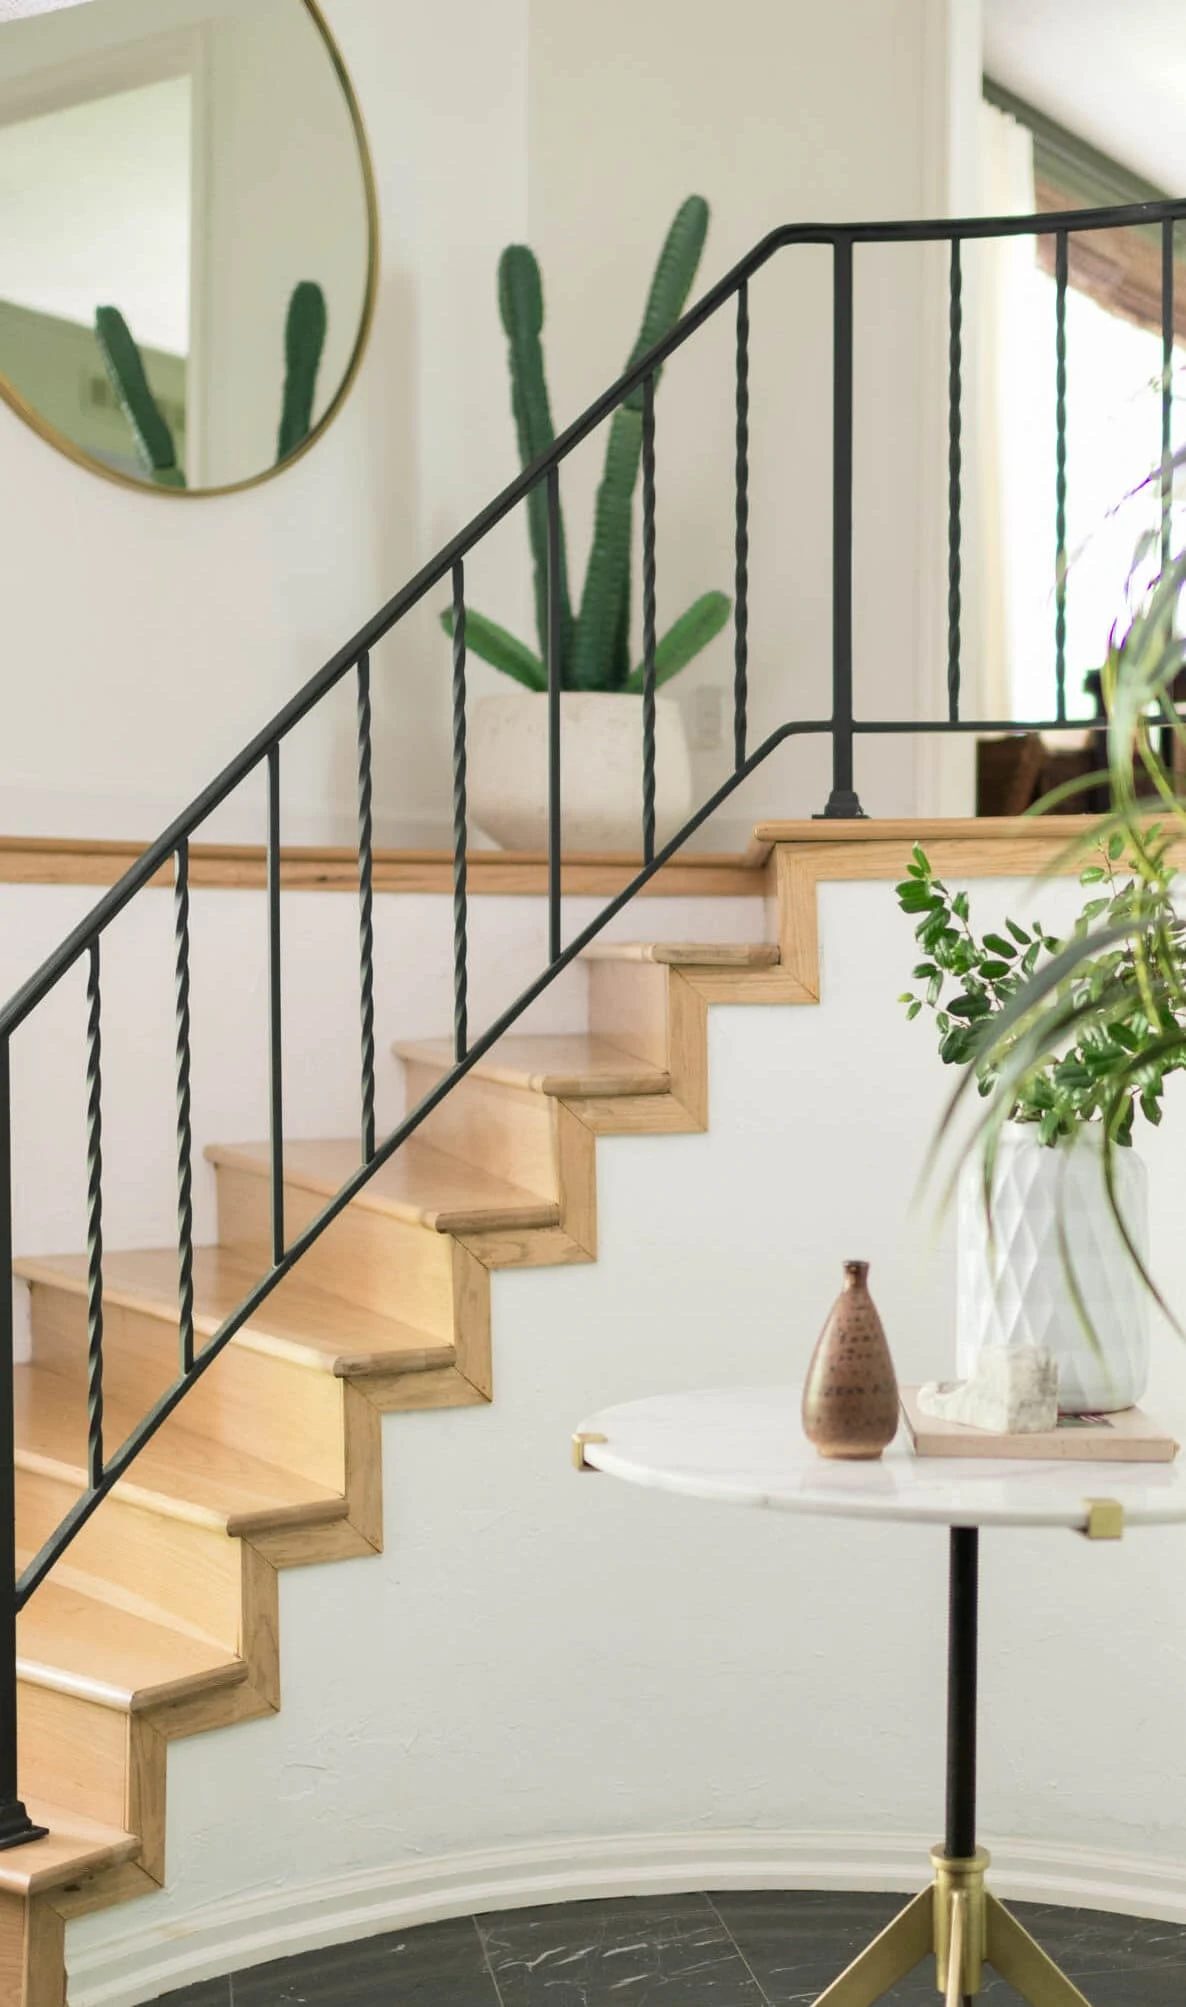
ANYWAYS, I wanted something modern and simple and could see a simple black railing and stair spindles working well. If I squinted at the iron handrail with the scrolls, I felt like it could be modern and simple just without the scrolls.
So, we started with the stair handrail on the back side of the house because, if it didn't go well, that was the easiest one to replace. Spoiler, it went WELL! We ended up doing all the interior stair railings and today are sharing the step-by-step tutorial for making over your stair railing without replacing it!

*Affiliate links below. Thanks for supporting this blog. Click to read my disclosure policy.
Supplies Needed for Iron Railing Staircase Makeover

- Angle Grinder, 4-½-Inch
- Cheap Metal Discs
- Orbital Sander
- Sanding Pads
- Drill
- Drill Microfiber Cloth
- Clamps
- Respirator Mask
- Safety Glasses
- Gloves
- Painter's Paper
- Primer - Enamel
- Paint - Flat Black Enamel
Video for How to Modernize Stair Spindles
How To Modernize Iron Stair Spindles By Grinding Off Scrollwork
Step 1: Remove Wrought Iron Staircase
Removing the stair railing was super simple! On each post, which is the piece that screws into the floor, there was an iron post cap at the bottom. We raised that up and, underneath the cap, you could see screws that were screwed into the flooring. To remove the handrail, just unscrew the screws and the post will be free.
Carry the iron railings into the garage or wherever you plan to do this project.

Step 2: Grind Scrolls Off Of Stair Spindles
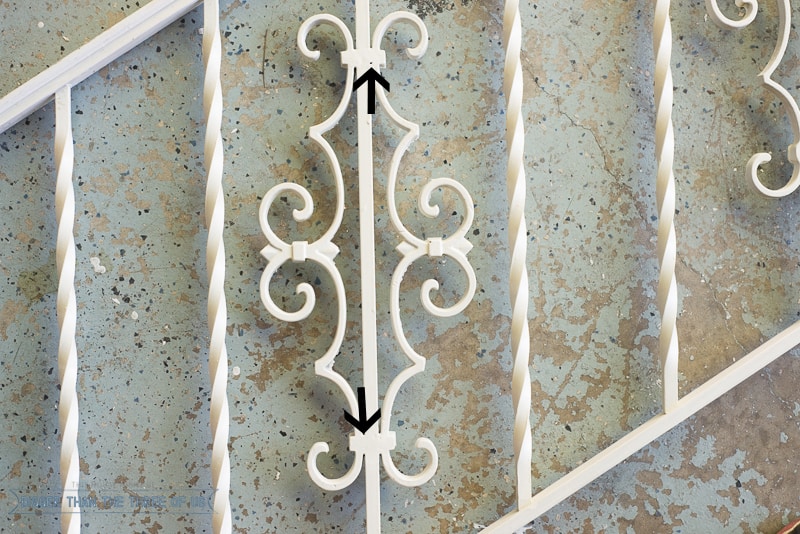
Look at your iron stair spindles and determine if the connection pieces are thinner on one side. We learned this the hard way and didn't realize at first that we were grinding through a side that was much thicker. If you have thinner connection pieces on one side of the balusters, then you will want to work on grinding that side first.
Grab your grinder, safety glasses, gloves and respirator mask. Start grinding on the thinner side between the bar and the scroll. Go slow! You will grind on both sides of the bar at the top and at the bottom. If you cut into the vertical bar, you can't fix that so you want to take your time and do it right.
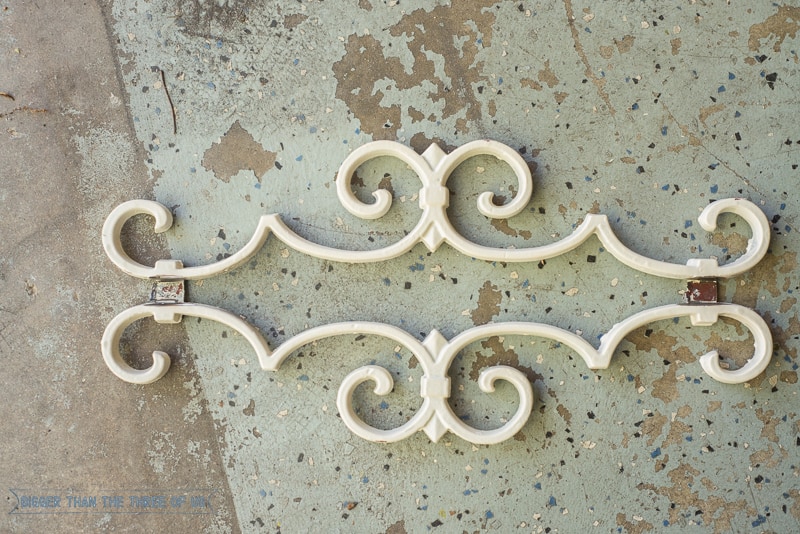
In the photo below, the arrows mark the area that we cut through the metal staircase but we cut four times (both sides of the vertical bar at the top and the bottom).
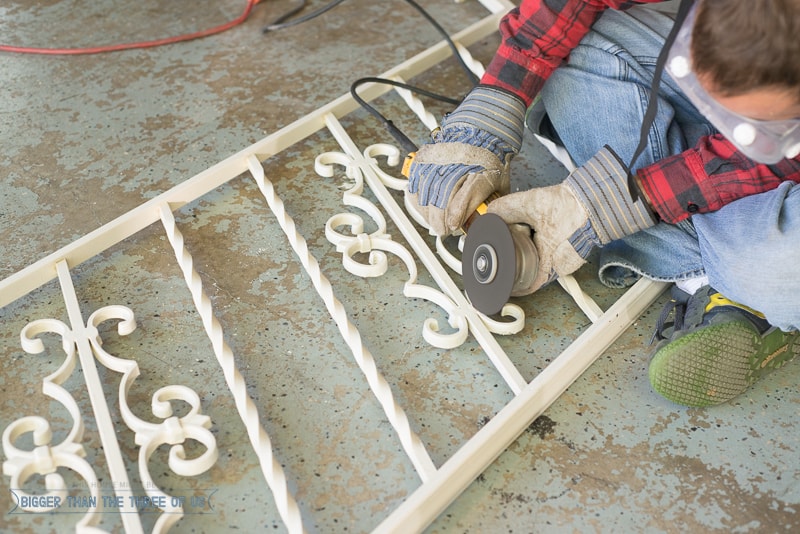
Once Luke got the hang of it, each scroll took about fifteen minutes to get off.
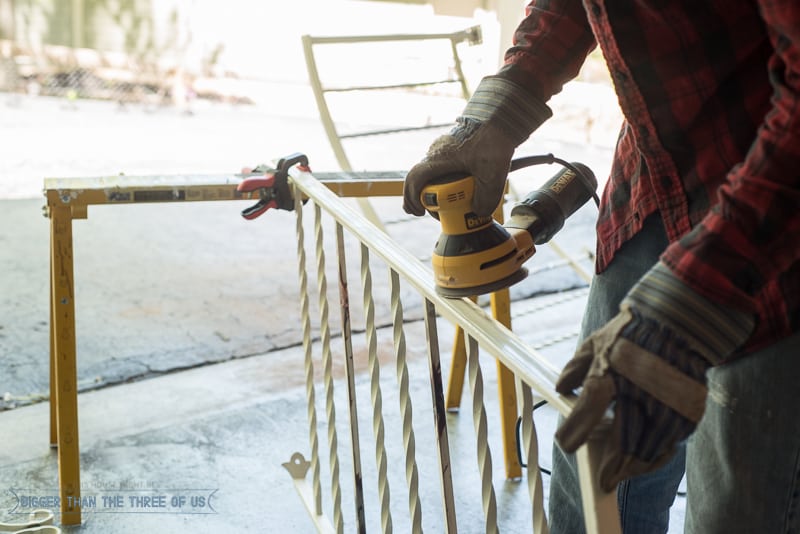
Step 3: Sand Stair Railing To Prep For Paint
If you don't have paint on your iron handrail, then you might not need to do this step. If you look closely below, you will see dark spots in the photograph on the bars where we grinded the scrolls off. Those areas were sharp so they needed a really good sanding.
If you are like us and your wrought iron handrail has been painted, grab the orbital sander and sand.
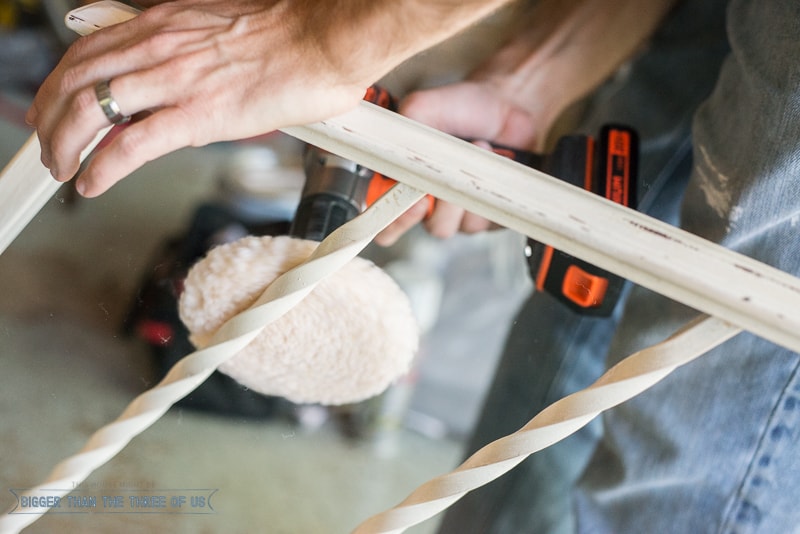
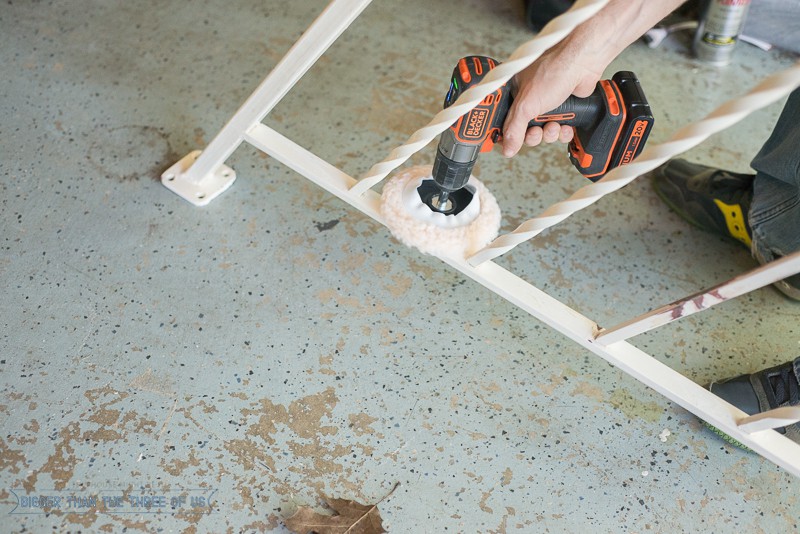
Step 4: Clean Iron Stair Spindles and Iron Railings
We used an attachment for our drill to clean the stair railing bars. You could use a microfiber cloth if you wanted.
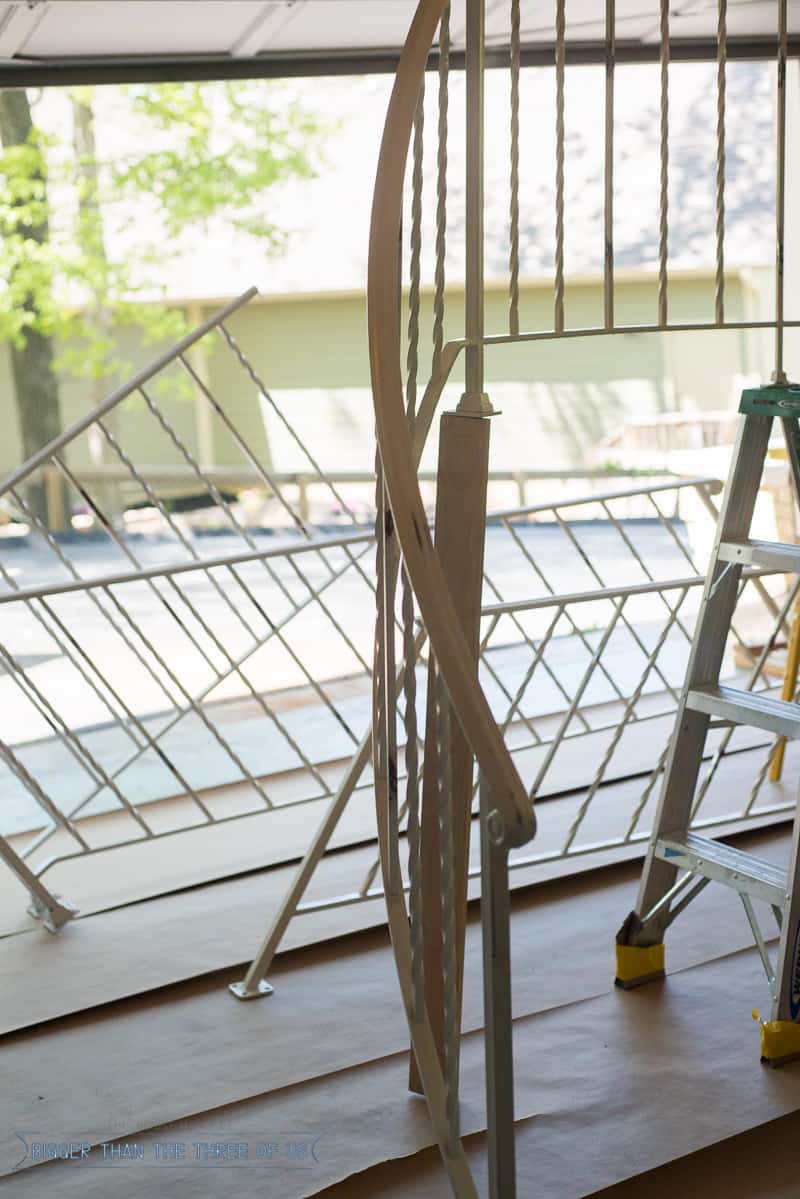
Step 5: Prep for Painting Stair Railing
We had a lot of railings so we had to clear out most of the garage and lay paper down. We also rigged up a ladder and extra wood support (it looks totally wonky in the next picture, but it wasn't) to get the railing set up so that we were able to paint both sides.
Step 6: Paint Stair Spindles To Create A Black Stair Railing That Looks New!
We used Rustoleoum epoxy primer and paint in the cans. It took about twenty-two cans. To be honest, I'm not in love with the finish. It's not completely smooth but it's not necessarily rough either. We used matte black and I got some remarks on Instagram saying that matte black is usually a bit gritty. All in all, I don't hate the finish but it's not as smooth as I would have hoped for.
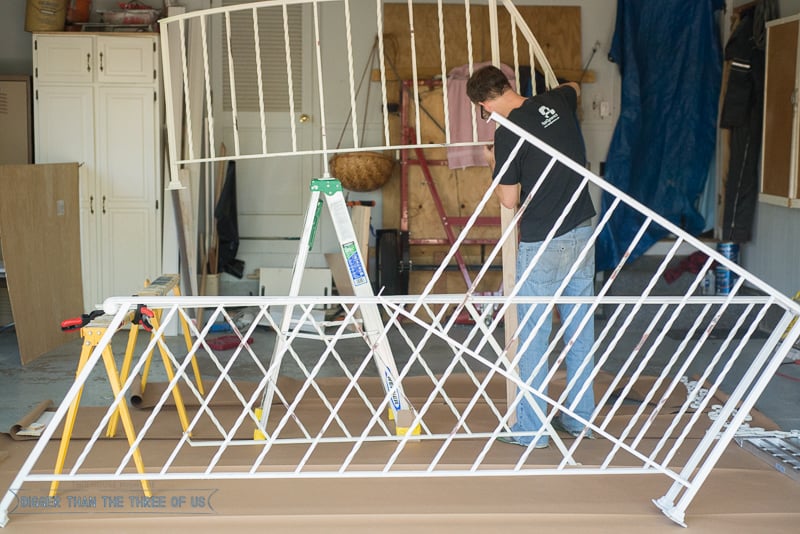
Step 7: Reinstall The New DIY Stair Railing
Carry in the iron railing and reinstall using the same screws that you unscrewed in the first step.
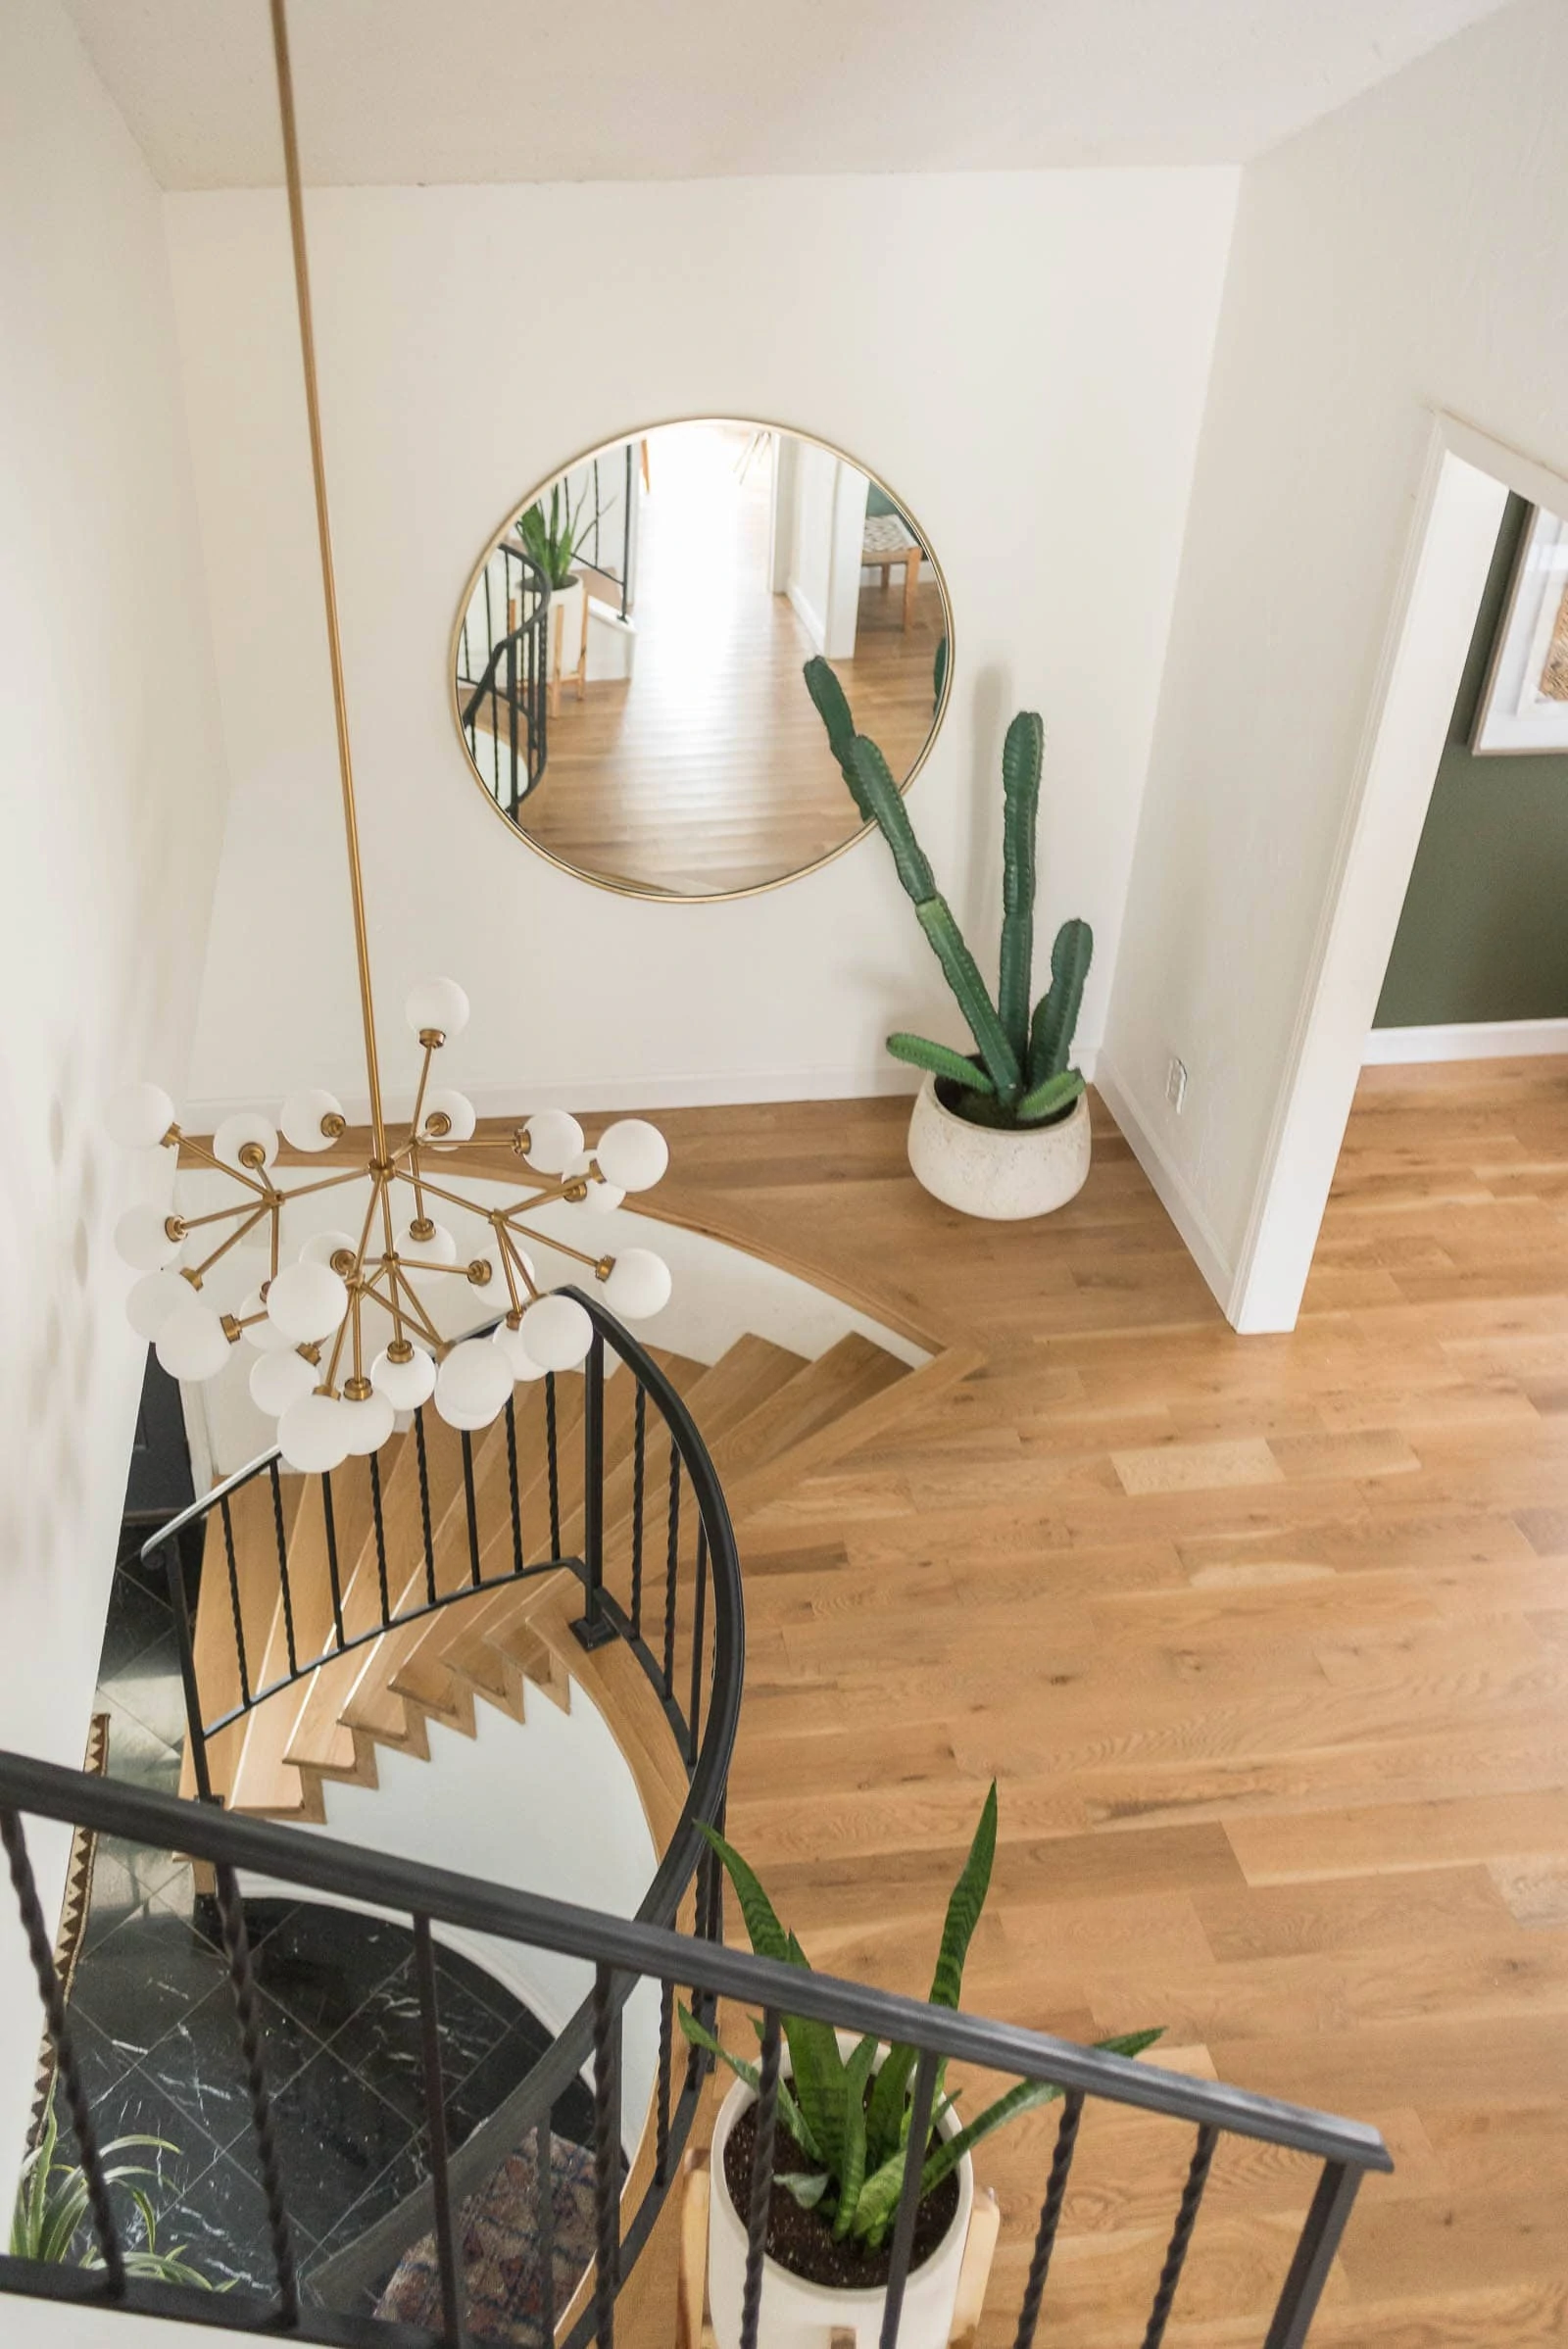
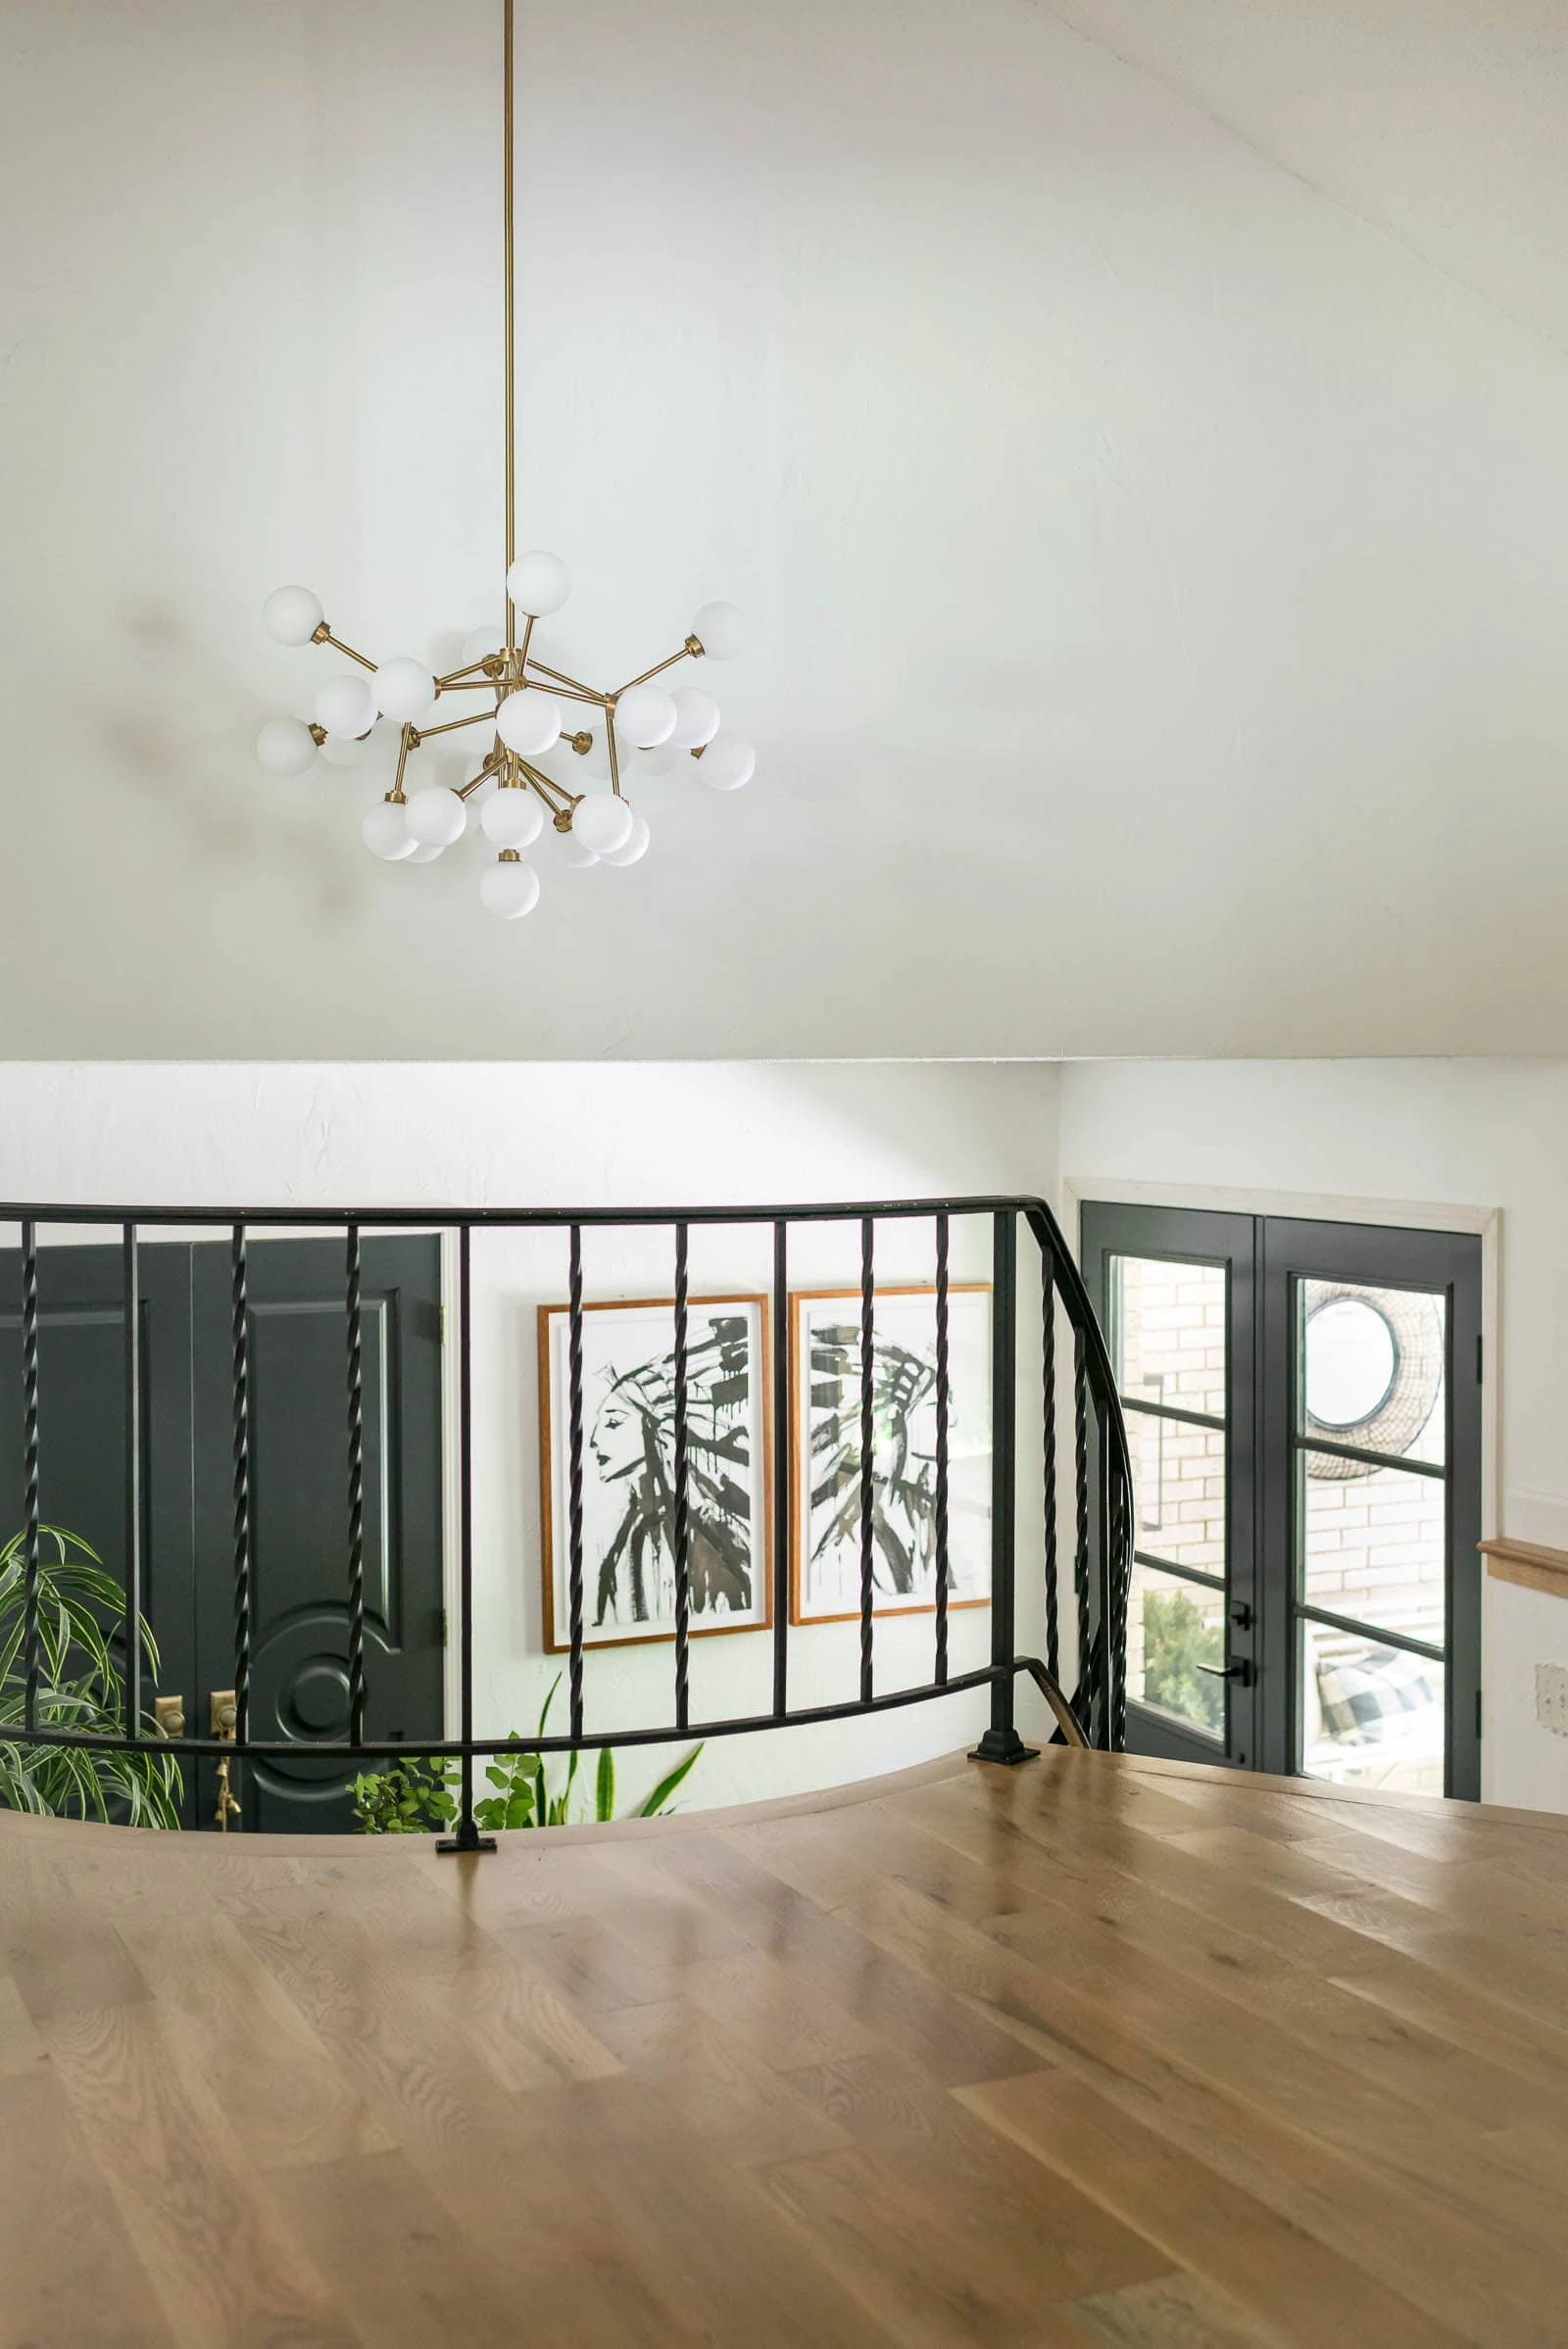
Black Stair Railing Reveal
When I first decided to try this project, I couldn't find any information about something similar. We flew by the seat of our pants and are so happy that we did. the DIY stair railing turned out great and has been such a good addition to the overall look of our foyer.
So, it's been about 10 years now since we first did this project. I thought I'd answer a few questions that I normally get on our "new" modern banister.
Frequently Asked Questions About Our Black Metal Stair Railing DIY Project
How do you paint wrought iron railings?
We used an epoxy primer and paint and the key is definitely to clean your stair spindles really well before painting. Keep in mind that a painted finish is not the exact same as a factory finish but, overall, painting a stair railing is a great option for updating iron railing!
Would you recommend this DIY Stair Railing Makeover?
Yes! This project has definitely stood the test of time at our house and gave us a completely different look for a small budget.
Staircase Makeover Including How To Grind Iron Stair Spindles Off
Cut the scrolls off your old iron stair spindles and transform your stair spindles to a fresh black stair railing. By grinding off the scrolls, sanding and painting the black railing, you’ll get a more modern handrail look without breaking the bank.
Materials
- Painter’s Paper
- Primer – Enamel
- Paint – Flat Black Enamel
Tools
- Angle Grinder, 4-½-Inch
- Cheap Metal Discs
- Orbital Sander
- Sanding Pads
- Drill
- Drill Microfiber Cloth
- Clamps
- Respirator Mask
- Safety Glasses
- Gloves
Instructions
- REMOVE WROUGHT IRON STAIRCASE
Removing the stair railing was super simple! On each post, which is the piece that screws into the floor, there was a iron post cap at the bottom. We raised that up and, underneath the cap, you could see screws that were screwed into the flooring. To remove the handrail, just unscrew the screws and the post will be free.
Carry the iron railings into the garage or wherever you plan to do this project. - GRIND SCROLLS OFF OF STAIR SPINDLES
Look at your iron stair spindles and determine if the connection pieces are thinner on one side. We learned this the hard way and didn’t realize at first that we were grinding through a side that was much thicker. If you have thinner connection pieces on one side of the balusters, then you will want to work on grinding that side first.
Grab your grinder, safety glasses, gloves and respirator mask. Start grinding on the thinner side between the bar and the scroll. Go slow! You will grind on both sides of the bar at the top and at the bottom. If you cut into the vertical bar, you can’t fix that so you want to take your time and do it right. - SAND STAIR RAILING TO PREP FOR PAINT
If you don’t have paint on your iron handrail, then you might not need to do this step. If you look closely below, you will see dark spots in the photograph on the bars where we grinded the scrolls off. Those areas were sharp so they needed a really good sanding.
If you are like us and your wrought iron handrail has been painted, grab the orbital sander and sand. - CLEAN IRON STAIR SPINDLES AND IRON RAILINGS
We used an attachment for our drill to clean the stair railing bars. You could use a microfiber cloth if you wanted. - PREP FOR PAINTING STAIR RAILING
We had a lot of railings so we had to clear out most of the garage and lay paper down. We also rigged up a ladder and extra wood support (it looks totally wonky in the next picture, but it wasn’t) to get the railing set up so that we were able to paint both sides. - PAINT STAIR SPINDLES TO CREATE A BLACK STAIR RAILING THAT LOOKS NEW!
We used Rustoleoum epoxy primer and paint in the cans. It took about twenty-two cans. To be honest, I’m not in love with the finish. It’s not completely smooth but it’s not necessarily rough either. We used matte black and I got some remarks on Instagram saying that matte black is usually a bit gritty. All in all, I don’t hate the finish but it’s not as smooth as I would have hoped for. - REINSTALL THE NEW DIY STAIR RAILING
Carry in the iron railing and reinstall using the same screws that you unscrewed in the first step.
Notes
FREQUENTLY ASKED QUESTIONS ABOUT OUR BLACK METAL STAIR RAILING DIY PROJECT
HOW DO YOU PAINT WROUGHT IRON RAILINGS?
We used an epoxy primer and paint and the key is definitely to clean your stair spindles really well before painting. Keep in mind that a painted finish is not the exact same as a factory finish but, overall, painting a stair railing is a great option for updating iron railing!
WOULD YOU RECOMMEND THIS DIY STAIR RAILING MAKEOVER?
Yes! This project has definitely stood the test of time at our house and gave us a completely different look for a small budget.
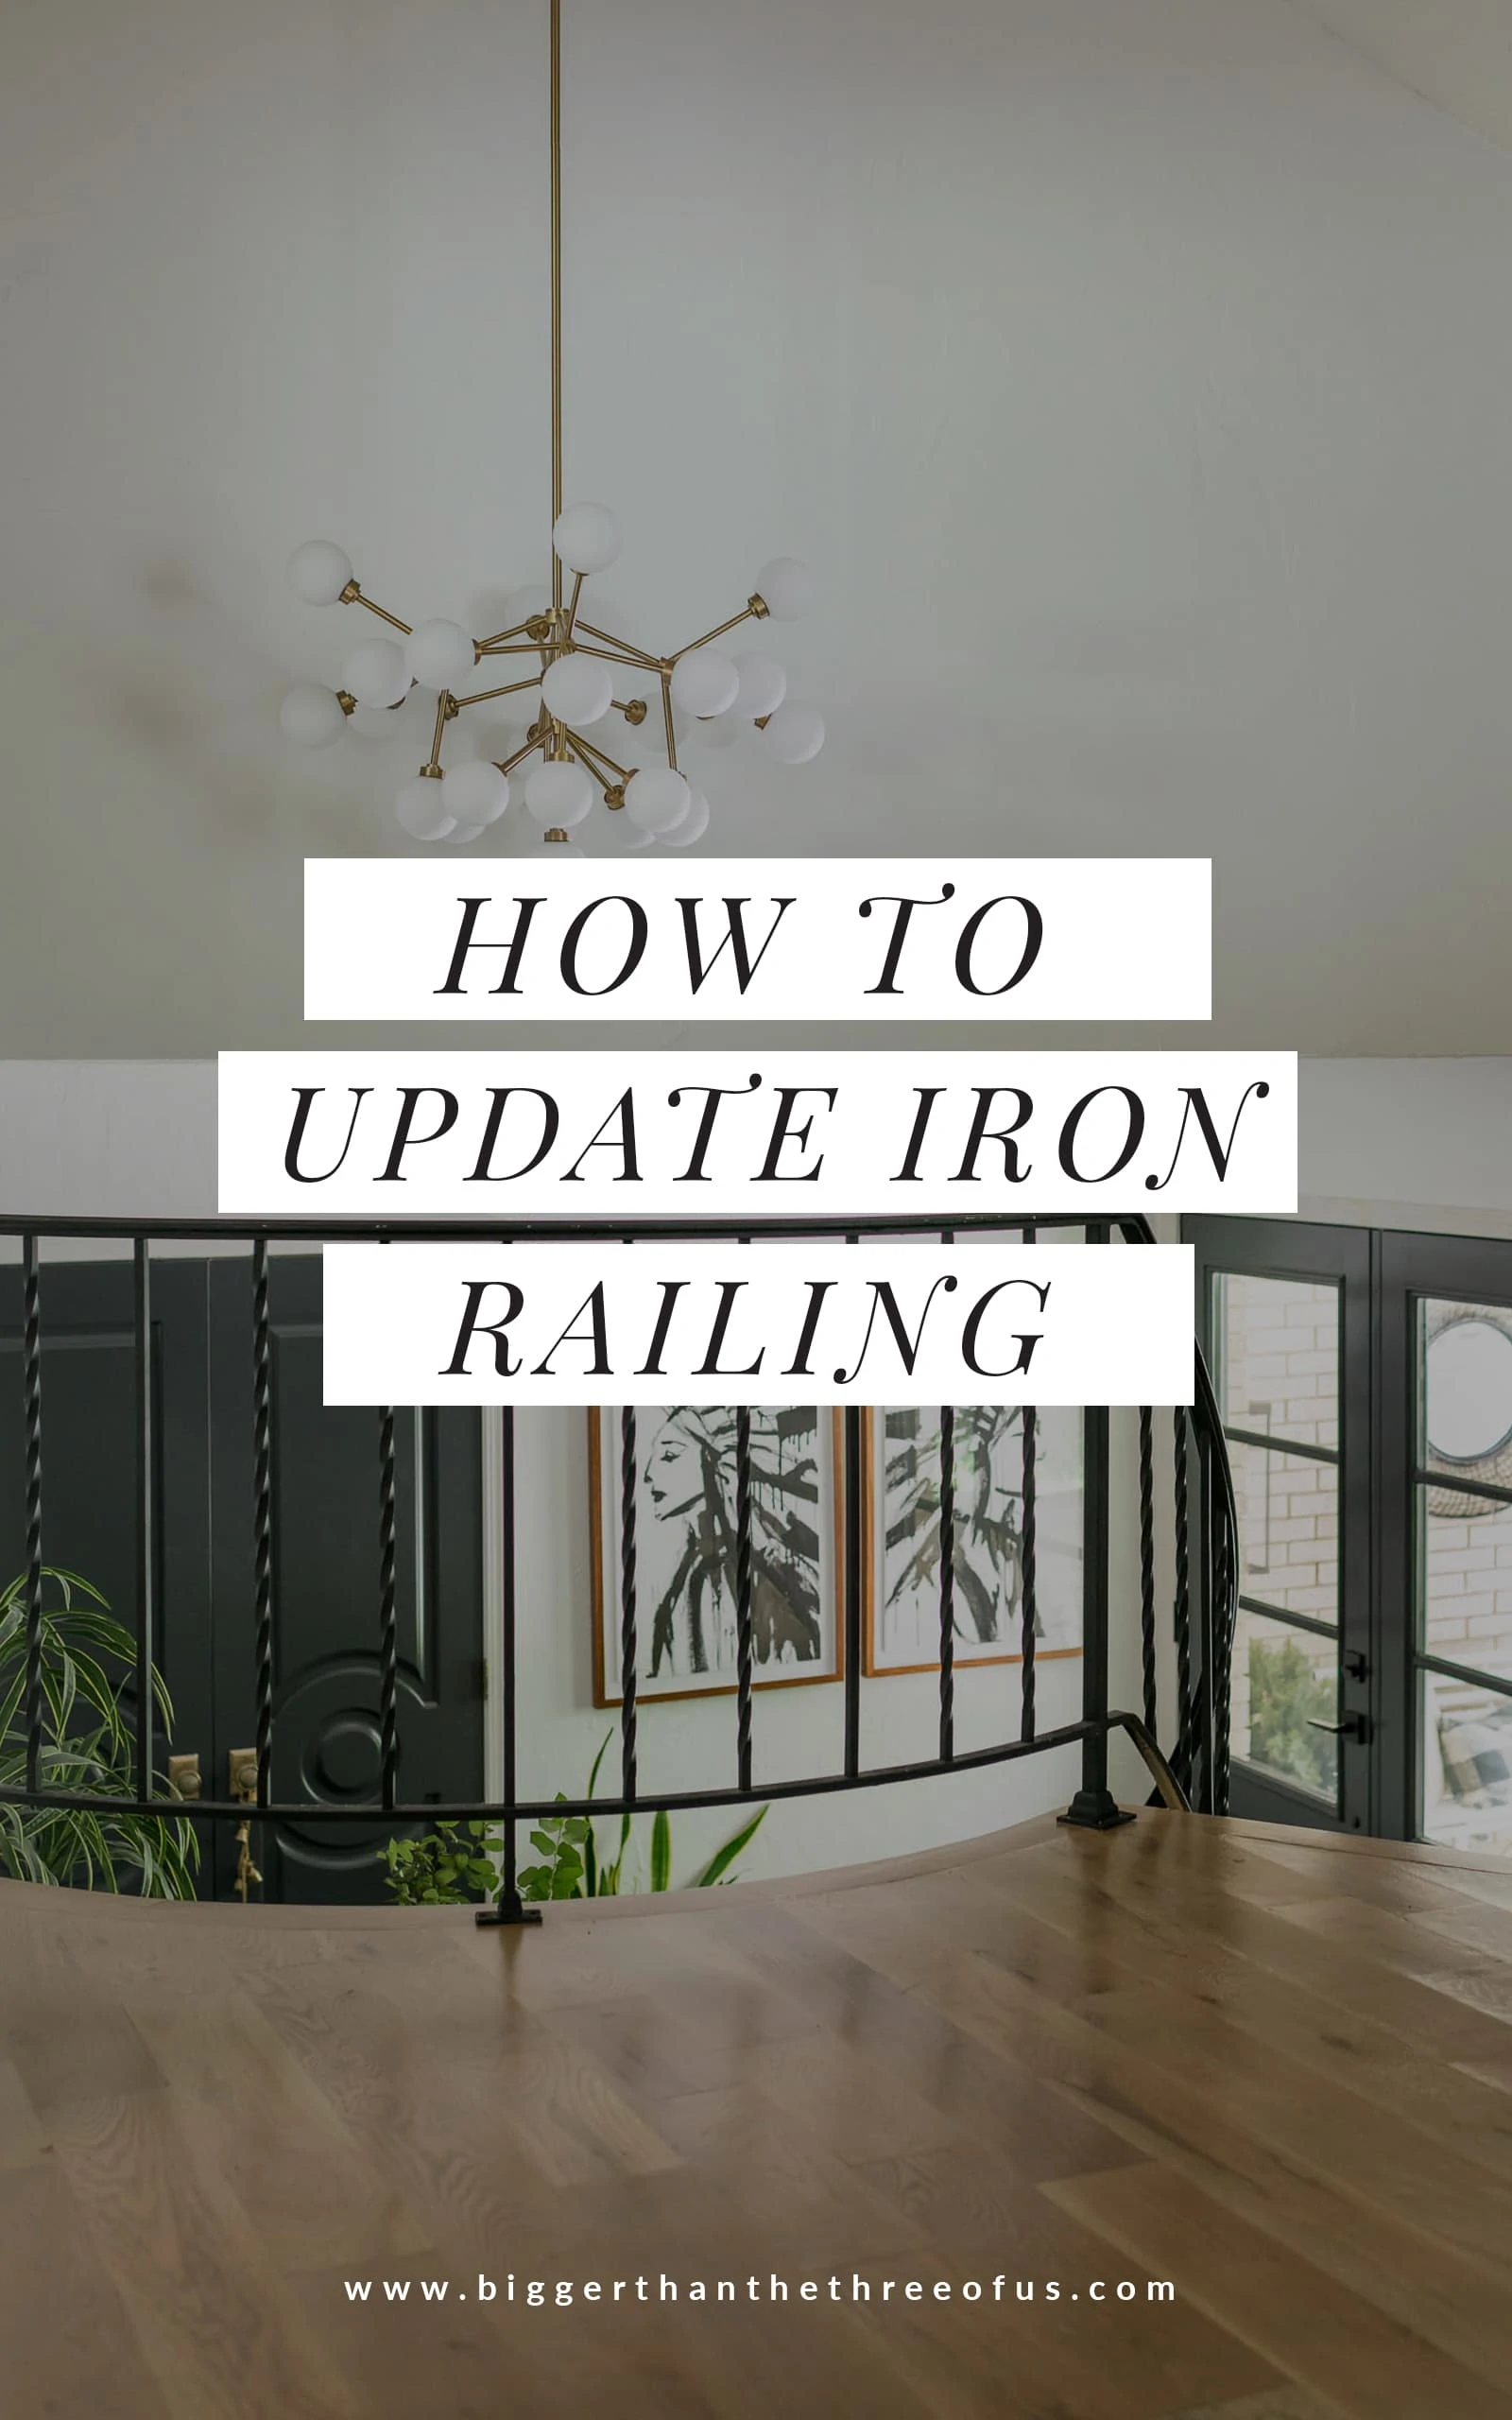
We have quite a few other projects that have been completed close to this staircase makeover including my antler wall, built-in closet bench and double front door replacement. The space has come such a long way and I couldn't be happier.
p.s. Pin with me!
}


Brit | House Updated
What an improvement! It really looks so much better now. Can't wait to see your reveal next week!
Ashley Mayes
Thanks Britt! I'm so happy that this worked out.
Amaris Mateo
Where did you get your ceiling light from.. i love love your remodel and upgrade of the railing. I’m doing mine next . Wish me luck lol
Ashley Mayes
Lumens. =) Linked on the shop my home page.
Toni
I love this! I only have one scroll on my railing and no handy husband do you think I could grind it off without removing the railing? I bought a grinder and its a little intimidating.
Ashley Mayes
Hi Toni,
I'm not sure I'd try it inside. The grinder shoots off sparks and metal.
Steph @ One Mile Home Style
These look so good Ashley! Removing the scrolls made such a big difference, and the new color looks great too!
Ashley Mayes
Yay! Glad you think so! Thanks Steph!
Robin from Frugal Family Times
Oh wow, Ashley! What a difference - getting rid of those scrolls made your railings look decades newer. Good job. 🙂
Ashley Mayes
Thanks Robin!
Donna
Love the look of no scrolls I have them also but I hate to pull the entire railing off hardwood floors.
Any solutions?????
Ashley Mayes
I don't think there's a solution unless you wanted to cover the flooring and try to do it attached but it makes a big mess.
Cassie Bustamante
what a great difference! i am sure the paint is one of those things that other people won't notice as much as you. in general i always have a hard time with spray paint and getting even finishes.
Ashley Mayes
I think you are right! I've mentioned it to a few people as they have come over and no one has noticed it first for sure.
AlisonG
Major difference. Great before and after! Great job.
Ashley Mayes
Thank you so much!
Jessica | house homemade
That makes such a huge difference! I love it. Great job.
Ashley Mayes
It really does, thanks Jessica!
Lizzie Ravn
They look so much more modern now, and I love the black. So cool that it actually worked!
Ashley Mayes
I know! I'm still pinching myself that it actually worked!
Carrie
What a difference! They look great and definitely flow better with the rest of your house now,!
Ashley Mayes
Thanks Carrie! I think so too!
Susie
Ok. You get the prize this week for most original and clever idea. I can't believe the difference in the railings. Total genius. Can't wait to see the room reveal! Susie from The Chelsea Project
Ashley Mayes
You have me blushing!! High praise for sure!
Bre
It seriously made such a huge difference!!
Ashley Mayes
I know!! So exciting!
Tee @ Beauteeful Living
Wow - I thought you got new stairs! This came out so amazing! Major difference. I can't wait to get rid of my metal railings one day soon. Good luck with finalizing the last details before the reveal next week. Look forward to seeing it!
Ashley Mayes
I know, right?!
Leslie
I'm so excited it all worked out! It looks amazing and fresh and I just love it. I have small scrolls on some mine (from the 90's) I don't think there's anything I can do with those except replace them.
Looks so great already!
Ashley Mayes
Thanks Leslie!
Dagmar
I love your frugality. Improving what you already have. And reading your posts makes me get up and work on mine. Thanks!
Ashley Mayes
Sometimes, it's hard to think outside of the box but I'm glad this one worked out!
Emy
The stairs look absolutely amazing!
Ashley Mayes
Thank you so much!
Charlotte
They look awesome. Love the black!
Ashley Mayes
Woohoo! Thanks Charlotte!
Carol @ CAD INTERIORS
Removing the scrolls did wonders for the railings! They look great. Looking forward to your reveal!
Ashley Mayes
I know, right?! Thanks Carol!
Stephanie @ Casa Watkins Living
Love it Ashley!!! Definitely an improvement!! Love the new color as well!
Ashley Mayes
Me too! Thanks Stephanie!
Julia@Cuckoo4Design
I like it so so so much better now.
Ashley Mayes
Me too!
Nicki Parrish
It looks so much more modern now, and I would have never thought this was possible! I love the way it turned out, and by keeping them, but still updating them, it probably fits in really well with the era of the house. I am guessing they were original to the home. Great job!!
Ashley Mayes
It really does! Thanks Nicki!
Casey
I love them! What a great job
Ashley Mayes
So much better than before for sure!
Ariel
Those are looking great! The black makes them look so different already, and then without the scroll it's night and day!
Ashley Mayes
I know, right?! Thanks Ariel!
Jessica | Petal + Ply
Wow! The railing looks great!
Ashley Mayes
So glad you like it!
Carolann
Wow, what a huge difference! Lots of work for sure but so very worth it!
Ashley Mayes
For sure! Thanks so much!
Lynn Spencer
Ashley, I am so glad you did this and spilled the beans on how to do it. I don't have railings right now, but I can see knowing how to do this will come in handy in the near future.
And it looks SO GREAT! I know you love the new look...in fact your whole foyer looks fantabulous!
Hugs, Lynn
Ashley Mayes
Thanks Lynn! It really helped the space!
Matt Owczarczak
Thanks for sharing this article. We just bought a house with the same iron handrails and spindles down a circular stair. I was trying to explain to my wife that I wanted to cut off the iron frill details and paint it black and she could not imagine what it would look like. Once I showed her the article, she was on board. Thank you again.
Ashley Mayes
Oh my, so fun! I'd love to see a photo when you get done!
Sharon
This looks beautiful! Can this be done without removing the rail. Ours has alot of paint , it would be a lot of work to remove them.
Ashley Mayes
We had a lot of paint on ours too but I wouldn't try to do it without removing it.
LP
We did this year 15 years ago, too. A big improvement and very cost effective. Now we are looking at modernizing the handrail. Yours looks great.
Ashley Mayes
Would love to hear if you come up with an option for modernizing the handrail. We have the circle staircase which is so challenging because it takes a custom situation but if you land on something that would work for that, I'd love to know. Good luck!!