

Interested in a secret door? Learn more about how to install a hidden door within a wall in today's post!
Installing a hidden door is a great way to add a touch of mystery and intrigue to any room. Whether it's for a secret passage, a hidden closet, or just for fun, a concealed door can be a unique and exciting addition to your home. While it may seem like a daunting task, with the right tools and some basic carpentry skills, installing a DIY hidden door can be a fun and rewarding DIY project.
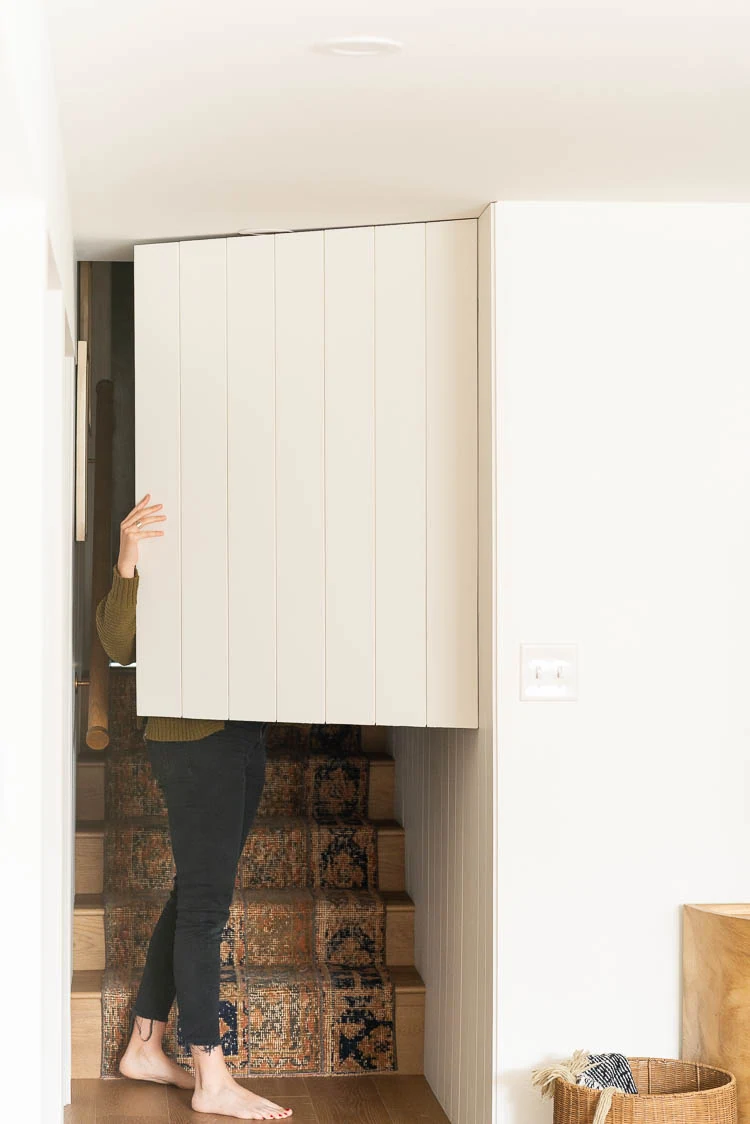
Before we jump right in, let me explain that our jib door is a bit different from most others because it's a small door that opens to a platform storage area behind a circle staircase. Old houses are fun, right?! So, some of the project supplies and parts of the process of building our hidden door will be different than if you have a traditional door that you are trying to make a concealed door (a.k.a.... jib door).
This project reminds me, a bit, of our scuttle attic door in that we have an old house and, with older houses, you have to just find ways to make things work. I hope that you are inspired and take bits and pieces of this project to make your own concealed, hidden door.

Let's define this door first!
What is a Jib Door?
A door that is seamless within a wall that is disguised as the wall.
For today's purposes, I'm using hidden doors, jib doors and secret doors interchangeably! Someone, somewhere, might have slightly different takes on what each of these are but, in our research on adding a hidden door to our house, we took them to all be the same. =)
Building A Hidden Door In A Wall
In the early stages of our basement planning process, our 11-year-old son, expressed interest in a few different aspects of the basement. As we narrowed down ideas, we wanted to make sure to include his vision in the planning and implementation process. One of those ideas that he loved was having some sort of invisible door where he could hang out.
As adults, my husband and I knew that the hidden doorway would be a feature that would be a pain to try to implement and one that wouldn't last that long as a fun place to "hang" because of the age of our kiddo. We also knew that a hidden door wasn't a bad idea, longterm, because it could hide a storage area for us.
We approached the idea to hide a door within the wall with the thought that it would bring a huge smile to our kid's face as well as fit for the future by being an aesthetically pleasing way to not see another traditional door that hides a storage room.
It was honestly quite a process to figure out how to do the DIY hidden door, for a few reasons, so I thought I'd walk you through the brainstorming process first and then get to the hidden door hardware and more in a bit!
Brainstorming how the secret passage will work
This is one of those projects where you really need to think through multiple stages of the project in-advance or you're likely to run into trouble. The space your door fits into and how you want to hide it (trim or a frame or a flush-fitting door) will change what options you have for hinges and latches.
Our basement door setup is a bit strange because it's not a full-sized door and can never be because the lower area, underneath the door, is poured concrete for the support of our basement.
We basically needed a half-sized door that would be elevated so lots of the traditional hidden door ideas (such as a bookcase with door, etc.) wouldn't work for us.
Our door also needed to open out (instead of into the storage space). The storage space is not a finished space, so it is alright if hinges or latches are visible (on the inside), but everything has to be hidden from the outside. Also, the door needed to open outward so that the storage unit could be more usable.
Hidden Doorway Ideas
When we originally started thinking about the secret door, I threw out the idea that we could just hang a large piece of art in front of the door and call it a day. If we had gone this route, we could have used simple/cheap European cabinet hinges and a magnetic push-latch. This route wouldn't look finished without the art hiding the door, but was an easy route to contemplate.
The second idea was to frame the door opening with box moulding and continue that moulding up the stairs. I've seen this done a few times and it looks pretty sharp! If we had done this, it would have limited our hinge options because we would need to make sure the trim and door could both open without running into the wall surrounding the door.
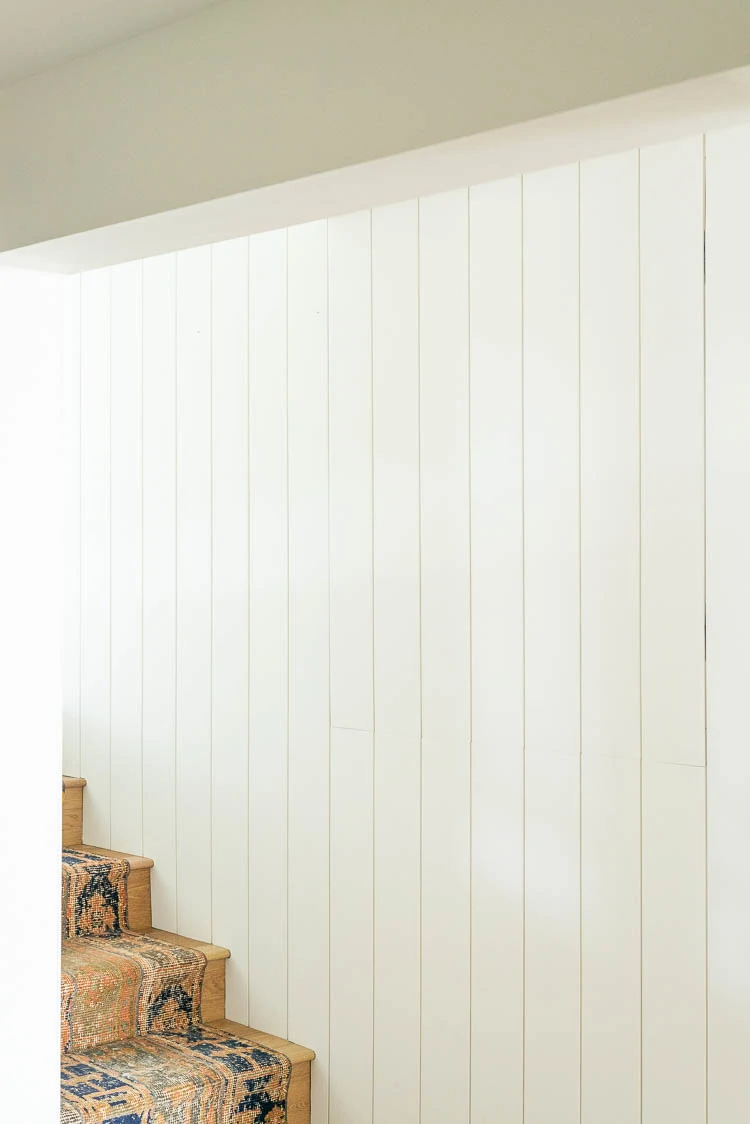
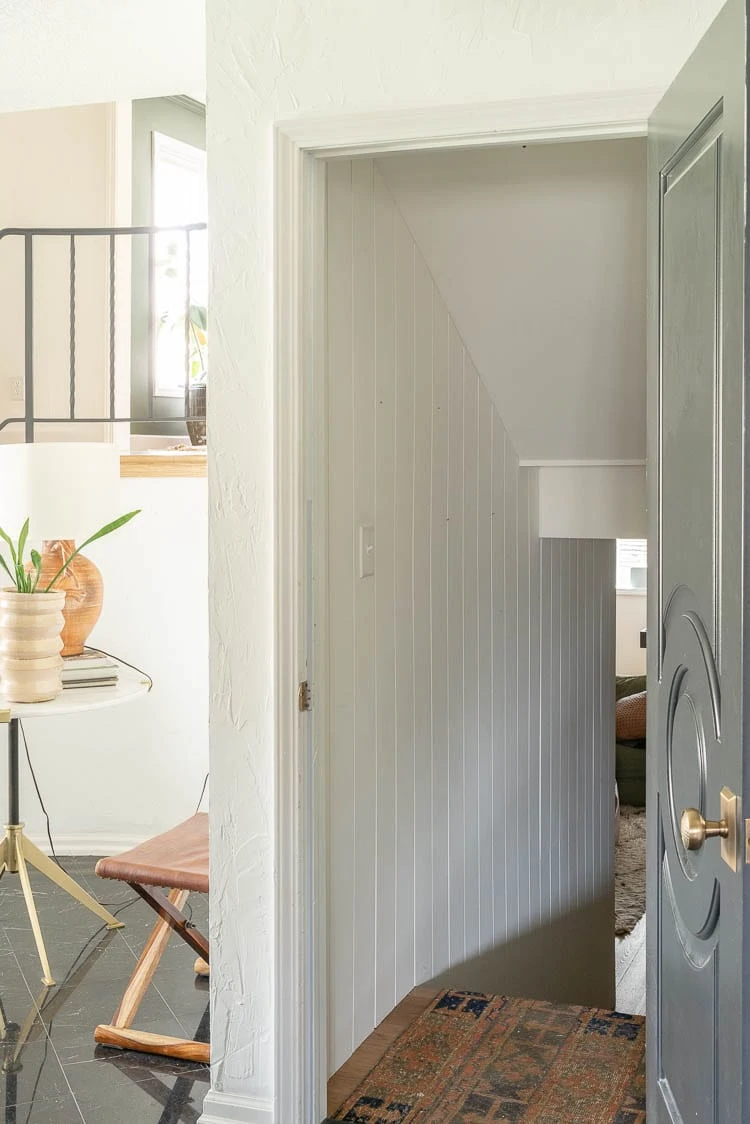
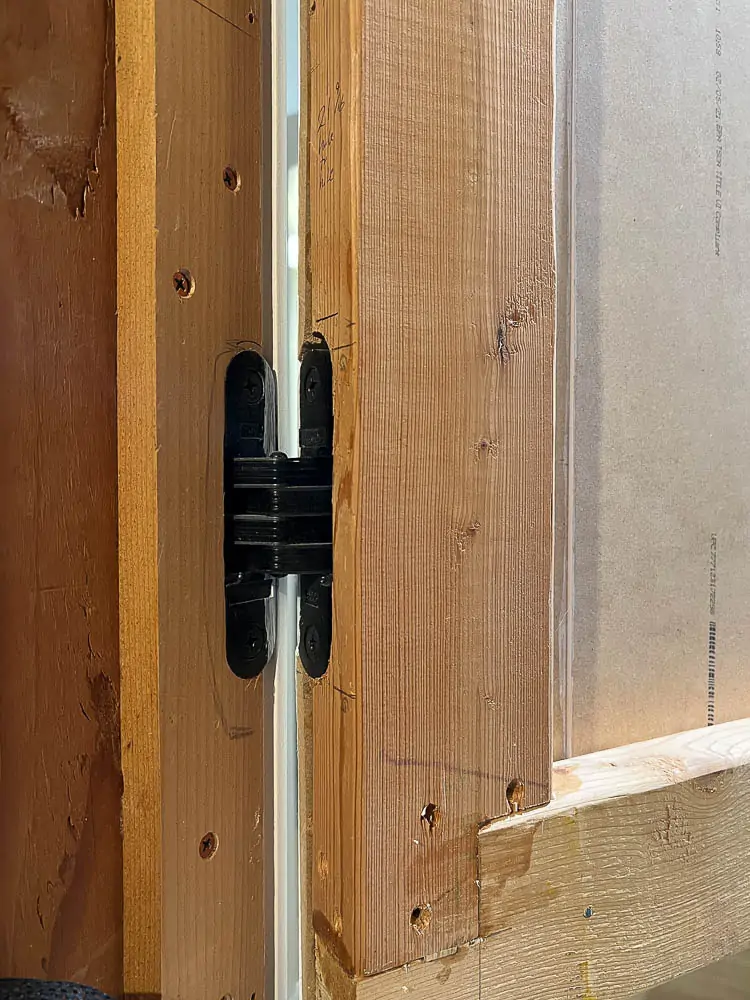
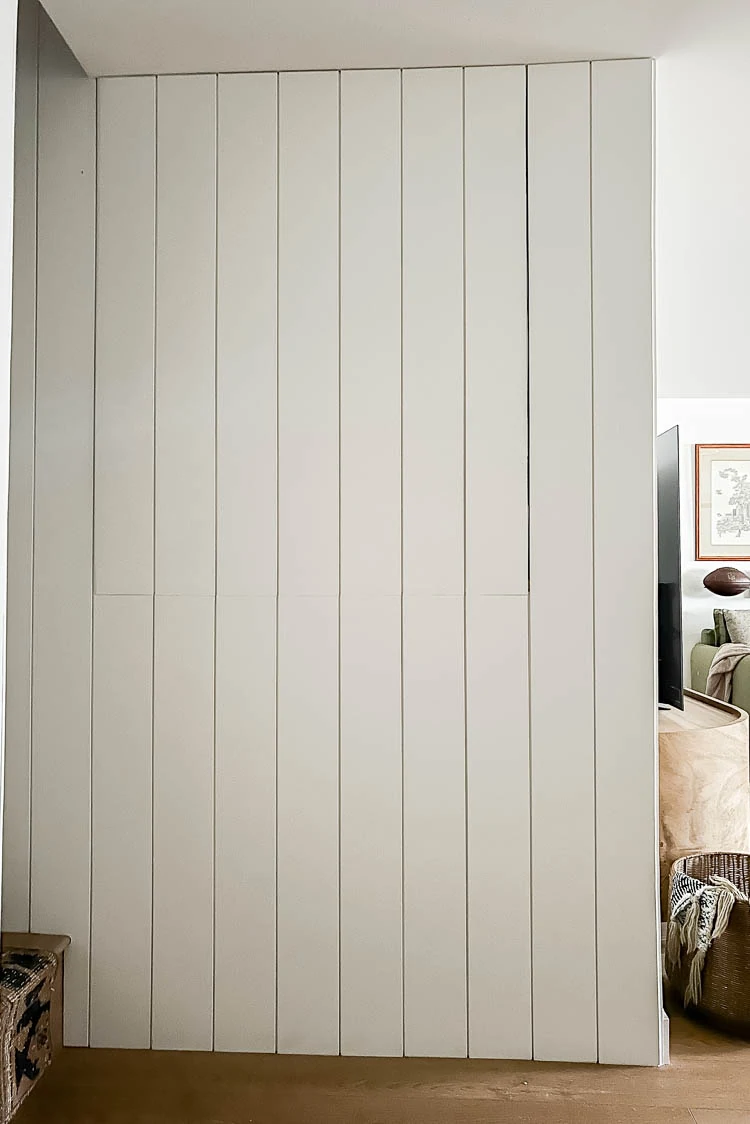
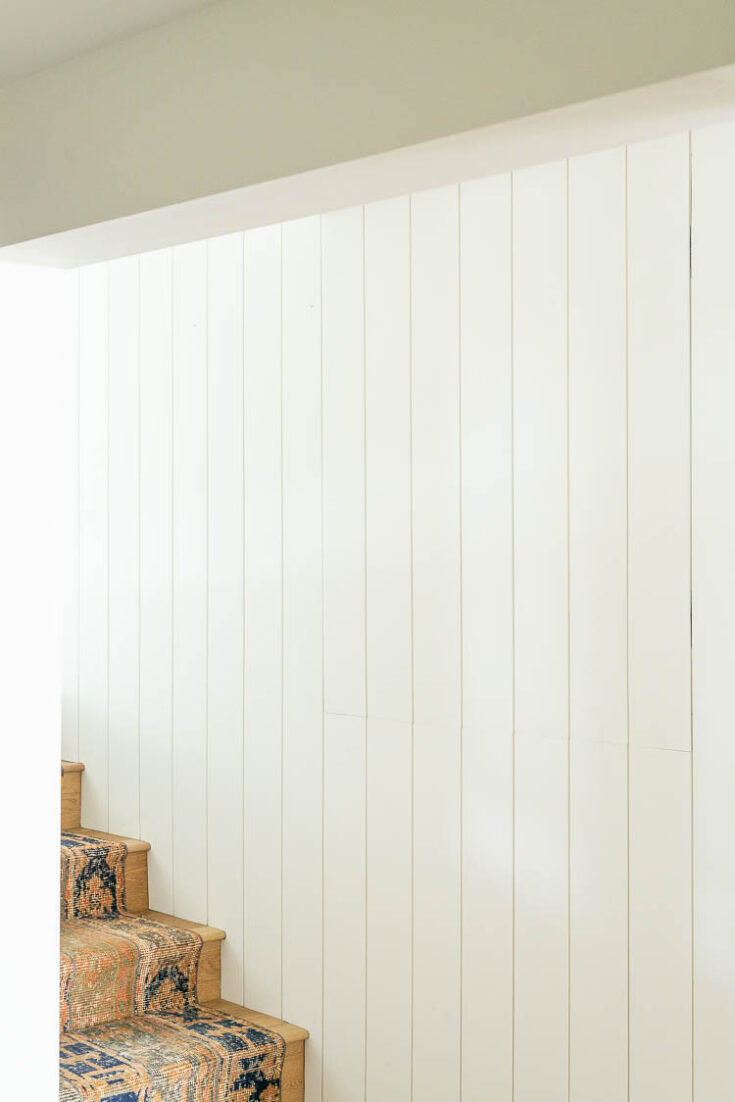
The hidden door idea that we went with was to build a door and add planking on top to help hide the door within the wall. To do that, we bought SSOS hidden hinges. Honestly, searching for the right hinges that would work for our door style, depth, etc., was super tricky. The goal was to get the secret door aligned flush with the wall and typical hinges will show (on whatever side the door opens to) so we needed special hinges that would be hidden.
Affiliate links below. Thanks for supporting this blog. Click to read my privacy and disclosure statement.
Hidden door latch system for our secret door set-up
For us, this part took a lot of trial and error. We started with some simple/cheap ideas (magnetic push latches and a heavy-duty push latch) and weren't happy with the results.
When opening the door, the heavy-duty push latches work the same as a magnetic latch, but have a lot more holding power and will keep a larger door closed. They also need a little extra room for the door to close before it un-latches. For that reason, they didn't work for us.
What we ended up using was a combination of 12v electrical components that would provide a strong latch, without needing any extra closing room for the door. They have a very strong holding strength, and made it pretty easy to make sure the door is closed tight, so the door is flush with the wall. The downside is that they require a little custom wiring. You could go this route without having to solder, but there is definitely some work required to wire everything together.
We ended up using two of these latches in combination with this wireless switch and this power supply. Figuring out the correct combination of components took a bit of research, but these seem to work well together. "And, an added benefit is the nostalgia I feel when I open the door and am reminded of the aftermarket keyless entry I added to my first car". (Luke wrote that part, lol).
Let me give you the full supply list and then I'll share more about how we actually made the secret door behind the staircase!
Secret Passage Supplies
- 2x4's
- Planking
- SSOS Hidden Hinges
- Wood Router
- 2 Latches
- Wireless Switch
- Power Supply
- Soldering Iron Set
- Drill
- Miter Saw
- Nail Gun
How to Build a Hidden Door in a Wall
- Install planking up to door opening (on hinge side of door). We mitered our planking in this step and at the end when we continued to plank. See photos below for more details!
- Build door (or skip, if you already have one)
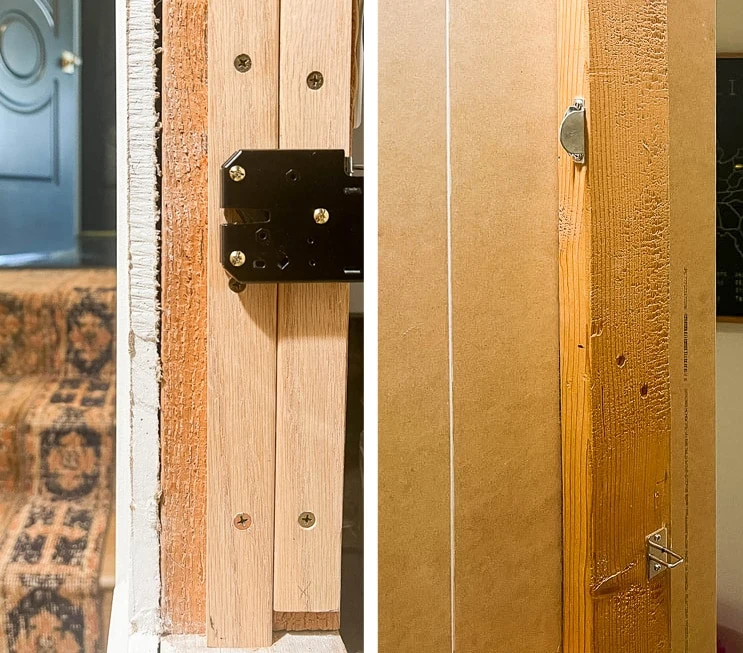
- Use SSOS templates to route hinge holes into door
- Place door in opening, and mark hinge holes on frame
- Use SSOS templates to route hinge holes into frame
- Dry-fit hinges and make sure there's room for planking on door to clear
- Screw hinges into place
- Install, or adjust placement of door stop, to make sure door is flush with wall
- Continue installing planking over door
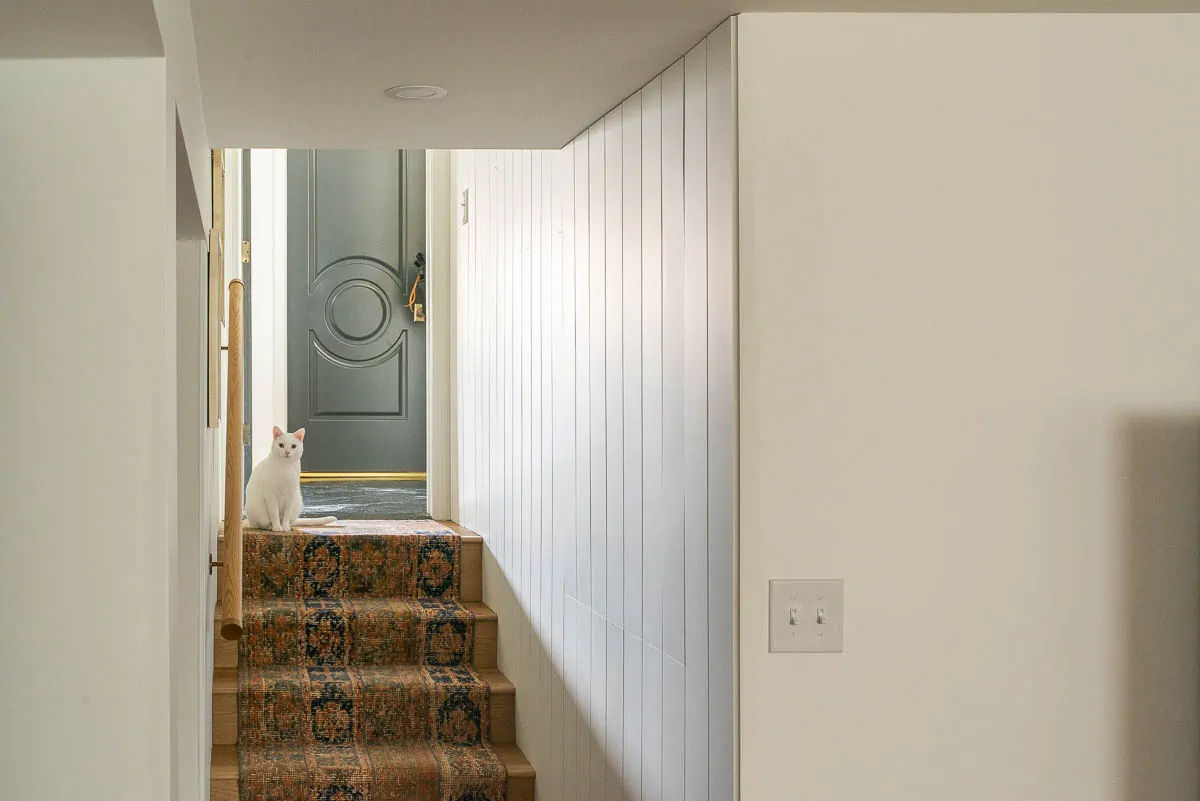
This project was either a labor of love or a crazy idea... we are still undecided. =) That being said, it really does look amazing in person. I tried to up the contrast on the photos a bit so you could see the line of the door but, in person, it's really not noticeable at all. We haven't had a single person notice that there's a secret door in our house until we point it out.
Remote for passageway
I wanted to show you the remote for the door latch.
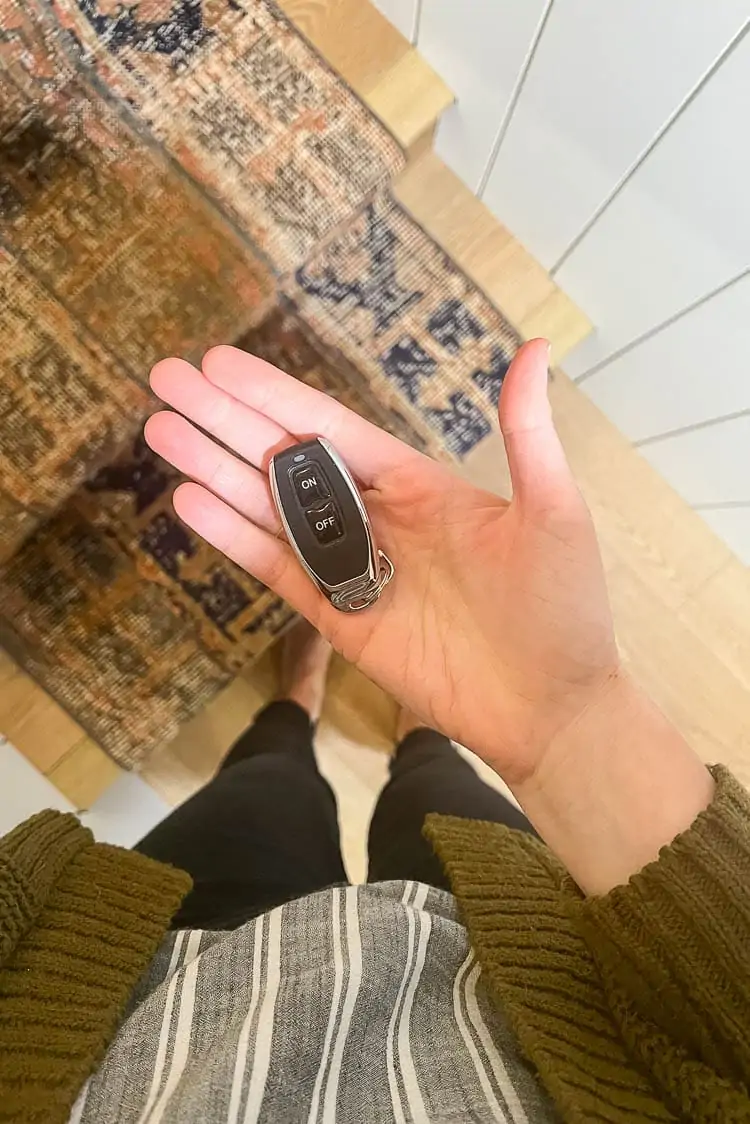
We keep the remote on the TV console which is easy to grab and use when needed. You can open the latch with the remote from anywhere in the basement. When you click the remote to open the jib door, the door latch clicks and pops open and stays open enough to grab the door and completely swing it open. Here's a photo of the door popped open by the remote control.
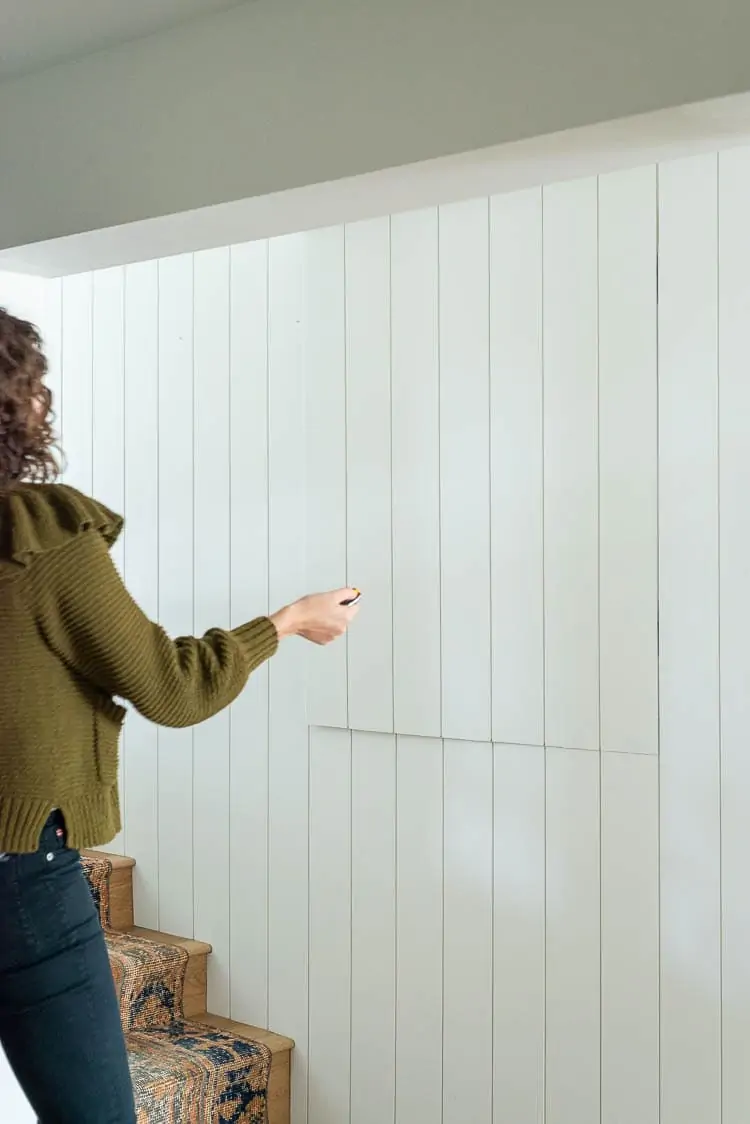
When you are done using the space, you just push the door closed to latch. Easy peasy.
Sneak Peek of the Basement Gallery Wall with the Paneling
If you are looking for more resources for modern hidden door ideas, etc., I thought this was good article on issues that you might have and price point for hiring a project like this out. Also, if you have a traditional door that you are wanting to turn into a hidden door, Chris Loves Julia has a good tutorial on that!
Since our door sits high up over concrete, it's a bit unusual. It's also weird that it needs to open outwards. The goal of writing this tutorial was to give you ideas for making a hide out room of your own. It was hard to find supplies that would make our secret door work. We spent quite a bit of money trying out different hinges and locks, so take what works out of our project and combine it with other tutorials for your secret passageway.
Overall, installing a hidden door can add both functionality and style to a room. It can provide a discreet entrance to a private space or simply create a unique feature in a home.
When planning to install a hidden door, it is important to consider the size and weight of the door, as well as the available space and the type of wall or floor it will be installed in.
There are a variety of options for hidden door hardware, including hinges, pivots, and sliding mechanisms. Each has its own advantages and disadvantages, so it is important to research and choose the best option for the specific project.
With careful planning and attention to detail, installing a hidden door can be a rewarding and satisfying project! We, are definitely happy with ours!
How to Build a Secret Door (Also called hidden doors or jib doors)
Interested in a secret door? Learn more about how to install a hidden door within a wall in today’s post!
Materials
- 2x4's
- Planking
- SSOS Hidden Hinges
- 2 Latches
- Power Supply
Tools
- Soldering Set
- Drill
- Miter Saw
- Router
- Nail gun
- Air Compressor
Instructions
- Install planking up to door opening (on hinge side of door). We mitered our planking in this step and at the end when we continued to plank.
- Build door (or skip, if you already have one)
- Use SSOS templates to route hinge holes into door
- Place door in opening, and mark hinge holes on frame
- Use SSOS templates to route hinge holes into frame
- Dry-fit hinges and make sure there’s room for planking on door to clear
- Screw hinges into place
- Install, or adjust placement of door stop, to make sure door is flush with wall
- Continue installing planking over door
Happy secret passage building!
}

Christi
So cool!
Ashley Mayes
Thanks Christi! It's fun (and Greyson has loved to use it for hide and seek). =)
Kevin
I’m trying to do a hidden door in an entryway closet. Why didn’t you choose you use the push latches? I too will need this door to swing out passed the wall paneling I have chosen.
Your tutorial was a great help.
Thank you.
Ashley Mayes
Hi Kevin. We did try push latches to start with as they're simple and cheap. We ran into two problems. One, is that push latches don't work as well for heavier doors. Ours is a bit overbuilt and weighs a good amount because of it. The second reason is that push latches need a little give (from where they're closed / flush looking) inward to unlatch. Because of how our shiplap interlocks, there's very little play without making the door look less seamless.
Edith Anne
Did you 45 the shiplap so that the door will open? Trying to do the same but with a baseboard on the door but the miter on the base looks horrible.
Ashley Mayes
We only used a 45 degree cut on the bottom of our door (the top sits pretty flush against the ceiling, so it is hidden). The left and right side of the door have the shiplap overlapping, like shiplap normally does, so no 45s there. These SSOS hinges are meant to be used with two flat pieces of wood butting up to each other (and very little gap between them). They open in a way that gives some extra clearance as the door opens. That said, we did route out the door frame last and attached the hinges to the door to mock up the fit and make sure the door could open and close freely.
Latoya
Ashley, thank you for the tutorial! After reading it I am a bit concerned with the latches I was considering. We are trying to create a jib door in our family room to lead to an office/guest bedroom. I found a door that weights around 60 lbs. and curious the best option for a latch. This project is part of an addition to our 100 year old house. We are working a contractor and he mentioned doing a similar project years ago so fingers crossed. This was super helpful. By the way, we also purchased the SSOS hinges.
Ashley Mayes
We did try some push-to-open latches (like you see on some cabinets) but we couldn't get them to work for us. Because we wanted a really tight fit on the latch side of the door, we didn't have enough play for the door to push in and allow the latch to release. Maybe we were just doing something wrong, but that's why we ended up with a more complicated latch.
Lori
Where did you get the latch and remote?
Ashley Mayes
Hi, It's all linked under the heading,HIDDEN DOOR LATCH SYSTEM FOR OUR SECRET DOOR SET-UP. Thanks!
Wade and Ana
We are building an exact build of this, outward opening door with shiplap for a storage space. I noticed that you routed the template partially in the door jam/frame and also partially into the shiplap itself. That seems less sturdy than I to the wood entirely. Did that compromise the strength of the hinge?
Ashley Mayes
With these hinges, we didn't really have any other option. They come with a template that specifies exactly where in the door and jam they need to be mounted. We planned for the edge of the shiplap to line up exactly with the door frame and then I glued and nailed the shiplap piece to the frame before routing out for the hinges. We were hoping this would be sturdy enough, and so far it's worked great.
Heather Adams
Awesome door. My husband and I have ordered the hinges and latch and are in the process of building our outdoor shed with a hidden door. I have a question...Where did you get your runner carpeting on your basement stairs? Looking forward to your response..
Ashley Mayes
Hi,
The runner is vintage. I buy from Etsy or Ebay. I have a few rug posts that share how I find them.
Spencer
Would you be able to share a picture of the interior of the door? Curious as to what’s behind the shiplap and how you did it.
Ashley Mayes
We left it unfinished because our space didn't require anything other than that. You can see the back of the shiplap and the 2x4 frame in one of the close ups on one hinge. Hope that helps!
Renee
Thank you for sharing! I’m looking to do a very similar project. How did you construct the actual door?
Ashley Mayes
Our situation for the door was a bit weird so I didn't share that. You can see what we did in a few photos though. Basically constructed a square using 2x4's and nailed the front facing boards on it. It's not finished from the inside because it's an unfinished storage space.
Becky Deller
Thank you so much for your tutorial as this was extremely helpful. I am working to build a new wall to conceal a murphy bed in my home office and will have board and batten with a baseboard so hoping we can still make this work. The idea of a remote is brilliant too. Thanks again!
Ashley Mayes
That sounds like a fun project!!! Good luck
Molly Minczeski
hi there! We are working on a secret closet door (actually, french doors). I am using the hinges you recommended but the gap on the hinge side of the door has to be soooo big in order for the door to open fully. How did you remedy that?? The look you achieved is exactly what we are after!!
Sincerely,
A long time BTTTOU follower!
Ashley Mayes
Hi Molly. If you are using the same hinges we did, they should have instructions about how far from the wall the hinges should be installed. In the right location, the gap between the door and the side jamb should be really small. On SOSS's website there's a good, but hard to find, example of what this looks like: https://www.soss.com/wp-content/uploads/product_drawings/cased_jamb_detail.pdf
The hinge will be very close to the surface of the wall.