

Learn how to make a DIY headboard on a shoestring budget. A padded headboard can really improve your nightly reading session and also add interest to your space. This upholstered headboard tutorial is perfect for beginners, so grab some tools and let's make a simple headboard!
A reader needs a padded headboard
As I've been sourcing and planning for the cabin renovation, I've been thinking about doing a DIY padded headboard in the main bedroom. I'm a reader in bed, so I really like having a plush headboard to sit back against. The trick in the cabin bedroom is that the bed frame is going to go up against a window. So, I've been thinking about king headboard ideas that are lower to the ground. I don't want to block much of the window, but still would like a plush bed frame that feels good when you want to sit back and read.
Anyways, in thinking about headboard plans for the cabin, it reminded me of this simple foam headboard that I made years ago for our main bedroom at home.

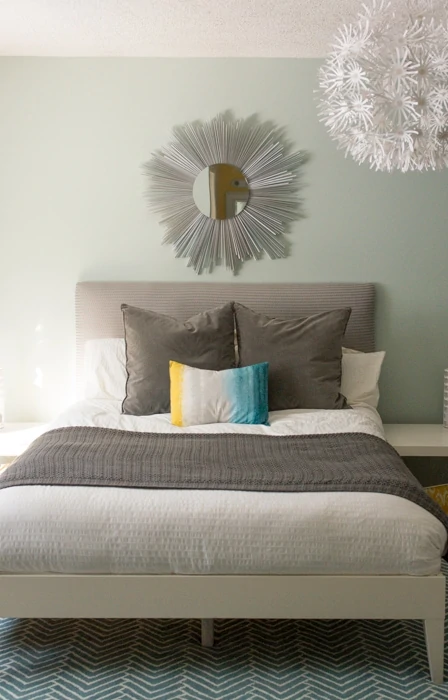
Can you believe our main bedroom used to look like that? I revealed that space in 2014 and since then my style has definitely changed. The paint color was Rainwashed by Sherwin Williams and it was gorgeous. The bed frame we still have in our guest bedroom, which makes me feel good!
Anyways, I scored a great queen bed frame without a headboard but then was stumped on headboard ideas. This was quite a few years ago, before you started seeing floating headboards or other hanging headboards with wood, pipe, etc.
A small budget makes you creative
With a very small budget, I knew that we weren't going to be able to afford to buy a tall upholstered headboard, so making a cheap DIY headboard was our plan.
Homemade headboards have been popular for quite some time. There are tons of gorgeous padded headboard tutorials. I recently rounded up some of my favorites in my headboard ideas post.
To be honest, when thinking about making our headboard, we just went with what we had on hand and didn't follow a tutorial. I've upholstered a chair and reupholstered a bench. I figured that making a DIY queen headboard would be pretty similar to both of those projects and just winged it. I get winging projects isn't always the best idea though. I'll share a little tutorial for how to build a headboard so you feel more confident!
*Affiliate links below. Thanks for supporting this blog. Click to read my privacy and disclosure statement.
How to Make a DIY Headboard
*This do it yourself headboard tutorial is for a queen sized headboard. You can make this fabric headboard for any size bed, you'll just need to adjust your dimensions to fit your bed size. Also, if you want to print instructions for this project, find those at the bottom of DIY upholstered headboard post.
DIY Upholstered Headboard Supplies
- Plywood
- Fabric
- Foam
Tools Needed to Make Your Own Headboard
- Manual Stapler or Pancake air compressor with Nailer
- Utility Knife
- Fabric Scissors
- Circular Saw or Table Saw
How to Make a Headboard
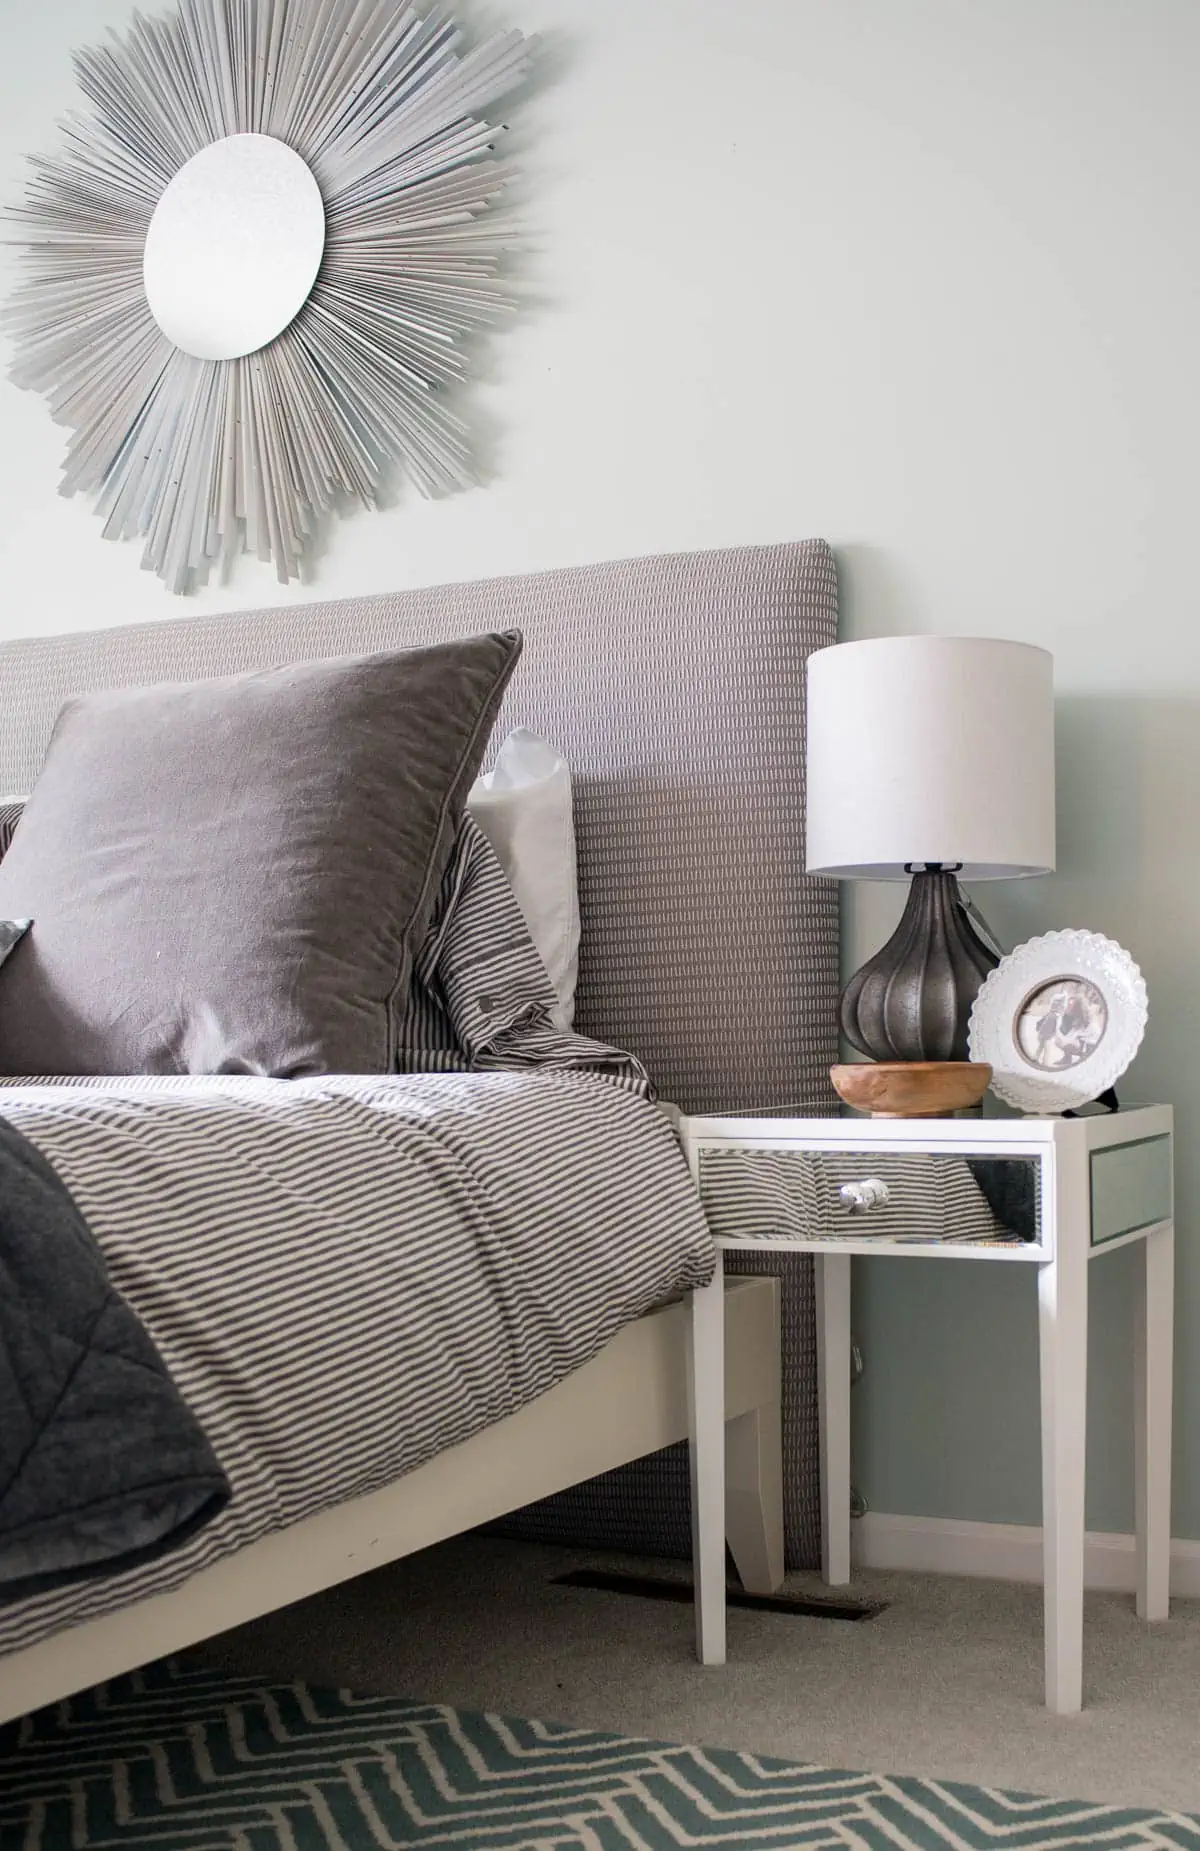
- Decide on headboard size (twin, full, queen or king). We chose to make our queen headboard 62" wide.
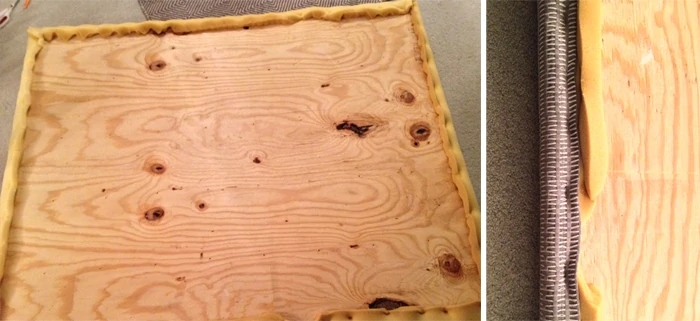
- Cut a piece of plywood to headboard size (we had our plywood cut at the hardware store but you could cut your wood at home).
- Staple foam on to plywood. If you are using thin foam, you can double the foam for a soft headboard.
- Upholster fabric to headboard.
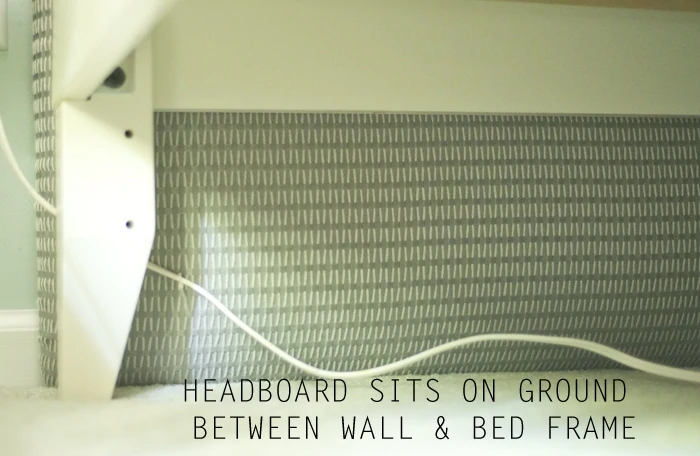
- Carry the handmade headboard inside and place on floor between bed frame and wall. Or, if you want, attach cleats to the back of the headboard and then you can do a wall-mounted headboard.
If you are new to upholstery projects, I like to start in the top middle of the headboard. Pull fabric tight (but not so tight that seems appear) and put in a few staples a few inches apart. Next, go to the opposite side and repeat. I flip back and forth on the long sides until I have finished them. I repeat the process on the shorter sides of the piece that I'm upholstering.
When you get to the corner, it's a combination of folds to make the corners look nice. Once you get going on it, you'll understand what to do. Just make sure to check the front of your fabric as you are upholstering the headboard to make sure the fabric is not pulling too tightly.
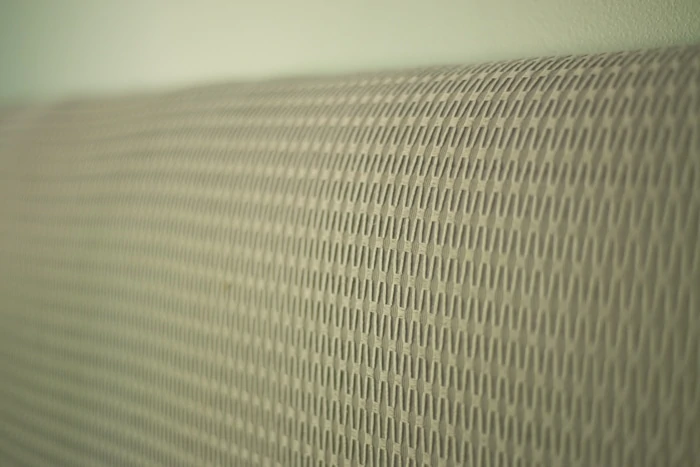
My cheap DIY headboard uses bed foam
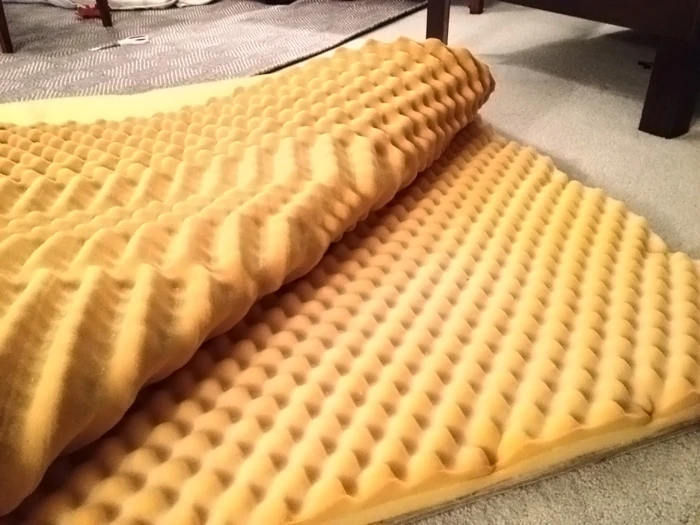
Before I started this project, my grandparents were getting rid of extra foam that they had on hand. It wasn't the perfect depth to make a padded headboard, but I decided to use it to save money. I doubled the foam, placing the egg carton shapes facing each other so that I didn't have any ridges in my simple headboard.
Since making this DIY queen headboard, I have found some great options for cheap upholstery foam and did a blog post on it.
Backside of soft headboard
Save money by not buying cleat attachments for the wall
You could easily reupholster a headboard if you had one that you don't like. It would be the same steps and would be such an easy project.
Luke and I were so proud of this DIY upholstery project. There are so many fancy fabric headboards out there and this definitely isn't one of those, but this project felt really rewarding.
We both remember thinking that we waited way too long to try to make this soft headboard. We were used to having just a wall to lean against at night with no headboard. For under 1 hr and less than $30, this fabric headboard should have been a no-brainer to start a long time ago.
How much does it cost to make a DIY headboard?
Total cost for this this DIY bed headboard was $26.99 ($23 for plywood & $3.99 for fabric).
- Our "fabric" which is actually a Target Threshold window curtain was snagged at the Goodwill for $3.99.
- We didn't use any hardware to attach the headboard to the wall. We had bought hardware to do this, but realized that because of the size of the headboard it fit on the ground between the wall and the bed frame perfectly. This was actually a mistake on our part (headboard size is too big), but a good mistake to make because it saved us money.
- We were able to get our foam for free. Check out my tips for affordable foam to find a good deal yourself!
Let's chat about a few questions that you might have before you get started with your DIY headboard.
What are king size headboard dimensions or other bed sizes?
King headboard sizes are usually around 80" but can vary just a bit. Here's a good guide to get you started on headboard sizes.
What type of wood should I use when making a headboard?
If you are planning to upholster a headboard, then using plywood is a very good option to make your headboard. Plywood is cheap and, like us, you can have it cut at the hardware store.
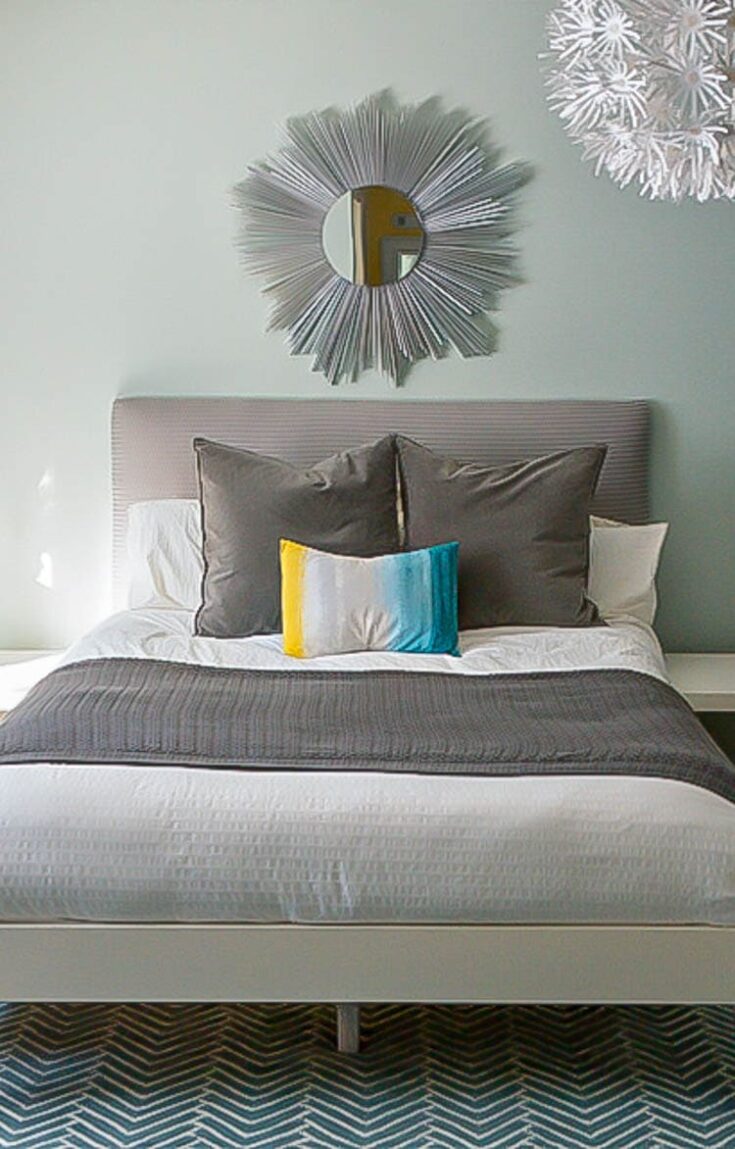
Ready for a before/after of the room? Remember this is from quite a few years back, but I'm still so proud of how our fabric headboard turned out.
Bedroom without a fabric headboard:
Bedroom with a cheap DIY headboard:
Hope you all feel inspired to get creative with resources, time and energy in your bedroom. Even though we don't have this headboard any longer (we passed it on to my sister), I can still feel good about this project and be inspired to tackle something similar for the cabin!
And, if you are curious on how our bedroom looks today...

Simple Fabric DIY Headboard Tutorial for Under $30
Learn how to make a DIY headboard on a shoestring budget. A padded headboard can really improve your nightly reading session and also add so much interest to your space. This upholstered headboard tutorial is perfect for beginners, so grab some tools and let’s make a simple headboard!
Materials
- Plywood
- Fabric
- Foam
Tools
- Manual Stapler (or air compressor with stapler)
- Utility Knife
- Fabric Scissors
- Circular Saw or Table Saw (or have this cut to size in store)
Instructions
- Decide on headboard size (twin, full, queen or king). We made a queen headboard at 62" wide.
- Cut a piece of plywood to headboard size.
- Staple foam to the plywood. If you are using thin foam, you can double the foam to make a softer headboard.
- Upholster fabric to the headboard and staple in place.
- Place the homemade headboard on the floor and push the bed frame againist the headboard. If you want, you can attach cleats to the headboard and secure it to the wall.
Notes
If you are new to upholstery projects, I like to start in the top middle of the headboard. Pull fabric tight (but not so tight that seems appear) and put in a few staples a few inches apart. Next, go to the opposite side and repeat. I flip back and forth on the long sides until I have finished them. I repeat the process on the shorter sides of the piece that I’m upholstering. When you get to the corner, it’s a combination of folds to make the corners look nice. Once you get going on it, you’ll understand what to do. Just make sure to check the front of your fabric as you are upholstering the headboard to make sure the fabric is not pulling too tightly.

Julia @[email protected]
I can't believe how cheap all the material was and you got such an amazing headboard in return!
Awesome!
Ashley Mayes
Thanks Julia!
Megan
Looks beautiful! Your master is really coming together!
Ashley Mayes
Thanks Megan!
Sahar
Thank you so much for this DIY. Did you do a queen or full bed? I would love to get measurements if you have them. About to redo my preeetn's room and this will be great for it. Also, do you have a DIY on the cute headboard?
Ashley Mayes
It's a queen bed. I don't have any in depth tutorials on making a headboard, but there are a ton all over Pinterest. Thanks!
Krissy
Do you have the measurements you used for the length and width of the wood you used for the headboard?
Ashley Mayes
Yes, it's 62 by 48.
Lauren
Ashley - I love the white bed frame! Where did you find it?
Ashley Mayes
Thanks Lauren! We got the frame from West Elm.
Andrea
How do u keep the pillows from falling between the headboard and the bed?
Ashley Mayes
The headboard is pretty thick so we just don't have a problem. I think there's about 3-4 inches between the headboard and the bed frame (up top) and that isn't enough of a difference for the pillows to fall through.
vera westmoland
Love the headboard; working on one for my full sdize bed.
I think you mislead folks when you said under $30. That price applies to you because you were able to pick up the foam for free. If the average person will need to purchase the foam; which would bring the price to more like $50 or more. Am I correct?
Even for that price, its a good bargain.
Ashley Mayes
Fun! Hope yours turns out well. Yes, if you didn't have any foam, then you'd probably be at around $50.
Kathy Werder
I cannot wait to do this! You are bringing me back to my craft days. I really did not want to spend 5 to 700 dollars for a headboard.
Thanks,
Kathy Werder
Ashley Mayes
yay!! Hope you have fun with yours!